Monday, 31 March 2014

Tripods for Architectural Photography


When it comes to architecture and interiors photography, your tripod is your best friend, my advise to you is buy the best you can afford. It's perhaps more valuable than your camera or your sharpest lens, coz without a stable tripod good architectural photography is ...... impossible........well......almost.


tripod for architectural photography


One thing to remember when shopping for tripods is that there is no one tripod that work for everyone. Buying a tripod can be a very personal decision, depending on each person's style and nature of work, the equipment and techniques frequently used etc. Generally it is best to buy a good set of legs and a good head separately.

Why a Good Tripod is Indispensable for Architectural Photography?


In architectural photography, especially when shooting interiors, every exposure is more or less a long exposure. Then comes the art of compositing two or more images to get a final result. Not to mention the need for precision alignment and then further fine tuning the camera position. I think now we have enough reasons to substantiate our claim that a good tripod is a must for architectural photographers.

Things to Consider When Choosing a Tripod for Shooting Architecture


Weight Rating


First consideration when buying a tripod for any type of photographic work is the weight rating. The tripod head and legs you select should be able to support the weight of your heaviest lens and your camera and then a couple of extra pounds. Do also consider any equipment acquisition that you might do in the future.

Stability


The tripod legs you choose must be able to easily support the weight of your camera and lens. Legs with more sections are more portable but less stable, for outdoor work spiked feet are more practical and for interior work rubber soles are more stable.

Height


Always choose a tripod that could at-least hold the camera at your eye level when fully extended (without extending the center column). It is not uncommon for architectural photographers to use tripods that extend much higher, this extra height comes in handy on many occasions, using the center column should be avoided whenever possible as it makes the whole setup vulnerable to camera shake.

Weight


Architectural photography often involves a lot of walking so it’s a good idea to keep your tripod as light as possible. Often this is a compromise between weight vs cost, stability and height. Carbon fiber tripods offer the best of both worlds, they are both light weight and extremely stable but is an expensive option.

The Importance of Choosing Right Kind of Tripod Head


Perfectly aligning the camera and fine tuning the camera position which are of paramount importance to architectural photography requires the ability to make camera movement in many axis-es independent of each other. And for this a 3 way pan and tilt head is the best option, geared 3 way pan and tilt heads like the Manfrotto 410 or Manfrotto 405 are even better. For those who seek the ultimate in geared heads irrespective of costs the Arca Swiss C1 Cube, Geared Tripod Head or ARCA-SWISS camera platform D4are quite simply the ultimate choice.

Understanding how a 3 way Pan and Tilt Head Works


As the name suggests the 3 way pan and tilt head allows camera movement in 3 directions; up and down, left and right, and pivot from portrait to landscape. All these movements can be made independent of each other. This is important in architectural photography because each movement has a different affect on the subject. Professional heads also  incorporates dual axis bubble levels to better achieve level shots.

Choosing the Ideal Tripod and Head for Architectural Photography


An ideal tripod and head combination for architectural photography should have the following characteristics.

  1. It should be robust and sturdy, with sensitive controls for fine tuning the camera position.
  2. The head should facilitate movement in three dimensions.
  3. Preferably large sized handles for making fine and tight adjustments.
  4. The ability to move in each direction in precisely calibrated degrees of angle via markings on each axis.
  5. Should have bubble levels on 2 axis-es to better level the camera.
  6. Another useful time saving feature is the quick release plate.
  7. Tripod The legs should be sturdy should extend to a height above eye level for the greatest flexibility.
  8. Ideally black color legs and head to minimize problems caused by its own reflection in glass windows and other shiny objects.
  9. Interchangeable feet - Rubber feet on legs to prevent slipping or sliding on a smooth floors for interior work and spiked feet for exterior work.
  10. Ability to hang weights to better stabilize the tripod when working in unstable (windy) conditions.


As we have mentioned above the choice of tripod and head is truly a very personal thing. A professional grade tripod and head is not cheap and it is recommended you invest in a set only after trying it out so that you will know if it fits your style of work.

Related Reading


  1. Architectural Photography Tips - Necessary extras
  2. Perspective Control A.K.A Tilt Shift Lenses
  3. Understanding Camera Movements - Scheimpflug Adjustments
  4. Using Camera Movements in Architecture Photography - Shift Movements
  5. The Need For Camera Movements in Architectural Photography

Sunday, 30 March 2014

Architectural Photography Tips - Necessary extras


Apart from the bare essentials like camera, lenses and tripod (extra memory and spare battery) there are some essential items that an architectural photographer should bring with him on all locations.Having these items handy during a shoot will make your work a lot more easier. This one extra bag of equipment is extremely important to take on a shoot and should certainly not be overlooked.


Architectural Photography Tips - Necessary extras
Architectural Photography Tips - Necessary extras: Photo by: Louish Pixel


Ideally a bag of extras should contain items like a roll of Gaffer's Tape , some paper clips and or safety pins, Cable Release , Flash Sync Cords , an extra Transceiver (if using wireless triggers) Extension Cords , double/triple socket adaptors, continental socket  adaptors (if working overseas) and spare fuses for both the flash units and the plugs, spare modelling lamps, a Flashlight , a small knife/Multi tool , compass (now most smart phones have it built in), a dust pan brush, Camera and Lens Cleaning Kit , a pack of tissue paper, a Screwdriving Set and Pliers Set , 5-in-1 Reflector , some black cards etc. 

Although not indispensable having a small Table-top Tripod / GorillaPod , one or more Super Clamps and Magic Arms on location will prove very useful in situations which demand precise light placements. A very useful item to have on location but that wont probably fit in your bag is a light weight aluminium Step Ladder . Same is the case with a small roll of neutral density film (which you can tape on glass windows to take out a couple of stops of light depending on the strength of the film) this you will find very useful to balance exposure between flash and ambient in situations when the details outside of the window are important.

Make sure you modify your bag to fit in your equipment, each piece of gear should have its own place in the bag, it makes matters easy if you group similar items together, arranging your bag systematically will help make sure that you have not left any thing behind.

What did we miss... if you have any suggestions to add to the list do let us know in the comments below.

Related Reading


Saturday, 29 March 2014

Perspective Control A.K.A Tilt Shift Lenses


Tilt-shift lenses provide the DSLR shooter with a limited amount of functionality of a view camera. With a tilt shift lens mounted on a DSLR camera it could do all the movements that the front standard of a view camera could do although the rear standard (image sensor) remains fixed. Thus allowing some creative control over perspective and depth of field. Many optical tricks performed by the tilt shift lens could not be faked in post production and so they are indispensable for some advanced work mainly in architecture, landscape and product photography.


tilt shift lens
tilt shift lens: image courtesy wikipedia


Tilt and Shift Movements an Overview


Before discussing tilt and shift movements it should be understood that a tilt shift lens produces a much larger image circle than conventional lenses.

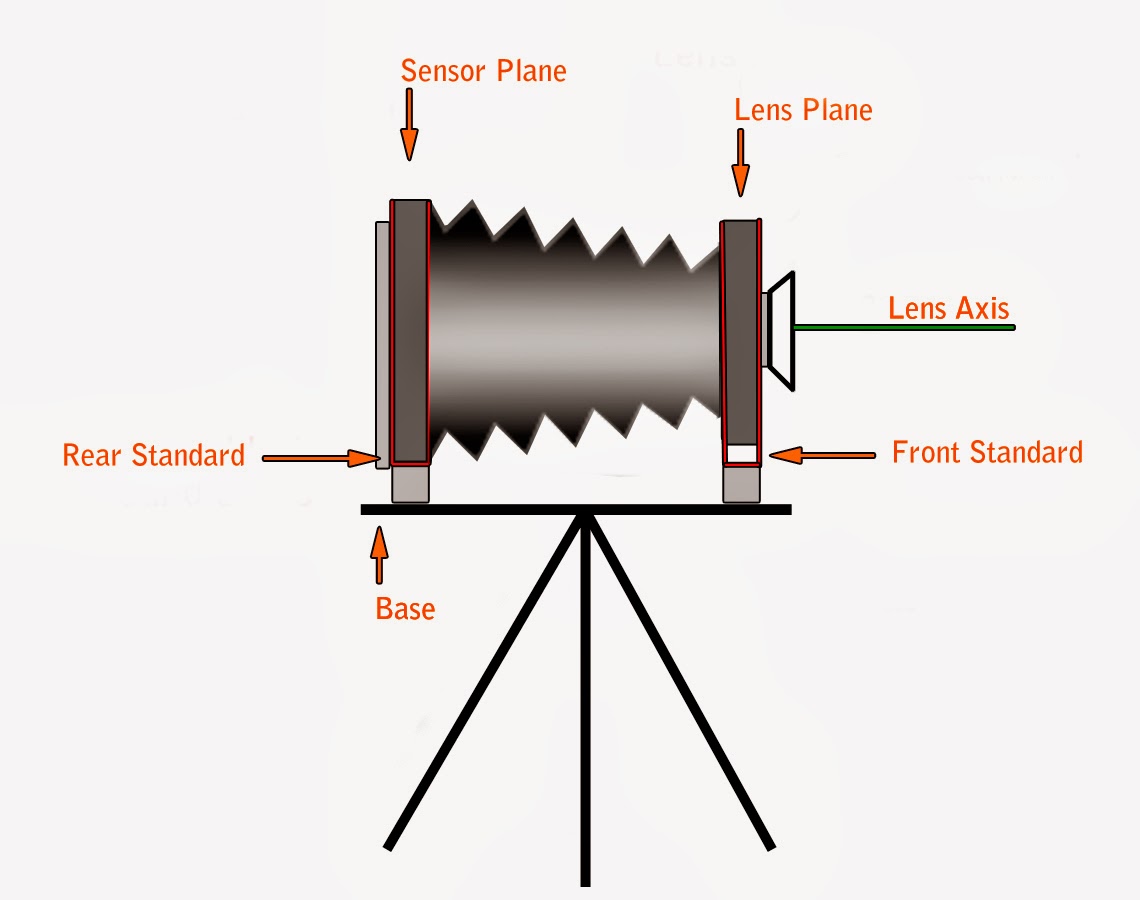
With a fixed lens mounted on a DSLR camera the lens plane, sensor plane and the plane of focus are all parallel to each other at all times. Tilt movements allow the photographer to tilt the plane of focus such that it is no longer perpendicular to the lens axis, thus creating a wedge shaped depth of field. The width of the wedge increases as the distance from the camera increases. In effect tilting the lens does not increase depth of field instead it allows the photographer to modify it to suit the subject being photographed.

Shifting the lens changes the lens's imaging circle in relation to the sensor and thus uses only a small crop from the image circle, from which portion of the image circle should the image be formed is determined by the direction of the shift.

Advantages of Tilt Shift Lenses


Tilt shift lenses offer many advantages, like rendering straight lines straight in images, correct the geometric distortion in objects that are in the foreground when shooting with a wide angle lens, helps photograph a mirror without the camera being reflected in it etc. We have covered all these in detail in previous articles. But one thing worth mentioning is that  even when unshifted, a tilt shift lens will produce better image quality at the edges of the frame when compared to fixed lenses. This is similar to the effect of using lenses designed for full frame cameras on crop sensor bodies.  Due to the crop factor the camera only uses a crop from the center portion of the lens and thus image softness, vignetting, distortion etc are minimized. These defects are generally more pronounced at the edges of the lens and by not using the corners of the lens all the problems areas are simply cropped out.

Disadvantages of Tilt Shift Lenses


Although advantages far outweigh their disadvantages, tilt shift lenses do have their share of disadvantages.

  1. In most cases they are prohibitively expensive.
  2. They are limited in the amount of movement possible.
  3. They are single focal length lenses and you will need individual lenses of different focal length if you need to cover many focal lengths. (In case of view cameras as the movements were integral to the camera body they allowed movements with lenses of all focal lengths).
  4. Tilt shift lenses are often much larger and heavier than their fixed counterparts of the same focal length and maximum aperture.


Here are the tilt shift lenses currently available in the market from popular camera manufacturers

Tilt shift lenses from Canon


Canon TS-E 17mm f/4L Tilt-Shift Lens


Canon TS-E 24mm f/3.5L II Tilt-Shift Lens


Canon TS-E 45mm f/2.8 Tilt-Shift Lens


Canon TS-E 90mm f/2.8 Tilt-Shift Lens


Thursday, 27 March 2014

Understanding Camera Movements - Scheimpflug Adjustments


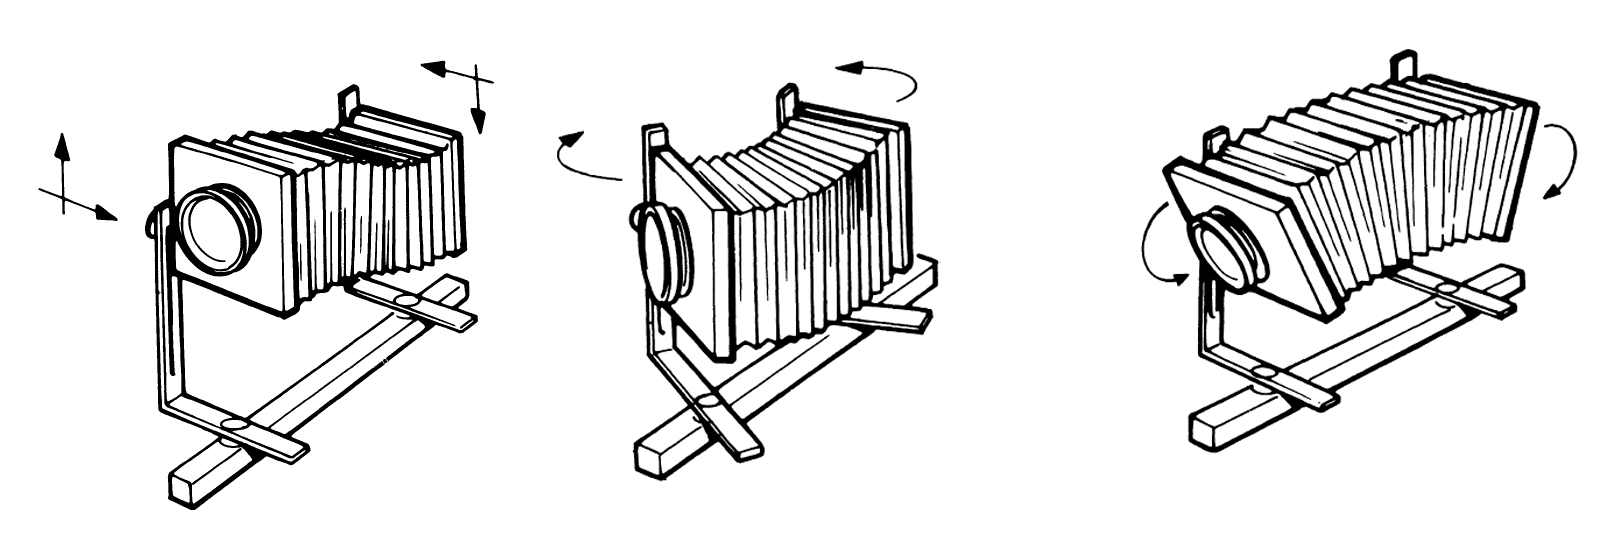
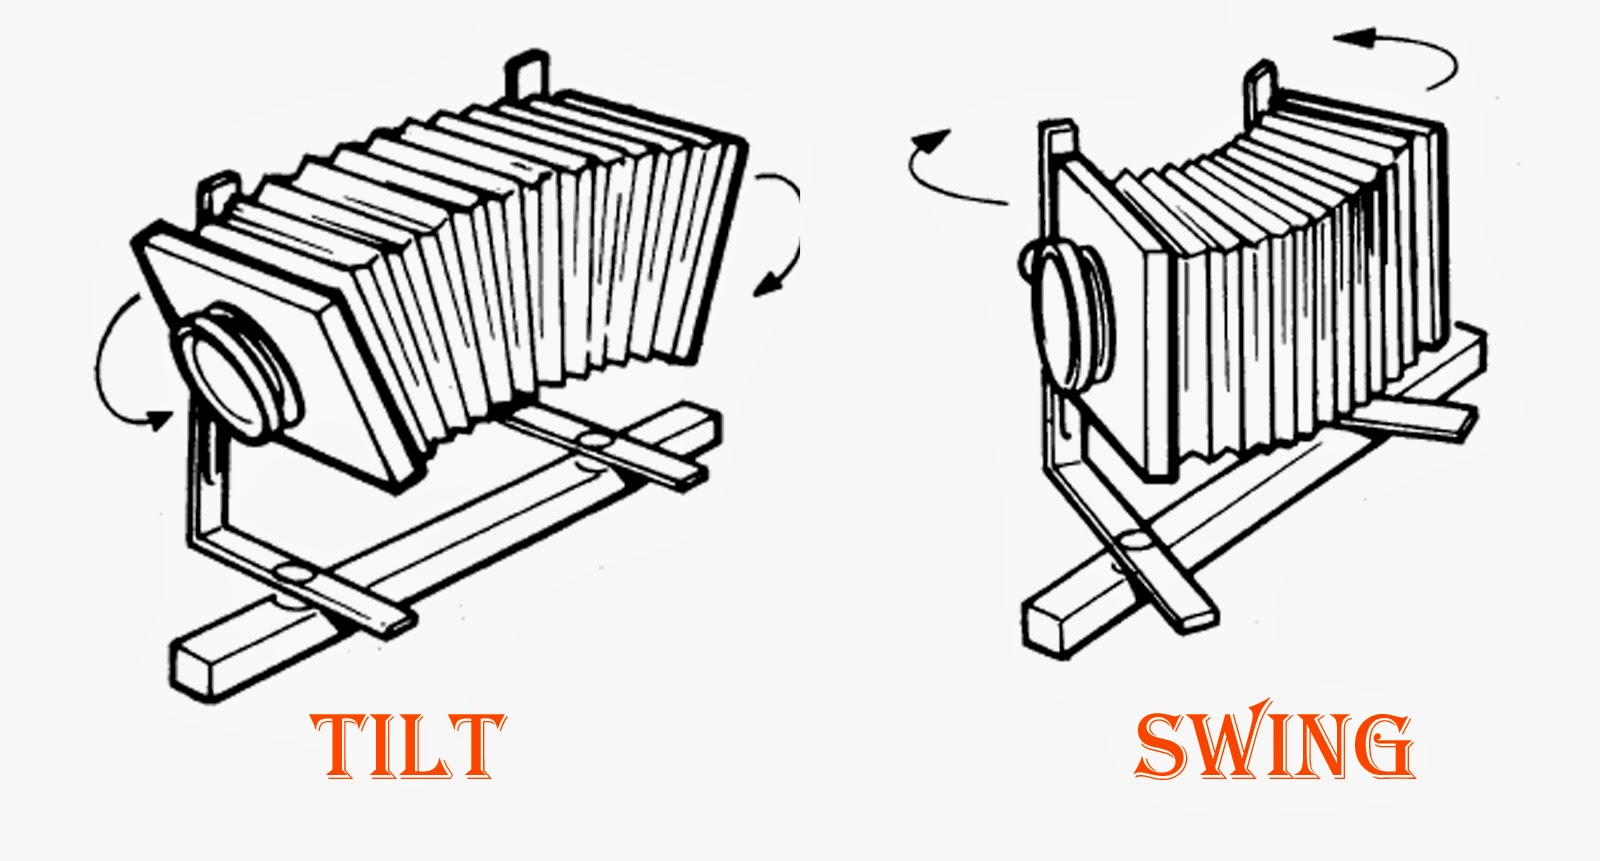
It is the Swing or Tilt movement of either standard of the view camera to precisely control the plane of focus in an image that is called Scheimpflug adjustments.


Scheimpflug Adjustments


Swing movement refers to the movement of the lens panel or focusing screen or both around the vertical axis; similarly tilt movements are movements over the horizontal axis. Swinging or Tilting the the lens alters the plane of focus, there by modifying depth of field without in any way affecting the shape or position of the image.

In order to properly grasp the principle we should first familiarize ourselves with the three planes at work in any camera; the film plane, the lens plane and the plane of sharp focus.

Film Plane


Film plane refers to a flat imaginary palne at the rear standard of the view camera on which the film is fixed. Film plane extends well past the physical edges of the actual film.

Lens Plane


Lens plane is another flat imaginary plane that passes through the optical center of the lens and remains perpendicular to the lens axis.

The Plane of Sharp Focus


The plane of sharp focus is an imaginary plane positioned such that any object lying on it will be imaged sharply (by the lens) on the film plane.

In case of ordinary cameras without the capability for Swing or Tilt movements the three planes mentioned above will always be parallel to one another.

Scheimpflug Principle


Scheimpflug Principle states that if a lens is tilted in such a way that the lens plane and the film plane intersect, the plane of sharp focus must also pass through the same line of intersection; thus  a planar subject that is not parallel to the image plane can be rendered completely in focus.

Advantages of Scheimpflug Adjustments


Swing and tilt movements could be useful for taking detail shots of elevations photographed at an oblique angle. In such situations getting full depth of field is otherwise impossible even when the lens is fully stopped down.

Limitation of Scheimpflug Principle


The limitation of Scheimpflug adjustments is that they can only control depth of field across one specific plane of focus and this restricts their use in photographing three dimensional subjects.

Scheimpflug principle in Practice


In theory swing or tilt movents could be of either front or rear standard or a combination of both, it makes no difference as long as the three planes intersect at a common line. However in practice there is much difference; swinging the lens panel is limited to the covering power of the lens, similarly movement of the rear standard (film plane) alters the perspective especially of elements int he foreground.

So which standard you move should be based on the exact effect you wish to create, if getting a correct perspective is your priority then swinging the lens panel alone is the best way to increase depth of field. If perspective is not important then the best way to maximise depth of field along an oblique subject plane is to swing both the front and rear standards around the vertical axis in opposite directions so that the three planes intersect at an imaginary  common line.
Tilt movement works just the same except the movements are around a horizontal axis. Tilt movement is mainly used to increase depth of field along the ground rending areas from the foreground to the background in sharp focus even with relatively wide apertures. However as we pointed out earlier in the limitations of the principle, subject height above ground level is unlikely to be sharp (unless lens is stopped down).

Due to the limitations of the principle, and as we mostly deal with three dimensional subjects in architectural photography stopping down the lens is or using a wider anle lens advisable to increase the depth of field rather than resorting to schiempflug adjustments.


Related Reading


Wednesday, 26 March 2014

Using Camera Movements in Architecture Photography - Shift Movements


View cameras have a simple yet very effective design consisting of two standards mounted on a rail. The front standard holds the lens panel and the rear panel holds the film. A set of flexible bellows connects both the standards. This versatile design makes possible many types of movement of both the standards to achieve a wide variety of optical effects.


View Camera
View Camera


We can broadly divide the movements possible on a view camera into two; Shift movements and Scheimpflug adjustments. In this article we will discuss Shift movements and what it does to the image in detail.

Shift Movements


Shift movements are parallel movements of the front or the read standard in vertical or horizontal direction. Shift movements could be further divided into two categories; rising shifts and cross shifts.

Rising Shifts


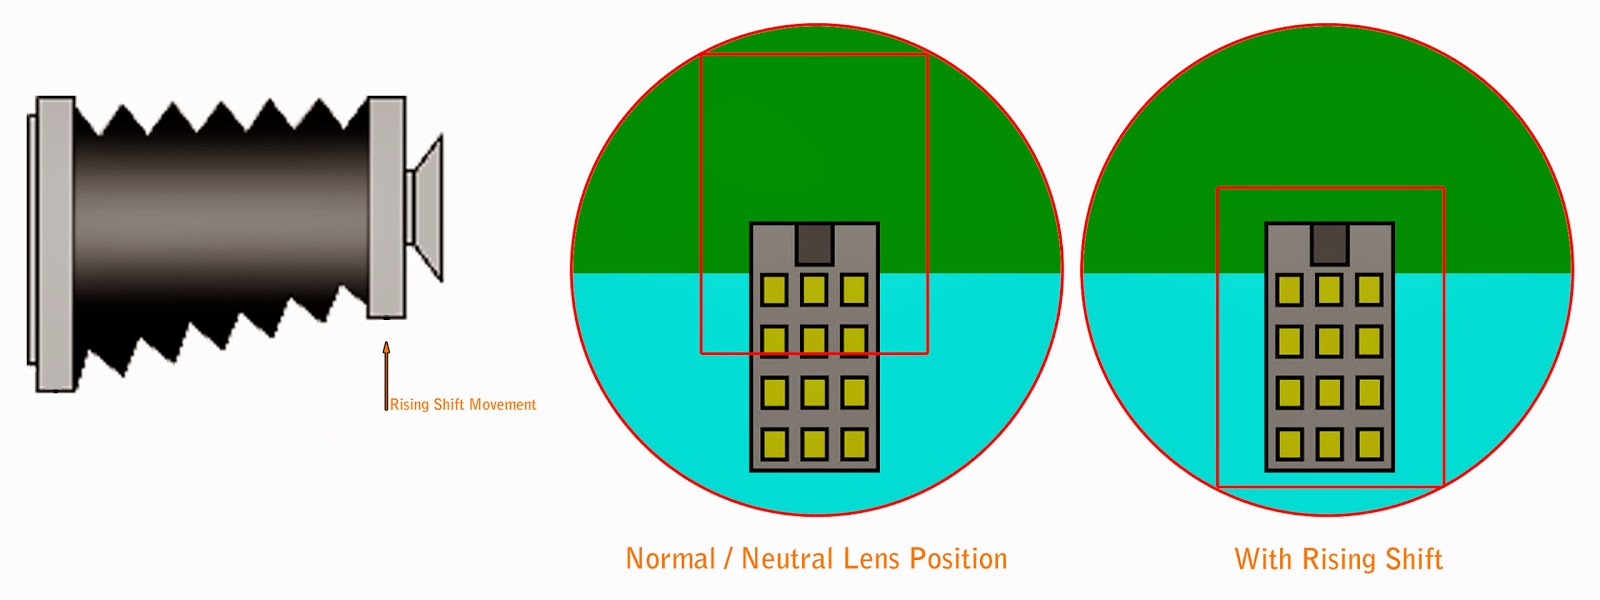
Rising Shift Movement

In the illustration given above the image circle formed by the lens on the sensor plane is shown, (notice that the image is inverted). The first illustration shows how the frame could be captured with the lens in the normal/neutral position, we could see that this framing includes excessive amount of foreground and still the top of the building is cropped off. The next illustration shows the result of a rising shift, now the top of the building is inside of the area captured and we have eliminated the unwanted foreground.

Vertical shift movements (parallel movement of the lens plane in respect to the sensor plane) help architecture photographers eliminate the problem of converging verticals caused by tilting the camera up (mainly during exterior work) and also diverging verticals caused by tilting the camera down (mainly during interior shoots). In rising shifts the lens plane is shifted either up or down from its central (neutral) position. Shifting the lens plane up is also known as rising front and it helps avoid tilting the camera up (you can now include tall buildings in the frame just by using rising front movement keeping the sensor plane parallel to the subject plane). Similarly shifting the lens plane down is known as drop shifts and helps keep verticals straight without having to include too much ceiling or the need to photograph from very low angle.

Cross Shifts


Horizontal shift movements (parallel movement of the lens plane in respect to the sensor plane) help architectural photographers control perspective.

Using Cross Shift Movements for Exterior Shots


 While shooting exteriors cross shift help photograph a straight on view of the building while the camera is actually positioned on to one side of it, helpful when the viewpoint directly in front of the building is restricted. You simply line up the camera parallel to the front elevation of the building and employ cross shift instead of turning the camera thus preventing any perspective distortion.

Another important use is to control the perspective of the receding building when photographing a building at an angle from a relatively close vantage point using a wide angle lens. Turn the camera to make the angle to the building less acute and use cross shift movement to bring the building back into view. This creates a somewhat flattened perspective by expanding the area of front elevation visible through the lens.

Another use of cross shift is to create perfectly aligned panoramic shots. Place the camera on a tripod and take a series of shots applying cross shift movement in increments facilitating a minimum of 25% overlap between frames. It could be from extreme left to extreme right or from extreme right to extreme left. Using cross shift movement instead of simply turning the whole camera and lens setup avoids any parallax error and creates perfectly stitchable panoramas.

Using Cross Shift Movements for Interior Shots


While photographing interiors cross shifts help prevent converging of parallel horizontal lines. The secret to keeping parallel horizontal lines from converging is to keep the sensor plane horizontally parallel to the back wall.   As soon as the sensor plane ceases to be horizontally parallel to the back wall in a rectangular interior, the horizontal lines of the far wall in the picture will start to converge or diverge as a result of natural perspective.


Cross Shift Movement

The first illustration show how a fixed lens captures the scene, as the sensor plane is not horizontally parallel with the back wall of the room, horizontal lines of that wall converge. The second illustration shows how the room can be captured by using a cross shift movement of the lens allowing the sensor to remain parallel to the back wall thus keeping lines parallel.

Another use of cross shift movements in interior work is to correct the geometric distortion in objects that are in the foreground when shooting with a wide angle lens. The trick is to compose the frame with the foreground object directly in the center and use cross shifts to compose the frame with the object to the side instead of turning the camera. This will help minimize the distortion because our subject is in the center and distortion is greater as the subject is further from the central optical axis of the lens. Had we turned the camera to get the subject off center instead of employing cross shift we would have much more distortion in our image.

One technique that is impossible without camera movement is to photograph a mirror or any shiny subject from a parallel/head on position without having the image of the camera reflected in the surface. With camera movement we could simply place the camera to the side of the mirror and employ cross shift to include the mirror. Now the camera will not be reflected in the mirror as it is not directly in front of it.

It is even possible to combine both rising and cross shift movements of the front and rear standard within the limitation of the lens (Refer the article Lens Coverage for more on this) to achieve the exact framing required. In the next article we will discuss the second type of movement possible with view cameras - Scheimpflug adjustments.


Related Reading


  1. The Need For Camera Movements in Architectural Photography
  2. Architecture Photography Tips - Practical Lens Testing
  3. Lens Distortion
  4. Lens Aberrations
  5. Choosing Lens for Architectural Photography – Aperture, Speed and Performance

Monday, 24 March 2014

The Need For Camera Movements in Architectural Photography

The single most important requirement in architectural photography is to reproduce straight lines straight. Reproducing straight lines of a building with absolute precision however requires the use of some camera movements which most beginners would not be very familiar with. So we will discuss some camera movements which were possible with view cameras and how they helped keep straight lines straight in various situations. Once we familiarize ourselves with the different camera movements and how they impact the scene in front of us or how the camera captures the scene, we will look into ways to achieve the same with our modern DSLR cameras through the use of some specialist equipment.


view camera movements


DSLR cameras have an image sensor which is mounted parallel with the lens precisely centered on its axis. This is critical as it produces the most optically accurate reproduction of the subject in front of the lens. However there is one catch, in this setup the camera reproduces a true scale only as long as the subject plane remains parallel to the sensor plane. And you will observe the verticals in an image converging as soon as the sensor and subject plane deviates from a perfectly parallel orientation.

For example.

Consider the example of photographing the exterior of a tall building, on many occasions we need to tilt the camera up in order to take in the full height of the building and when we do this we no longer have the sensor and subject planes parallel to each other. The lower part of the building is now closer to the camera than the upper; this varies the scale of reproduction across the subject image. The affect of this on the image will be that the building appears to be falling backwards if we photograph it straight on and it appears to be falling on itself if we photograph it from an angle.

Keeping Sensor Plane and Subject Plane Parallel


We have seen that converging verticals occur when the subject and sensor plane are not parallel to each other. And we do need to include the whole building in our frame; let us now consider our options. To capture the entire building without tilting the camera we basically have four options.

1. Shoot from Further Back


If the location allows, you could move further away from the building so as to include the whole of it without tilting the camera up. This option is however not applicable 90% of the times as we more often than not work in clustered environments with very little space to move. Even if we are able to do it, the shot will have excessive amount of foreground that need to be cropped, making us lose image resolution.

2. Use a Still Wider Lens


It is possible to capture the entire building without tilting the camera up by using a wider angle lens which will cover the entire height of the building without any tilt. However this forces the photographer to use wider angle lenses than necessary and this will affect the perspective of the image, not to mention the excessive amount of foreground that will be captured and need to crop out effectively reducing the image quality and resolution.

3. Raise the Height of the Camera


If you could somehow raise the height of the camera to half the height of the building being photographed, you could capture the building without any tilting the camera up or down. This option could work in some cases as there might be some accessible building directly opposite of sufficient height or you can use a hydraulic platform to shoot from.

4. Move the lens vertically in Relation to the Sensor


This is our final and more practical option, moving the lens in vertically in relation to the sensor; this is called shift movement and it is one of the more important camera movements for architectural photography. In the next article we will discuss the various types of camera movements in detail. 


Related Reading


  1. Architecture Photography Tips - Practical Lens Testing
  2. Lens Distortion
  3. Lens Aberrations
  4. Choosing Lens for Architectural Photography – Aperture, Speed and Performance
  5. Architecture Photography Tips

Saturday, 22 March 2014

Architecture Photography Tips - Practical Lens Testing

Getting straight lines straight is extremely important in architecture photography and so lenses used in architectural photography should be thoroughly tested for curvilinear distortions.


architecture photography tips practical lens testing
architecture photography tips practical lens testing. photo by: Jijo John

As a general rule longer focal length lenses are of better quality than wide angle lenses. Ultra wide focal length lenses (lenses wider than 24mm on a full frame camera) are the ones mostly used for architectural work and it is the barrel distortion of those lenses we are most worried about.

Here is a practical method to critically test lenses for distortions.

Photograph a scene which has perfectly straight lines in it. Use the lens at its widest setting (assuming it is a wide angle zoom lens). Compose your frame in such a way that you have straight lines in the foreground towards the borders of the frame.

Now compare the picture given above with the one given below, the picture given below shows some serious distortions, notice the distortions are more pronounced towards the edges of the frame, left, right, top and bottom.


curvilinear distortion of wide angle lens


Door frames, windows, pillars etc are all suitable subjects for our testing.

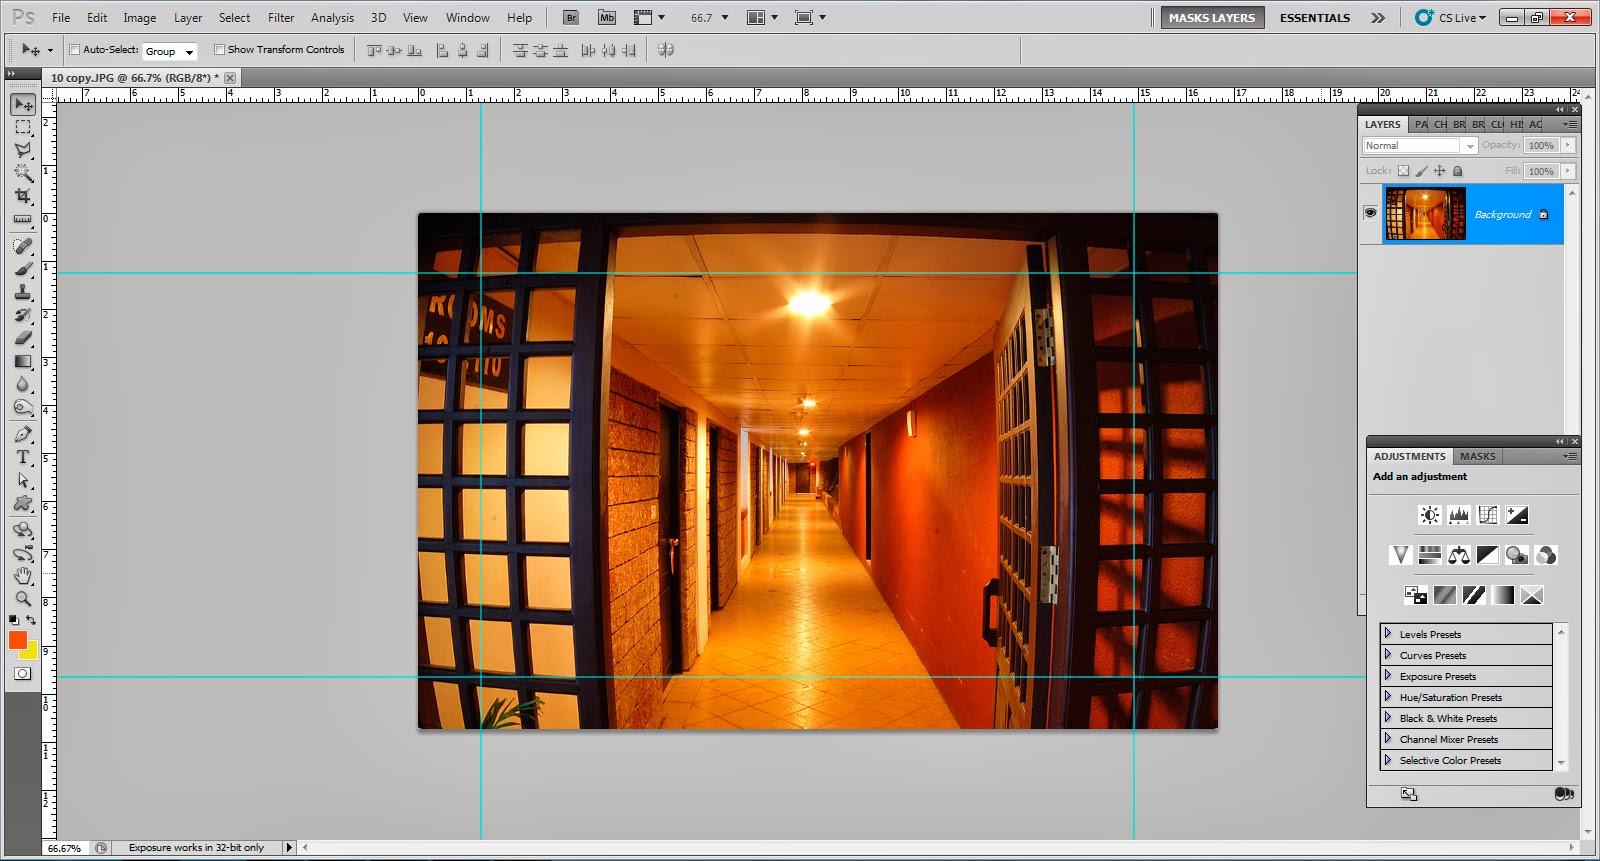
Download the picture on to your computer and open it in Photoshop or any similar image editing program. In most cases, any distortion present could be easily noticed by simply looking at the image. To precisely check the amount of distortion or to correct it in editing one easy way is to place guides on to the straight lines in the image and any deviation from a perfect straight line could be easily noticed and corrected.


testing camera lens for distortions


If the lens shows a great amount of barrel distortion it is best to reject the lens in favor of a better one. A similar test can be devised to test for pincushion distortion in tele photo lenses, but it is seldom a severe issue in architecture work and so we need not delve deep into it.


Related Reading


Friday, 21 March 2014

Lens Distortion


Though most modern lenses are of very high standards, especially the pricey, top of the line series from major manufacturers, the very high level of precision demanded by architectural photography dictates that only the best of the best passes the stringent guidelines.

All lenses intended to be used in architectural photography should be tested critically for any distortions.

What is Curvilinear Distortion?


curvilinear distortions


Curvilinear distortion is the curving of straight lines in an image caused by uneven magnification in the lens. It occurs more towards the edges of the image.  There are two major types of curvilinear distortions namely barrel distortion and pincushion distortion.

What is Barrel Distortion?


barrel distortion of camera lens


Barrel distortion is associated with wide angle lenses and typically occurs at the wide end of a zoom lens. It causes images to be spherical or "inflated" and is most visible in images with perfectly straight lines, especially when they are close to the edge of the image frame. The use of converters often amplifies Barrel distortion.

What is Pincushion Distortion?


pin cushion distortion of camera lens


Pincushion distortion is associated with tele lenses and typically occurs at the tele end of a zoom lens. It causes images to appear as if pinched at their center. Similar to barrel distortion, pin cushion distortion is also most visible in images with perfectly straight lines, especially when they are close to the edge of the image frame. The use of converters often amplifies Pincushion distortion.

As we are mainly interested in Architectural photography, our greatest concern is the barrel distortion of wide-angle lenses that we commonly use. In the next article we will discuss how to practically check lenses for distortions.


Related Reading


Thursday, 20 March 2014

Lens Aberrations

What is Lens Aberration?


In an ideal optical system, all rays of light from a point in the object plane would converge to the same point in the image plane, forming a clear image. The influences which cause different rays to converge to different points are called aberrations.

What Causes Chromatic Aberrations?


Chromatic aberration is caused by lens dispersion; it occurs when light of different wave length travel through a lens at different speeds. This causes the image to look blurred and also causes noticeable color cast (red, green, blue, yellow, purple or magenta) along the edges, especially of bright objects or where there is high contrast in an image. There are different types of aberrations:

1. Axial Chromatic Aberration


Axial chromatic aberration is the failure of a lens to focus at least two out of the three primary colors to the same point on the film plane causing color fringing.


axial and lateral chromatic aberration of camera lens

2. Transverse Chromatic Aberration


Transverse Chromatic Aberration is most likely to occur with telephoto lenses. It is noticed as color fringing and occurs when the lens magnifies different wavelengths differently.

3. Spherical Aberration


shperical aberration

Spherical Aberration is the failure of a lens to focus the rays of light passing through the centre and the edge of that lens to the same point. This causes a blurring of detail across the whole image.

4. Coma


coma
coma illustration courtesy wikipedia


Here point sources of light to appear as smeared comma shapes on film. It affects the image more towards the edges and progressively less towards the centre, so when using lenses which have such a problem try to keep bright light sources away from the corners of the frame.

5. Curvature of Field


Field curvature
Field curvature illustration courtesy wikipedia


Curvature of Field is the failure of a lens to focus its image onto a flat plane, as a result when focus is on the center of the image, the corners will not be sharp, and vice versa.

6. Astigmatism


Astigmatism
Astigmatism: Illustration by Sebastian Kroch


Astigmatism causes a lens to form a linear image from a point source of light, with the line changing from vertical to horizontal as the lens is focused. The effect of residual astigmatism in a lens is its inability to focus equally horizontal and vertical lines, as a result vertical lines in the frame may appear sharper than the horizontal ones.

Wednesday, 19 March 2014

Choosing Lens for Architectural Photography – Aperture, Speed and Performance


What is a Fast Lens? And What does Lens Speed mean?


Lenses that have wider aperture openings (smaller f numbers, f/1.4, f/2.8 and so on) let in more light and thus enable the use of faster shutter speeds at the same ISO setting.

For example:

Consider a situation where the camera meter says f/4 at 1/30 at ISO 800. By looking at the variables we could easily see that it’s a low light scene and we are almost maxed out on ISO (considering ISO 800 as a good compromise between noise and camera shake). Having a faster lens for e.g one with an f/2.8 maximum aperture will let us expose the scene with double the shutter speed which is 1/60. And this is the reason why lenses with wider aperture openings are called fast lenses. For more information on this topic do take a look at some of our previous articles – What is a Fast Lens and Advantages of Using a Fast Lens.

Is Lens Speed an Issue in Architectural Photography?


It is a fact that fast lenses cost significantly more than slower lenses. For example a lens with a maximum aperture of f/2.8 could cost nearly twice as much as that of a lens with the same specifications (focal length, focusing systems, image stabilization etc) but with a maximum aperture of f/4 or narrower.

But for the purpose of architectural photography, do we really need fast lenses?


The answer is both No and Yes.

No we don’t necessarily need fast lenses for Architectural Photography.


Fast shutter speeds is rarely a priority when shooting architecture as most of the work involves shooting a stationary subject with the camera mount on a solid tripod.  One important factor in architecture is the requirement for large depth of field. Architectural photography demands both elements in the foreground and background to be in sharp focus on most occasions. To achieve this we do most of our work with very narrow aperture openings like f/16 and f/22. If we need more light we could always keep the shutter open for longer durations without having to resort to increasing ISO settings of our camera.

Yes Fast Lenses are Advantageous for Architecture Photography


Yes because fast lenses allow us to see a much brighter view of the scene in front of us, they make focusing faster and more accurate especially in low light conditions, they do offer better image quality when compared to slower lenses.

An f/2.8 lens lets in double the light than an f/4 lens which lets in double the light than an f/5.6 lens and so on. In order to double the quantity of light passing through the lens, the performance of that lens has to be substantially improved to take into account the wider aperture. This is because the worst aberrations, or optical errors, of a lens tend to occur towards the outer limits of the lens image field. Unlike narrow apertures which use only the center portion of the lens to form the image, wider apertures make use of the most part of the lens. So in order to render a perfect image at wider aperture the lens quality need to be considerably better.

So for the extra money you spend on the faster lens, you get a brighter/clearer viewfinder image, faster/more accurate focusing, better low light shooting ability (when handholding), better optics (they are often better corrected for distortions and aberrations) and in most cases also better build quality.

Now that you know the pros and cons of each your decision should be based on the nature of your work and your budget.

Tuesday, 18 March 2014

Architecture Photography Tips

1. Planning & Preparation


A little bit of planning and preparation goes a long way in ensuring that the shoot goes smoothly. It is always helpful to pay a visit to the location to get an idea of the building, where it is located, the size of the rooms, colors used, the position of the doors and windows etc and also to identify potential challenges, specialist equipment (lenses, lighting gear, triggers, filters, stands, clamps, modifiers, props and other accessories) you might need for the project, also to determine the best time of the day to shoot the structure.

If it is a running business or public structure you should also find the opening and closing times, obtain permits etc. Make sure you check the weather forecast for the location too, especially so if you plan to shoot the exteriors. Do also check the direction which the building is facing as that determines the perfect time of the day to shoot the exteriors.

 2. Lens Choice


architecture photography ideas
architecture photography ideas: Photo by: Jijo John


Choosing lenses for architecture should be based on certain considerations like:

  1. What does the client expect; are they looking for a realistic representation or for more dynamic/artistic images.
  2. How big or small are the spaces; are there confined spaces where you can’t move the camera back enough, is the building surrounded by other structures or will you be able to get a clean shot from the distance.
  3. Are there paintings / sculptures / wood work / fine examples masonry etc in the building of which you need to take detail shots.


For realistic shots (that approximate the normal human perspective) you will need a normal lens, for confined spaces you will need a very wide angle lens, for detail shots and shots from a distance you will need a short tele photo lens, if perspective correction is important you will need specialist hardware like the tilt shift lens, it all depends on the look and feel you wish to achieve in your shots and the message you wish to convey to the viewer. For more on choosing lenses, do refer this article which we previously published in this blog - What Lens for Architectural Photography.

3. Do Not Rush Through the Shoot


Once you reach the destination, don’t take the camera out immediately and start shooting, instead take your time to go around the building, studying the different areas, cross checking with your plans, considering lighting options etc and only when you have convinced yourselves that you have thought of most alternatives and have come to a decision on the best course of action should you take out your camera.

4.  A Stable Tripod is Your Best Friend On Location


architecture photography tips
architecture photography tips: Photo by: Jijo John


There is nothing like a good solid tripod and a matching head, it is indispensable for architecture photography. Get the best you can afford and you will not regret your decision as it will give you years and years of reliable service. While on location you will be taking some really long exposures, leaving your camera on the tripod for extended periods, might be taking multiple exposures with same framing to later combine in software etc. so it is critical that you have a tripod that keeps your camera and lens combination stable.  A tripod that can at least extend up to 6 feet without using the center column is a big advantage, remember eye level shots are the ones most frequently demanded by clients. I have found the 3 way pan and tilt head to be the most useful one for shooting architecture. It lets you adjust your camera in all three axes and also has spirit levels to help you level the camera.  One very useful accessory to have with you will be a wired remote for your camera which allows you to change exposure settings without actually touching the camera; for those who want the best remote triggering / tethered shooting CamRanger is an excellent option.

5.  Shoot Low ISO


One advantage of shooting architecture is that you are primarily dealing with inanimate subjects. So you have all the power to leave your shutter open for long duration, with a stable tripod and head you are also covered against camera shake. So make most of the situation by shooting in low ISO settings (helps you minimize noise and capture more detail).   Apart from low noise, images shot with low ISO settings also have better (more accurate) color rendition.

6.  Use Large Depth of Field


architectural photography tips
architectural photography tips: Photo by: Jijo John


Unlike other genres of photography, the shallow depth of field effect is seldom appreciated in architecture photography. Yes there are certain instances when employing shallow depth of field would produce really interesting results but on most occasions you need to use narrow apertures of f/16 or narrower to get both objects the foreground and background reasonably sharp. Another advantage of using narrow apertures is that it lets you correct some errors inherent in some lenses, comparatively cheaper wide angle lenses produce images which are soft towards the edges, and using narrow apertures lets you minimize such issues.

7. Composition and Framing


Keep the composition as clean as possible and try to avoid distracting elements. The principle of Less is More absolutely fits architecture. Before taking a shot do ask yourselves, why am I taking this picture, what is it that intend to show to my viewer and in what perspective. Some basic compositional tips for architecture are:

  1. Keep horizons and horizontal lines level
  2. Keep vertical lines vertical
  3. Include repetitive elements like lines, pattern, and forms in your composition
  4. Use leading lines to convey perspective and depth and to direct the viewer’s gaze along an intended path
  5. Shoot the details
  6. Show context
  7. Use the power of symmetry (of both horizontals and verticals)etc.


8. Avoid Converging Verticals


As an architectural photographer, one should be aware of the distortions caused especially by wide angle lenses. Unless you are purposefully including the distortion as an artistic effect you should take all steps possible to eliminate them in your shots. Shooting with your camera properly leveled in both vertical and horizontal axis helps minimize distortions.

One major distortion we often see in architecture shots is that of the walls (especially of tall buildings) leaning in when shot from a low angle. One could either move further back from the scene an shoot with a longer focal length lens to avoid this, or use specialist lenses like the tilt shift lens or try to correct it in image editing programs like Adobe Photoshop.

Another alternative is to try position your camera half way up the building by either using a ladder/crane platform, climbing a nearby hill or building. When you are positioned exactly half way up you could photograph the scene without any distortion, remember moving further up than the half way mark will start producing distortion in the opposite direction, now the bottom of the building will start to slope inwards.

9. Shooting Details


When we think about architectural photography our first thoughts are always of wide shots, comprising the whole building. But remember it is the small details that collectively make the architecture appealing and they should not be overlooked. If you pay attention to the details you will find many interesting items that make great subjects like spiral staircases, antique clocks, repeating patterns, stone carvings, wood art, interesting masonry carvings etc. all you need is a eye for detail and they will present themselves in almost every scene.

10. Pay Attention to Light


architecture photography tutorial
architecture photography tutorial: Photo by: Jijo John


Light changes the mood of an architectural photo like nothing else. It interacts with the building creating highlights and shadows, contrast, atmosphere and more. Different lighting conditions could completely alter the feel of any given space; a room may appear completely different when viewed in different times of the day and in different weather conditions. When you are photographing architecture, pay attention to the existing lights, both natural and artificial and think of ways to enhance the mood. It is always a good idea to use the ambient light present in the scene as your main light and only supplement it with fill light wherever needed.