Thursday, 18 September 2014

Fundamentals of Interior Flash Photography Explained


When it comes to lighting interiors using flashes and strobes most beginner photographers struggle. Let us discuss some of the fundamental principles that one need to understand in order to produce absolutely stunning images.


Interior Flash Photography Tips
Interior Flash Photography Tips: Photo Jijo John


When we are exposing a picture using flash, the important thing to remember is that there are two exposures happening at the same time, one for the ambient light and one for the flash. A proper understanding of how flash, shutter speed, aperture and ISO work together to create an image is an absolute must to be successful in interior photography.

Understanding Sync Speed


Sync speed is the maximum shutter speed at which your camera will be able to synchronize with your flash. Sync speed is different for each cameras, for most cameras it is 1/200th of a sec or 1/250th.
DSLR cameras have a shutter comprising of two curtains (each with 4 metal blades). In normal position the curtains will be closed and when the shutter button is pressed first curtain opens up to start the exposure and then at the end of the exposure second curtain closes the exposure. This holds true for shutter speeds below the cameras sync speed.

How flash works at shutter speeds below sync speed is very simple, fist curtain opens fully, flash fires – light reaches the sensor, then second curtain moves in closing the exposure. Things gets complicated at speeds beyond the camera's sync speed.

Remember the speed at which shutter curtains travel is fixed, higher speeds are achieved by shortening the delay of deployment of the second curtain; so faster the shutter speed, the sooner the second curtain begins its travel (it does not wait for the first curtain to open fully). In such cases the sensor is never fully exposed all at once, instead light reaches the sensor through a slit (between the first and second curtains) formed by the travelling curtains, it’s more or less like painting the sensor with light; the faster the shutter speed, the smaller the slit.

As there is never a moment where the sensor is fully exposed, firing a flash during such an exposure will only light up a small portion of the image. So basically you are limited in your ability to use shutter speed to control your exposure. Need to stay within the cameras sync speed at all times when using flash. There are ways and means like High speed sync to overcome such issues, but as interior photographers you need not even bother as you will never have to resort to such techniques. Interior photography is mostly low light photography and we are talking about exposure times in seconds, not fractions of seconds most of the time. The discussion above about sync speed is only for educational purposes.

First Rule of Interior Flash Photography – Shutter Speed does not affect flash


The first and foremost rule to remember when trying to light interiors is that the shutter speed that you set on your camera (sync speed or lower) has literally no effect on your flash exposures; wondering why?

Well assuming you are staying within your cameras sync speed you will be shooting at speeds below 1/250th of a second. Now take a look at flash durations at different power settings.

Flash in Manual Mode

Power Duration

1/1 – Full Power       1/1050 sec
1/2 – Half Power 1/1100 sec
1/4 - Quarter Power  1/2700 sec
1/8th Power 1/5900 sec
1/16th Power 1/10900 sec
1/32th Power 1/17800 sec
1/64th Power 1/32300 sec
1/128th Power          1/41600 sec

It is obvious from the table given above that even at full power the flash duration is 4 times shorter than your sync speed. By the time the shutter opens and closes the flash would have already discharged all its light (within a fraction at the beginning of the exposure time). So no matter what your shutter speed is your flash exposure remains the same.

Second Rule of interior flash photography – Aperture affects both ambient and flash


Aperture determines the size of the hole through which light needs to pass in order to reach the sensor. No matter what speed the light is travelling a larger hole would let in more light and a smaller one will only let in less light. So if you open up your aperture you will effectively capture more light both flash and ambient and if you close down your aperture you will only capture less light both flash and ambient.

Third Rule of Interior Flash Photography – ISO affects both ambient and flash


The role of ISO is very simple increasing ISO values increases the sensitivity of your cameras sensor and enables it to properly expose the scene with less light. Decreasing ISO does the opposite. The tradeoff here is digital noise, most modern cameras do fairly well at high ISO settings this opens up a whole lot of opportunities for the interior photographer which we will discuss next.

Practical Tips


When it comes to lighting interiors it could be done in many ways, using hot lights, small flashes, big powerful strobes etc. using flashes is the most convenient method. However perfectly lighting an interior using only small flashes requires perfectly tweaking exposure variables for the finest result. 

If you are aiming to light your interiors using flashes, you should first understand the concepts covered in this article How to Calculate the Optimum Plane of Focus and Necessary Aperture for Interior Photography.  Consult a depth of field chart and you will be surprised at how much depth of field you will get even at wide apertures like f/4 when shooting with wide angle lenses. Using the tips you should first find the Largest Aperture with Enough Depth of Field to Cover the Entire Room that you are planning to shoot. Using the largest aperture allows you to get the most out of your flashes.


Related Reading

Tuesday, 16 September 2014

How to get soft diffused light out of small flashes and strobes

In the previous article about fill in lighting we discussed that the best choice of lights to act as fill are big soft lights. Now in this article let us see how we could convert our tiny little flashes and strobes into really huge light sources producing soft light which wraps around furniture and fixtures producing little or no shadows.

Hard Light Vs Soft Light


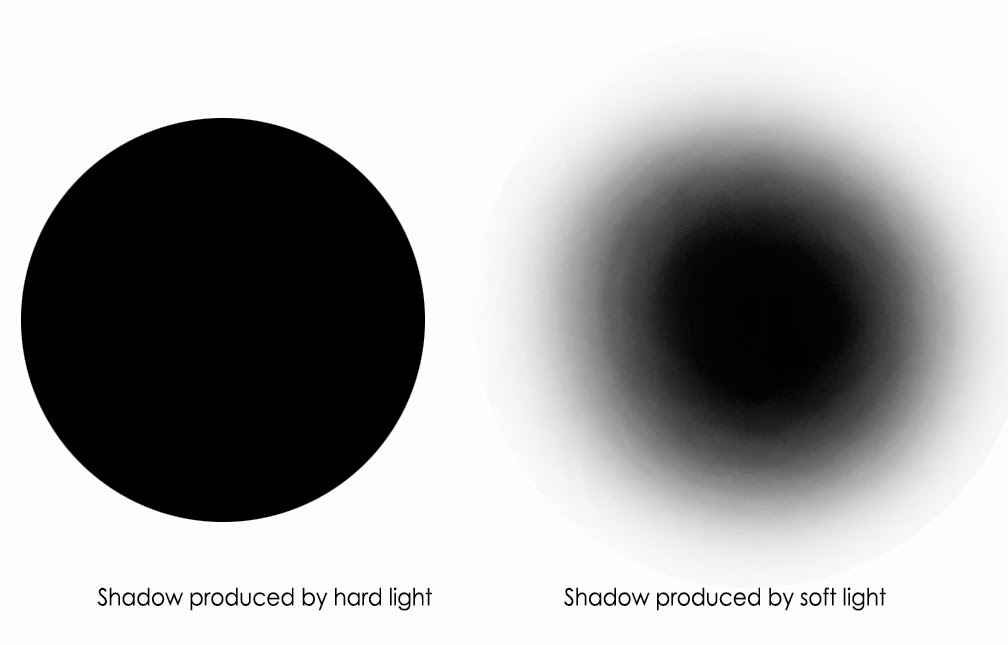
Shadow produced by hard and soft lights


We judge a light as hard or soft based on the definition of the shadows. If the edges of the shadows are well defined (like a chiseled edge) we call the light hard light 

hard light
Hard light

and if the edges are soft and the dark areas gradually turn to light (like a gradient) we call the light soft light.


soft light
Soft Light

Factors that affect the Quality of Light


There are two factors that affect the quality of light they are:

1. Size of the light source in relation to the subject and
2. The distance of the light source from the subject.

Well actually the two points given above are just one and the same, it is not the size of the subject or the size of the light source that matters; it’s the relative size of the light source i.e how large or small the light source is when compared to the subject. If the light source is tiny when compared to the subject result will be hard light with well-defined shadows and a lot of contrast. And if the light source is huge when compared to the subject we will have soft lighting which wraps around the subject producing much less contrast and soft shadows.

Then why did we put it up as two different points, the reason is simple, no matter how large a light source is, the farther it gets from the subject, the smaller is its effective size and thus the harder the light gets. A good example to illustrate this point will be Sun. we all know that sun is a gigantic light source which has a diameter of thousands of miles, but still sunlight on a bright sunny day is hard, it is because sun even though a very large source is thousands of kilometers away from earth. Now let us consider what happens to sunlight on a cloudy day, we all know for a fact that sunlight on a cloudy day is soft. This happens because the clouds above acts as a giant diffuser, softening the sunlight. The clouds now become our new light source, which is large and is not that far away…. Result… soft, diffused light.

Increasing the Effective Size of Light Source by Bouncing Light off Walls and Ceilings


The simplest way of converting our flashes and strobes to huge light sources is by bouncing them off walls and ceilings. Turning your light to the opposite direction of your subject and making the light bounce off some surface (walls or ceilings) will allow you to create a light source several times bigger. The farther the light is from the surface from which light is bounced the greater will be the effective size of light (lesser will be the power, so you’ll need to increase output) if you have the room to move the light several feet from the surface you can effectively create a light source which is as big as the wall or the ceiling (the wall or the ceiling is now our light source).

Take a look at the images given below, the first one is taken with the flash 12" (1 foot) from the wall, notice the size of the highlight area.


bounce flash tips
bounce flash tips

Now see how the highlight area enlarges as we move the flash back. The flash is now at 36" (3 foot) distance from the wall. The further we move the flash away from the wall the larger the highlight area becomes (which is now the effective size of our light).

bounce flash technique

Some Practical Tips


Always remember that light catches the color of the surface from which it bounces back. So bouncing lights work well in case of white walls and ceilings but one needs to be careful when bouncing off colored surfaces.

When bouncing flashes it is better not to deploy the wide panel as it causes the light to travel in a much wider angle (approx. 14mm) and as a result in certain situations some direct light might enter the scene.

Similarly when bouncing strobes use the standard reflector or even a small softbox with the outer diffusion panel removed. The diffusion panel will ensure even more diffusion but at the loss of a lot of light.

Other Light Modifiers


Umbrellas, both bounce and shoot through, softboxes etc could all be used to modify our light source. But there is one particular modifier that requires special mention. For architectural and interior photography a scrim could be a very handy tool to have. Apart from its main use as a very large diffusion screen, It could be used to cover doors or windows to make the light coming from it very soft, it could even be used as a huge reflector if need be. 


DIY Diffuser Scrim made of pvc pipes in action

The picture given above shows our 12 foot by 8 foot diy scrim in action.  It is made of pvc pipes and fittings and it uses the lee filters 460 grid cloth as the diffusion material. As you can see the ceiling there is not ideal for bouncing lights and the back wall is simply too far. The large scrim produces light unlike any other.


Related Reading


Sunday, 14 September 2014

Fill in lighting - What is it? Definition, purpose, how to calculate its strength and how to determine correct light positions.


fill in lighting in architecture photography
fill in lighting in architecture photography. Photo: Jijo John

Definition of Fill in Lighting


By definition a fill in light is one that supplements the main light without changing its character.

What is the Purpose of Fill in Light?


The main function of fill in light is to brighten the shadow (darker) areas thereby reducing contrast in the scene.

What type of lights work best as fill in light?


Big, soft light sources work best.

How to get soft, diffused lighting indoors?


Artificial light sources like flashes and strobes are by their very nature hard light sources, but one can easily modify the light coming from them by simply bouncing it off walls or ceilings, using light modifiers like umbrellas, softboxes, diffusion panels, scrims etc.

How to calculate the strength of the fill light for any given situation?


As we have discussed in our previous article Deciding Lighting Setup for Interior Photography Based on Client Requirements, the strength of fill light should be decided by answering two fundamental questions, what do I need to show and how do I show it?

For most architectural photography work the ratio of key light (read ambient light (daylight streaming in through doors and windows + light coming from light fixtures in the room) to fill light will be 1:4. The available light is used as the primary source of illumination and supplemental flash/strobe light is added to the scene the power of which will be at least 1 ½ - 2 stops lower than the key.

How to decide best light positions?


As we are dealing with soft, diffused light sources, the precise placement or angle is not important. It could either be placed behind the camera, at an angle between the camera and the dominant light source in the scene (closer to the camera or even at the opposite side of the camera to the light source). Care should be taken to ensure that the fill light only reduces the contrast in the scene, the gradual transition from light to shade should be maintained and also it should not cast additional shadows. 

When done right the interior photograph gives the viewer the impression that no additional lights were used to photograph the scene.


Related Reading


Saturday, 13 September 2014

Deciding Lighting Setup for Interior Photography Based on Client Requirements


When it comes to lighting interiors, the photographer has to keep in mind many things. Who the client is, the purpose for which the shoot is done, what their requirements and priorities are etc.


interior photography lighting techniques


Remember different clients have different requirements; one can get a fair understanding about the preferred style of the client by communicating with them and by going through their recent published works. It is based on this that the photographer decides the lighting approach.

interior photography lighting tips

In general most architectural and interior shoots are commissioned by three groups of people, architects and interior designers, real estate agents and editorial clients. As an architecture photographer it pays to have a good understanding of the general requirements of each of these clients..

Architects and Interior Design Firms


Architects and interior designers expect much higher quality than real estate agents. They are more interested in showcasing the functionality and aesthetics of a building and its interiors. Ultra wide angle shots will be few, and emphasis would be more on details rather than on exaggerating floor space. Furniture and other décor items now become more important than the spaces; pay special attention to design elements like drapes, color of walls, furniture, paintings, light fittings etc. The lighting should be such that it captures the mood of the scene, so very minimal fill lighting will be most common approach. The important thing to remember here is that there should be continuity in lighting, i.e the lighting scheme for the room as a whole should match the lighting used for detail shots.

Real Estate Agents


The purpose of real estate photography is to mainly illustrate different spaces and their relationships there by conveying a feeling of the property as a whole. Real estate agents in general will ask you to shoot with your widest lens to make the interiors look spacious, will also prefer to add as many windows in the compositions as possible to show that the space receives a lot of daylight, it also creates an airy, fresh look to the images. Use strong fill light to get a much brighter looking interior.

Editorial Clients


The goal here is to portray the property in the most appealing fashion. Pick pleasing angles so as to make it desirable. Editorial clients like magazines have to be dealt with care. As each have their own way of showcasing interiors. Some prefer using normal lenses to wide angle lenses so as to maintain a natural perspective; to show the space as it is seen by the human who is physically present there. They also differ in their opinion as to whether or not interior lights are to be turned on while photographing. Some go by the logic that normally artificial lights are turned on only during dull weather conditions while others prefer to include the atmosphere rendered by the lighting designers and also show details like the lamp shades used. What all of them commonly agree is that the pictures should capture the mood or atmosphere of the space. They also prefer to schedule most of their shoots during summer months as they do not want to showcase dull days to their clients. Lighting approach is more or less similar to what is done for interior design firms but should match the individual preference of the clients.


Related Reading


Friday, 5 September 2014

An Introduction to Lighting Interiors


The technique for lighting interiors is different than lighting most other photographic subjects. Interiors need an entirely different approach.  The fundamental difference between interiors and other subjects is that when lighting interiors we are not trying to light the entire scene but rather help camera capture the mood and atmosphere already present there; created by way of light from available sources and the shadows created by them.

Every interiors have their own lighting which gives character to the place. This might  be a combination of daylight streaming in from windows, doors or ceiling panels and supplemental artificial lighting from decorative lamps, light panels in the ceiling, table lamps etc.

Take a look at the scene given below

Interior Photography Lighting Tutorial


To the human eye, which has a much greater dynamic range than the most advanced digital camera ever made; the scene looks pretty well lit? But as far the digital camera’s sensor is concerned the contrast difference between the light areas and the shadow areas are beyond its capabilities to capture in a single frame. As a result if we expose for the light areas we will lose details in the shadows (shadow clipping) and if we expose for the shadow areas we will lose details in highlights (highlight clipping).

Here's a shot of the same scene exposed for highlights, you can clearly see that we are now losing lots of detail in the shadow areas.


interior photography lighting lessons

And here's the same scene exposed for shadows.


Interior Photography Lighting Tips

Thus it is clear that with the given conditions the camera is not able to handle the dynamic range present in the scene. The secret to capturing such a scene with a high dynamic range is to reduce contrast between highlights and shadows by subtly filling in the shadows with just the right amount of light. This will bring the contrast levels down to the sensors recordable levels. The key here is to find the right balance between available light and photographic fill light. The aim is to reduce the contrast in the scene without destroying the mood and atmosphere present. In the next article we will discuss about the technique of fill lighting in detail.


Related Reading