Friday, 31 January 2014

A Quick Tip to Get More Interesting Shots of Mountains


Ever wondered why most of the mountain shots we see look familiar? It even makes us wonder have we been there, or have I seen it before? The reason is simple; they are all shot from a very familiar angle, from the road at the bottom of the mountain. 


how to photograph mountains


Photographing mountains from the ground looking up will create pictures that look very average coz that is how we are used to seeing mountains. The trick to make your mountain shots interesting is to show the scene from an angle that people don’t normally see. For example shoot from up high; to achieve this you can either drive as high as you can, hike the mountain or an adjacent one, set up your camera and shoot down on or across the mountains. 


mountain photography tips


This will picture the scene from a whole new point of view, one the viewers had never seen before, adding much more visual interest to the photograph.


Related Reading


  1. Professional Landscape Photography Tips - Shooting Landscapes in Vertical / Portrait Format
  2. Professional Landscape Photography Tips - Using Telephoto Lenses for Shooting Landscapes
  3. The Golden Rule of Landscape Photography
  4. 20 Common Mistakes Beginners Make in Landscape Photography and How to Avoid Them
  5. Professional secrets of Night Photography for Capturing Stunning Star Trails and Moonlit Landscapes

Thursday, 30 January 2014

Professional Landscape Photography Tips - Shooting Landscapes in Vertical / Portrait Format


Talking about formats, let’s first clear the air about what do we mean when we say vertical/portrait or horizontal/landscape. In photography, 'portrait' is a vertical rectangle and 'landscape' is a horizontal rectangle period.

Most novice photographers shoot majority of their pictures in landscape format for the simple reason that they are used to holding the camera horizontally. But as is the case with many other forms of ART; in photography there are no hard and fast rules regarding composition. There is no reason why a landscape should not be shot in portrait format or a portrait should not be shot in landscape format.  It’s all about choices; in fact photography is all about choices, right from the start you have to make many choices regarding the focal length, shooting angle, aperture/depth of field, shutter speed/motion etc.


 Tips for Shooting Landscapes in Vertical Format
Photo by: Kenny Teo


Deciding whether to shoot in vertical or horizontal orientation is yet another choice, a rather important one. It has much to do with your composition technique; the orientation chosen should be able to frame the subject/scene at hand in a visually interesting way, including elements that add to the value of the picture and excluding ones that do not. When you choose between either one of the format you are making a decision as to what is best for your subject/scene and what you want to keep in the photo and what you don’t.

Shooting in Both Vertical and Horizontal Formats


You can shoot the same subject in both orientations; but you can never shoot the exact same picture in vertical and horizontal formats. They need to be composed differently. Deliberately shooting a subject/scene in both vertical and horizontal formats can be a very useful exercise in simulating your creative talents especially in situations where one format seems a very obvious choice than the other.

Tips For Shooting Landscapes in Vertical / Portrait Format


how to photograph landscapes in portrait format
Photo by: Sergiu Bacioiu


Sometimes Landscapes look better in vertical format than in horizontal format, it could be due to the unique characteristics of the various elements that make up the landscape or due to the unique characteristics of the vertical image format. Here are some quick tips to get you started in vertical landscape photography.

1. Break Down Your Composition Into Three Quarters


One trick to make sure your vertical landscape pictures work is to divide the entire frame into three equal quarters, the foreground, midground and the background (just like the rule of thirds grid) and make sure you have some interesting element present in all three quarters.

2. Get Close to the foreground element and Shoot from a Low Angle


tips for shooting landscapes in portrait format
Photo by: Dave Toussaint

In the previous tip we have mentioned the importance of having one interesting element in all three quarters. Now when you compose your frame, get as close to the foreground element of interest as possible and shoot from a very low angle. This accentuates the visual weight of foreground element and any leading lines present in the composition thus making your picture interesting. You should set the focus at the foreground element (which should ideally be at the hyper focal distance) and use a narrow aperture so as to get a large enough depth of field to render everything in the frame acceptably sharp.  A tripod which can be set to very low angles (preferably one without a center column) could come in handy during such situations.

3. Shoot from a High Angle with Camera Tilted Down


vertical landscape photography
Photo by: Pavel P


This technique works well when shooting vertical landscapes with an ultra wide angle lens. Raise your tripod high above the subject and tilt the camera downwards, the perspective distortion thus caused gives more emphasis to the foreground elements all the while including a full sweep of the vast landscape in the frame.

4. Use Rule of Thirds as a guide to Place the Horizon


rule of thirds in landscape photography
Photo by: Jens Ceder


The rule of thirds gird could be used as a guideline to place your horizon while shooting landscapes in vertical format. In most cases better results are achieved by placing the horizon in line with either the top or bottom grid line. The choice of which one to choose should be based purely on what works well for the scene, the mood you wish to covey to the viewer and whether you have an interesting sky or not in your scene. In majority cases it works better than placing the horizon dead in the center of the frame. But if you are looking for symmetry (trying to capture reflections in water etc.) then placing the horizon line in the center such that it divides the frame into two equal parts could work well.

5. Make Use of Negative Space


tips for shooting vertical landscapes
Photo by: H Matthew Howarth


Leaving some empty space on the top of your picture (usually the area covered by the sky) could work well to simplify your composition and to direct the viewers’ attention directly to the lower part of the image. It could also work well in a commercial point of view as graphic designers love empty spaces which allows them the flexibility to pop a photo caption onto an image, reverse out a headline, run body copy around an interesting shape, or even drop in a text box.

6. Shoot Vertical Landscapes with a Telephoto Lens


photographing landscapes with telephoto lenses
Photo by: Johan J.Ingles-Le Nobel


A telephoto lens makes background elements appear larger in comparison to the foreground elements. Thus it compresses the perspective, making objects that are in reality far apart from each other appearing as if they are closely stacked together. This compression of perspective makes them ideal tool for capturing vertical landscapes especially scenes that comprise of subjects at different distances and heights like mountains. Read more on this here - Using Telephoto Lenses for Shooting Landscapes.

7. Use the Tripod Mount on your Lens


If you are shooting landscapes using a telephoto lens, chances are the telephoto lens will feature a tripod mount. If so use it to attach the lens and camera to the tripod, this way you have the flexibility to keep the tripod head in normal position and just loosen and turn the camera to shoot vertical. Thus making sure the center of gravity stays where it is supposed to be.

8. Invest in an L-Bracket


landscape photography tips
Photo by: Iñaki Bolumburu


If you shoot frequently in vertical orientation, it is a good idea to invest in an L Bracket. An L bracket is an L shaped plate used to mount the camera on a tripod. It allows easy switching from horizontal to vertical format without tilting the tripod head ensuring better stability.

9. Invest in a Battery Grip


Battery grip also known as vertical grips is a very useful accessory if you shoot a lot of vertical shots.  Battery Grips have a lot of advantages. It allows you to load a choice of one or two battery packs thus doubling the battery life. This is especially useful when shooting videos or using Live View mode that use more power. In addition, with the included battery magazine, you can also run the camera off six AA batteries. It also provides full vertical shooting controls to enhance camera handling, especially for shooting vertical pictures. It has a large number of operating controls as well: shutter button, Main Dial, multi-controller, AF point selection button, AE lock/FE lock button, AF start button, and multi-function button.

10. Shoot Vertical Panoramas


vertical panorma
Photo by: Bossi


Yes panoramas could also be vertical; you shoot a vertical panorama by shooting a series of shots in the landscape orientation starting from low to high and stitching them together in software during post production.

If you are not already doing so, make a habit of shooting scenes in both vertical and horizontal formats. And do post some of your interesting verticals in the comments below.

Wednesday, 29 January 2014

Professional Landscape Photography Tips - Using Telephoto Lenses for Shooting Landscapes


When thinking about landscape photography gear, the first thing that comes to mind is the picture of an ultra wide angle lens, then comes the tripod, various filters, shutter release etc.

And when we think about the photographs we think of shots of wide vistas stretching from the immediate foreground to the distant background, strategically positioned foreground elements that add interest to the picture, large depth of field generated by narrow apertures rendering everything in the frame in sharp focus etc.


Tips for Shooting Landscapes with a Telephoto Lens
Photo by: Sathish J


Well there is nothing wrong in people thinking of landscapes the way it was photographed traditionally. There are endless photographers that prove time and again that the technique work well. However the approach has its limitations and people are also accustomed to seeing such shots all the time, so in this article let us explore the technique of photographing landscapes using telephoto lenses, their merits and demerits and how best to get the most out of them.

Why Use Telephoto Lenses Instead of Wide Angle Lenses


For many photographers, a telephoto lens is used to bring distant objects closer when it is impossible to physically get closer to the subject. But ideally the choice of focal lengths should be based on the distinct perspectives it generates. A 50mm lens when used on a full frame camera is called a normal lens because it renders the perspective between foreground and background similar to the way the human eye sees perspective.

Wide angle lenses make the foreground elements appear larger and the background elements appear smaller. This will give more emphasis to the foreground elements and make the background elements appear miniscule. This distortion of perspective causes the background elements to appear as if they are far away from the foreground elements, even though in reality they are only a few feet apart. Thus they create an illusion of depth in the scene.


using telephoto lens in landscape photography
Photo by: Martin Gommel


A telephoto lens does the opposite; it makes background appear larger in comparison to the foreground. Thus it compresses the perspective making objects that are in reality far apart from each other appearing as if closely stacked together.

The choice of focal length should thus be made depending on what message you intend to give the viewers about the scene in front of you.

Get the Most Out of Every Scene


The narrow angle of view of telephoto lenses lets you extract many interesting images from within a large seemingly uninteresting landscape. You can use the telephoto lens to isolate and compress distant portions of the scene or, to zero in on close portions for more image possibilities or even turn your landscape imagery into many graphic abstracts.


telephoto landscape
Photo by: Lutz Koch


Using a long lens for landscapes requires a totally different thinking strategy. Once you learn to see the way a telephoto lens sees, your brain will be able to simplify each scene into many different compositions, each consisting of pure line, shape or form giving you endless ways to work each and every scene you ever encounter.

Unwanted elements in a scene like power lines, poles etc are hard to deal with when shooting with wide angle lenses, but all these could easily be eliminated and only the interesting elements could be selectively framed by using a telephoto lens.

Choosing the right Telephoto Focal Length for Landscapes


There is no hard and fast rule for focal lengths to be used for shooting landscapes, but generally focal lengths from 100mm to 300mm (for full frame cameras) work well for most situations. Although it is possible to shoot landscapes using much longer focal lengths, the perspective distortion (compression in case of telephoto lenses) produces images so different than the actual that they fall into "abstract" realm rather than the "pictorial" realm.


landscape photography tricks
Photo by: Stewart Baird


Consider lenses of focal length from 100mm-300mm for full frame cameras, 70mm-200mm for cameras with APS sized sensors and 50mm-150mm for Four thirds sensor cameras. Choosing a telephoto zoom over a fixed focal length lens gives you the much needed flexibility when composing your shots. Modern professional zoom lenses produce very high image quality comparable with that produced by fixed focal length lenses; and saves you the hassle of carrying more than one lens to cover different focal lengths.

What to Look For in a Telephoto Lens mainly intended for Landscape Shooting


Landscape photography often requires the use of large depth of field and hence the lens will be mostly used stopped down. So a faster lens is not always a better choice for landscape photographers. Slower lenses are often much cheaper than their faster siblings, they are also much lighter making it easier to carry them long distances over tough terrains. Generally slower lenses take smaller filters, which cost far less than larger filters and also take up less space in the camera bag. Similar is the case with fast auto-focus and Image stabilization features, both of which add to the costs and also the physical weight of the lens. Since landscape photographers mostly shoot on tripods, image stabilization is not that important to them, same is the case with focusing; most professionals prefer manual focusing with stationary subjects. The features discussed above namely faster maximum aperture, image stabilization, fast auto focus performance etc. add the bulk of the cost and if you are planning to mainly use a lens to shoot landscapes you could cut down on costs considerably by choosing lenses wisely.

Tips for Photographing Landscapes Using Telephoto Lenses


Shooting landscapes with telephoto lenses is the same as when using wide angle lenses, except for some additional considerations that you need to make. Here are few tips to help you get stunning pictures.

1. Composing The Scene


When you come across an interesting scene, think of elements that you believe contributes to its interestingness and try to isolate them in your shots. Also think of elements that do not add significantly to the scene or is more of a distraction and think how best to eliminate them from your compositions. The power to eliminate unwanted elements from a scene is the greatest advantage of using telephoto lenses over wide angle lenses.


landscape photography using tele lens
Photo by: Sandeep Somasekharan


For ex. If you have a very uninteresting sky in your scene; why include it in your composition in the first place? Zoom in tight and crop out the sky.

2. Use a Sturdy Tripod


The large depth of field often required in landscapes means you will often be shooting with very narrow aperture that require slower shutter speeds to compensate for the light loss. The longer the focal length used the greater the chances of your shot getting spoiled by camera shake. Whenever possible shoot on a solid tripod to ensure maximum image sharpness.

3. Enable Mirror Lock Up


If your DSLR has a mirror lock up function enable it and use a remote trigger or the timer function to ensure maximum sharpness. The mirror which is located very close to the sensor could induce small vibrations when it flips up and down at the start and end of every exposure. Using mirror lock up introduces a small delay between the mirror flipping up and the opening of the shutter and thereby reducing the chances of the shake spoiling the image. Shooting in live view also has the same effect as the mirror stays up when the camera is in live view mode.

4. Image Stabilization / Vibration Reduction


Image stabilization is a very advanced feature found in relatively high quality lenses and could be a life saver when shooting handheld in low light conditions. However when shooting on a tripod, always remember to turn it off. Else the stabilization feature will look for vibrations that are not present and in the process introduce vibrations of its own resulting in a softer image.

5. Beware of Wind


telephoto landscape photography
Photo by: Sathish J


When shooting with long focal length lenses, the wind could cause serious issues; strong winds could even knock down the equipment if the tripod is not stable enough or is not weighed down. But what we need to be aware of is the fact that even relatively mild wind could easily spoil our shots. When shooting in windy conditions you could try the following tricks to reduce its impact.

  • Take off your lens hood; longer lenses have large hoods which could catch wind easily.
  • Use your own body as a shield; place yourselves in between the camera and the wind.
  • If your tripod allows you to hang weight for better stability do it.
  • Place a beanbag or something similar (consider reducing some weight) over your lens for increased stability.
  • Increase the ISO settings for faster shutter speeds.
  • Shoot from a protected location; place a solid structure like a wall or a building or even a vehicle in between the wind and you.
  • Wait for the wind to subside.


6. Shoot at Your Lens’s Sweet Spot


landscape photography tips
Photo by: Derek Fung


Every lens has a sweet spot. An aperture setting that produces the best image sharpness. A rule of thumb states that for most lenses the sweet spot is 2 stops narrower than its maximum aperture. So for a lens with a maximum aperture setting of f/4 the sweet spot will be 2 stops narrower that means f/8.

7. Specialized Filters for Creative Control


Unlike a wide angle lens, it is very easy to use polarizing filters on telephoto lenses as there is very little chance of getting uneven polarization. You can also use other filters like Graduated Neutral Density Filters to control the amount of contrast in your scene. One thing to remember is that filter sizes may differ for your wide angle lens and telephoto lens. So filters originally bought for wide angle lenses may not fit on your telephoto lenses. However if your telephoto lens has a smaller diameter filter than your filters you can use adapter rings to make the filters suit the lens. But if the filters you own has a smaller diameter than your telephoto lenses filter diameter you have no choice but to buy larger size filters or shoot multiple exposure and blend them together in software.

8. Shooting Panoramic Landscapes


panoramic landscape photography using telephoto lens
Photo by: Sathish J


Telephoto lenses have very little distortion when compared to wide angle lenses and hence are great choice for shooting panoramic landscapes. Zoom in tight on the most interesting area of your image and capture multiple shots with a 30% overlap to create stunning panoramas. With telephoto lenses you can make multiple panoramas from a single scene.

Tuesday, 28 January 2014

20 Tips to Improve Focusing Accuracy and Sharpness in your Images


Perhaps the most common complaint photographers have ever raised is that “my pictures are not sharp enough” or “the focusing system is not up to the mark”. And near about 100% of those who have these issues attribute it to fault in their equipment. Although in some instances they are right and the equipment is indeed the culprit; but in majority of the cases it is not the equipment but lack of understanding or improper shooting technique that are causing issues. In this article we will discuss some basic facts and certain shooting techniques that every DSLR user should be aware of which will help them get the best out of their equipment in terms of Focus and Sharpness.


Achieving Better Focus and Sharpness in Your Images
Photo by: antonio pascual belda

1. Clean Your Lenses and Sensor


Dirt on camera sensor and lenses could adversely affect the performance of your camera by making focusing difficult, regularly clean both the front and back elements of your lenses and also make sure there is no dust on your sensor for best performance.

2. Change / Remove Lens Filters


dslr photography tips
Photo by: Kai C. Schwarzer


Cheap low quality filters could reduce the sharpness of your lens, what’s the logic of putting a 10$ filter in front of a 1000$ lens, you will end up with image quality equivalent of a 10$ lens. Even good quality filters deteriorate over time so make sure the filters you mount on your lens are high quality filters in perfect condition else remove the filter from the lens.

3. Get to Know Your Viewfinder


Ever wondered why there are so many squares and rectangles in the viewfinder well they are all focus points and they are not all the same. Most cameras have 9 – 11 focus points but recent models are featuring 64 +, the general rule is the more the better. Remember not all of the focus points could be selected for focusing as some of them function only as assist points.


DSLR Viewfinder
DSLR Viewfinder


Rectangle Focus Points – focus points represented by both horizontal and vertical rectangles are single plane focus points. They work only on lines of contrast at a 90 degree orientation. So horizontal rectangles are to be used for focusing on vertical subjects and vertical rectangles are to be used to focus on horizontal subjects.

Square Focus Points – focus points represented by a square are Cross points and they are superior to single points which are represented by rectangles because they work either way (can focus on both vertical and horizontal lines).

Use this information to align your subject with the right type of focus point to get fast and accurate focus. Also keep in mind the actual sensor area covered by a focus point is at least twice as large as the size of the rectangle shown in the viewfinder. So within that area the camera will try to focus on the area of greatest contrast.

4. Use only the Center Focus Point


Yes I know it does not make sense, if the camera has 64 focus points why not use them all, will it not help make focusing faster? The answer is both yes and no, if your intention is to attain focus fast then using all focusing points will certainly help you achieve that. But if your intention is to focus on the right part of the scene then its better you shift to center focus point only and use the focus point to focus precisely where you want. Center focus point is the most powerful and fastest focus point in any camera; it is also a cross type focus point.


DSLR Viewfinder
DSLR Viewfinder


For example imagine you are trying to shoot a scene with 5 different elements in it; in all point focus mode the camera does not know which one is important to you and will generally focus on the element that is closest to the camera. if that is not what you wanted you will have to release shutter button and try again this could be very frustrating, instead shift to center focus point only, point the center point at the element you need to be in focus, lock focus and recompose the scene. 

5. Adjust your Diopter


Each person’s eye sight is different and so camera manufactures have provided a way to adjust the focus of your cameras eyepiece to match that of your eyesight. Without a properly calibrated diopter you will not be able to judge whether you subject is in focus or not. Read more about Why and How to Use the Diopter Adjustment on Your DSLR Camera.

6. Use the Correct Focus Mode


Dig you DSLR’s users manual and read the section of focus modes. This one is important, in general most DSLR cameras have 2 or 3 different focus modes. But in my experience only 2 of them works well.

One Shot (Canon)  / Single Servo Mode (Nikon) – use this mode for best results on subjects that are stationary. You will get both visual and audio confirmation on when focus is locked (depending on camera settings), the shutter will not fire if the camera is unable to achieve focus.

AI Servo (Canon) / Continuous Servo Mode (Nikon) – use this mode to shoot moving subjects, the camera will follow the subject as it moves across the frame, focus is set at the time of release of the shutter and the camera will take a picture irrespective of whether or not focus has been achieved or not.

7. Proper Focusing Technique


Many lenses struggle to focus when switching from near to far focus or vice versa. This happens because the lens stars to hunt for focus from one end (near or far) and need to travel all the way to the other to actually find the subject. To make things easier some lenses have a function called focus limiter that allows you to limit the area that the lens need to look for this could speed up things quite a bit.

For example Canon EF 100-400mm f/4.5-5.6 L IS USM Lens has a focus limiter that could be set from 1.8m to infinity or 6.8m to infinity so if you know that you are trying to focus on a subject that is far away you could set the focus limiter to 6.8m – infinity mode and make things much faster.


focus limit button


Another focusing technique is to manually focus the lens in the general direction so as to get the subject in acceptably sharp and then take auto focus do the precision fine tuning. This is much easier on lenses that have full time manual override function.

If manual focusing is not to your liking there is one tip that could help you auto focus better. Instead of pressing down the shutter button and keeping it pressed till the lens acquires focus, make it a two stage process, first half click to focus the lens in the general direction, release shutter button and half click again to fine tune and lock focus. This technique works because it helps minimize problems caused by inertia or slops in mechanics which cause the lens to overshoot the point of focus.

8. Understanding Subjects that are Difficult to Focus


Auto focus systems have evolved over the years and now deliver quite acceptable performance but they do tend to struggle with certain subjects such as the following:

  • Low-contrast subjects. (ex. blue sky, solid-color walls, etc.)
  • Subjects in low light.
  • Extremely backlit reflective subjects. (ex. car with a reflective body)
  • Overlapping near and far objects. (ex. animal in a cage)
  • Repetitive patterns. (ex. Skyscraper windows, computer keyboards, etc.)


When faced with such subjects / situations, do either of the following:

  • Focus on an object at the same distance as the subject and lock the focus. Recompose as needed and take your picture. 
  • Set the lens focus mode switch to <MF> and focus manually.


9. Where Should I Set My Focus?


focusing technique
Photo by: Jose Ramon


General rule of focus is to set your focus at the most important part of the subject / scene. Have your sharpest focus on the area that you want to draw the viewer's attention to.  For photographs of people and animals it’s the eyes, for landscapes with a foreground element it’s the foreground element, for landscapes without one set your focus at the Hyper Focal Distance.

10. Use Focus Lock Correctly


Focus, lock and then recompose is the most popular shooting technique. However bear in mind that if not used correctly this could cause focus errors due to lens movement (the arc angle) causing the camera to subject distance to shift slightly. This issue is most obvious when shooting macro and for macro photography I suggest you focus manually rather than depending on the cameras auto focus mechanism.

Some photographers suggest using the focus point closest to the subject so as to minimize this but in my opinion (especially if you are using a lens with full time manual focus) it is better to focus and recompose with your center focus point and if you find necessary (when using very shallow depth of field like f/1.4 or f/2.8) fine tune the focus manually. This will not be necessary in most cases however you should be aware of this and double check your focus after recomposing.

11. Don’t be Afraid to Focus Manually


Manual focusing has always been the best way to ensure accurate focus. But many photographers especially the ones who picked up photography in the digital age are very skeptical about this, they will shoot in manual mode if need be but does not entertain the idea of focusing manually. In fact manual focusing has never been so easy. The live view function coupled with the ability to zoom the view to say 5x or even 10x makes focusing manually much easier and precise.

12. Depth of Field is no Substitute for Good Focus


Irrespective of the depth of field in an image there is only one point of focus, you can only marginally improve the feel of sharpness by increasing depth of field but it could never substitute good focus.

13. Shutter Speed and Image Sharpness


dslr rule of thumb for shutter speed
Photo by: Kenny Teo


Camera shake is one other factor that could lead to loss of image sharpness, when shooting stationary subjects the general rule for handholding is to use a shutter speed that is 1 over the focal length of the lens used. So if you are using a 200mm lens make sure you have at least 1/200 as the shutter speed. But this is not applicable when shooting moving subjects, to capture moving subjects sharp one should either use fast shutter speeds capable of completely freezing the movement or use flash to freeze it. Learn more about action photography here – Understanding Action photography. Alternatively you could employ panning technique to capture movement in the background while keeping your subject sharp.

14. Turn On Image Stabilization / Vibration Reduction


If you are using a lens that has image stabilization feature (IS on Canon or VR on Nikon) turning it on could help you get sharper pictures while shooting handheld. Some cameras also offer stabilization at the sensor. However remember to turn it off when shooting on a tripod else it will influence the picture quality adversely.

15. Shoot on a Tripod for Ultimate Sharpness


tips to improve image sharpness
Photo by: Giuss 95


When it comes to keeping camera steady nothing could match the versatility of a tripod. But most photographers are put off from using one due to the extra effort of carrying it with them all the time and the time and effort needed to set up your shot. However it could help better compose the frame, and eliminate camera shake completely.

16. Focus and Sharpness are two Different Things


Focus and sharpness are two entirely different things, it should be understood that you can have a perfectly sharp out of focus picture. And you cannot make an out of focus picture in focus by sharpening.

17. Lens Correction Data


Sometimes your equipment could be the real culprit; a particular lens might be consistently focusing a few millimeters in front or behind the intended focus area. In such cases most modern cameras have the ability to make an adjustment in the camera to fix the issue. The camera allows you to enter lens correction data for up to 20 different lenses (depending upon camera model) and when the camera identifies a lens for which the correction data is entered is mounted it sets the focus accordingly so as to get accurate focus.

A simple home experiment could tell you whether or not your lens is focusing at the right point or is it off. Set camera on a tripod, use the widest aperture allowed by your lens and take a picture of a ruler places at an angle of 45 degrees to the camera. Autofocus on 5” mark and you will be able to tell where the focus area actually is when you look at the picture in your computer screen whether it is precisely at the 5” mark or is it off and if it’s off then by what amount.

18. Add More Light to the Scene


Cameras auto focus needs light to work properly and often its lack of enough light that causes issues. If your camera has an AF assist beam do enable it, similarly most branded external flash units have an infra red focus assist beam to make focusing easier, so even if you are not using flash you could use it to make focusing easier (turn of flash firing in flash menu). Alternatively a torch or a head lamp or virtually any light source could be used to throw light on to your subject to focus.

19. Ensure Correct Exposures


DSLR Histogram
DSLR Histogram


Sharpness of an image is determined by a line of contrast; so if your picture is underexposed or have dull lighting, an image will not appear sharp even if the focus and everything else is right. Use your camera's inbuilt histogram feature to make sure you have your exposures right. Modern DSLR cameras have both RGB and Luminescence histogram to help photographers with exposure decisions.

20. Check Sharpness by Zooming in on Your LCD Screen


zooming lcd panel of dslr camera
zooming lcd display of dslr camera


Always check your images for sharpness by zooming in to 100% on your LCD screen; if there is any blur at all it will be visible when zoomed in 100% so you could immediately re-shoot the picture.

Focus and Image Sharpness are two of the most important technical aspects in photography which sets apart great photography from mediocre work. so spare no effort to make sure your photographs are as sharp as possible with your current equipment.


Related Reading


Monday, 27 January 2014

How to Photograph Glass Bottles

Article by: Marc Alexander Sporys

This is one of my "How to ad" series where I pick a photograph which appeared as an advertisement and try to figure out how to light it up + post processing. I'm trying to get there as close as I can and will show you the whole process to the final image.


Is it possible to get this with a small equipment and do it like the "pros"?

Mock Up


tips for photographing glass bottles


(The original ad-image is not taken by me! It's only used to show)

Gear


- 5D II @ 1/160, ISO100
- 24-70 Æ’2,8 @ Æ’/11

Lighting Setup

Here's the lighting setup, please excuse the poor quality as it is taken with my mobile camera.

setup shot of how to photograph glass bottles

lighting setup photographing glass bottles


Key light - Quadra into Softbox, front of bottle
Rim light - D-Lite into Softbox, left of bottle

Post Processing

Here's a video of my post processing technique.


Saturday, 25 January 2014

Impact - How I Took It

Article by: LEVARWEST Benjamin

how i took it
how i took it

Planning the Shot

Here's the rough drawing that i used to plan  /pre-visualize the shot.


Planning the Shot
Planning the Shot

How I Took It


Drop the bottle on to a box/container filled tightly with flour or anything similar, then just add texture in post processing, add a little vignette and you have a nice result.


Behind the Scene
Behind the Scene

Exif Info:


Camera: Canon 1100D
Lens: Tamron 17-50mm 2.8
Exposure: 1/180 - f8 - 100 iso

Lighting Setup


YN-467 @ left with umbrella
YN-467 @ right with umbrella


Related Reading


  1. How to Photograph Liquor Bottles Using Dark Field Lighting
  2. How to Photograph Coins using Dark Field Lighting Technique
  3. Using Axial Lighting for Photographing Coins
  4. A Tutorial on How to do Smoke Photography
  5. Food Photography Tips

Friday, 24 January 2014

How to Photograph Wine Bottles Using Dark Field Lighting

Article by: Trevor Dennis

This was done as part of a poster project for Chris. The glass is pure dark field. The bottle is a bit of a mishmash using the dark field setup I had in place for the glass, but with a manual blend of three exposures and finally an exposure with my largest white reflector each side of the camera.


how to photograph wine bottles


I have taken to using the largest scrim I can manage behind the subject to maximize the wrap round. You can see this worked better camera right than camera left, and that's because I was holding a two meter high reflector while pressing the shutter release, and I could not reach on the left side, so had to improvise. (I was set up in the corner of our bedroom because it’s too cold to work in the garage)

Post Processing


The BG is Photoshop, as are the shadows. The texture was placed behind the glass by:

  1. Ctrl click the Glass layer to select it.
  2. Select the BG layer with texture, and press “Ctrl + j” to copy the glass shape.
  3. Move the new layer above the glass layer, and set its blend mode to Lighter Color.
  4. Ctrl click the new layer to select it.
  5. Contract and feather the selection (enough to shrink it back from the glass edges)
  6. Add a layer mask to the new layer. (I think I have that the right way round, but if not, just invert the mask – Ctrl i)
  7. I also reduced opacity a bit as you would not see the full texture behind a real glass.


BTW When you add noise to a gradient to produce texture, it lightens it. There’s no way round it if you already started with full black, so you need to use curves or levels on the texture layer. The smart way is to do it with a linked adjustment layer so you can run a gradient down the mask to control where and how much.

Lighting for the Shot


Bowens Gemini, (triggered Pocket Wizard Plus 2s), with 1.2 meter octobox, fired into 1.5 meter scrim behind subjects, with dark card between subject and scrim (dark field - as in Fil Hunter's 'Light Science & Magic' book)


Related Reading


Thursday, 23 January 2014

Getting Backgrounds Right in Macro Photography


Background is as important as the main subject in all genres of photography, especially macro. Backgrounds have a huge impact on the photograph; it could be used to emphasize the subject and to relate it to its environment.  One can achieve a completely different look to a photograph just by changing its background.


macro photography background
Photo by: Thomas Shahan


To achieve an interesting background the photographer should get many variables right. The color of background, its brightness, saturation and even the amount of blur affect the final result.

Choosing the right background color


To create aesthetically pleasing backgrounds one must make sure the color of the background chosen would work well with the subject being photographed.

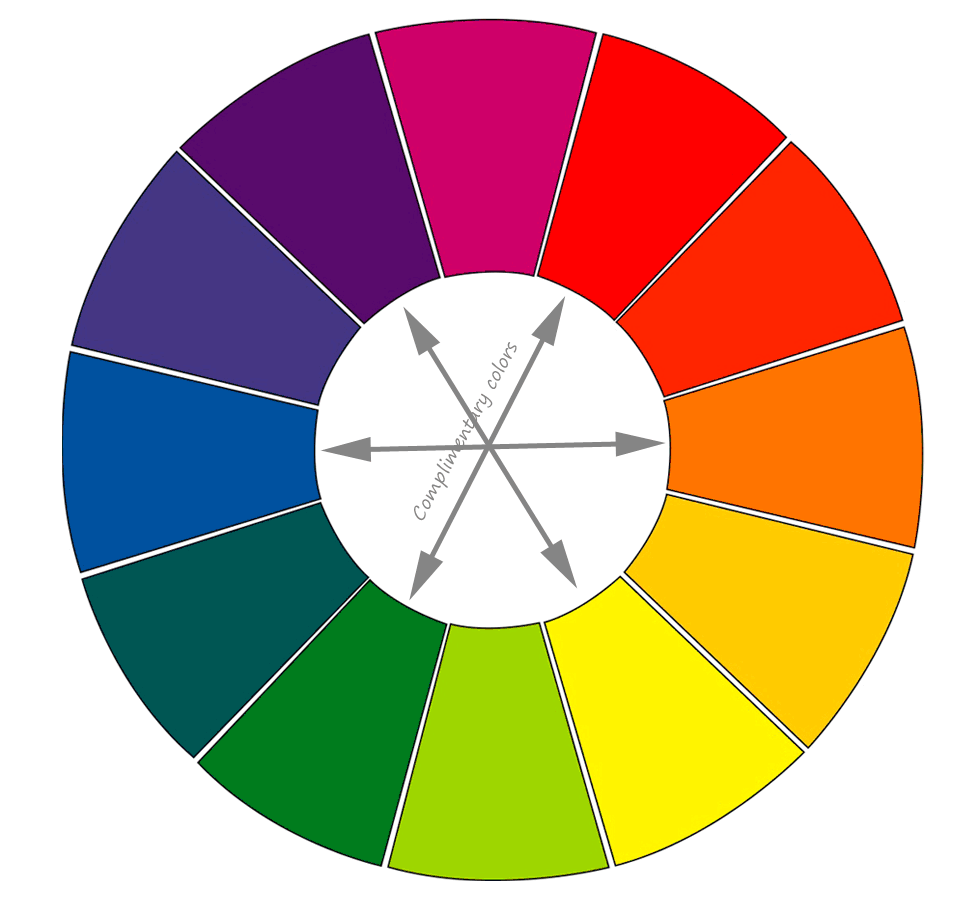
A very useful tool which helps you choose the right color background for your macro photograph is the color wheel.


color wheel
color wheel


Using Complementary Colors


Colors that are opposite in hue (colors that are opposite to each other in the color wheel) to the color of the subject works well as backgrounds.


getting backgrounds right in macro photography
Photo by: Tarique Sani

Using complementary colors will help emphasize the colors of the subject and make it stand out from the background.

Using Analogous Colors


background macro photography
Photo by: Rovanto


Color schemes using colors that are adjacent to each other on the color wheel are called analogous color schemes. Colors that are adjacent to each other in a color wheel are naturally harmonious and using them will help create an organic feel to the image. Analogous colors work well as backgrounds when photographing highly camouflaged insects and animals.

Brightness Level of Background


The brightness level of background is also very important to create interesting photographs. Usually photographers prefer to work with different brightness levels for the subject and the background. The reason for this is that if the subject and the background is of same brightness level then the final image will have very little contrast making the image uninteresting. However one should remember not to overdo it as backgrounds that are too dark or too bright could also throw an image off balance. The trick is to achieve a lighting ratio that works.


macro photography tips
Photo by: Walwyn

  • A completely black background often caused when using flash looks artificial and is therefore considered far less appealing. 
  • A background that is a stop or two darker than the subject works really well and makes the subject stand out, especially subjects that are very colorful.
  • A very bright background can work well in some situations if not in all. A background that is brighter than the subject will work as long as it doesn't divert the viewers’ attention from the main subject.


Amount of Background Blur


A photographer can control the amount of blur in his/her shots by controlling Focal length/shooting distance, aperture, subject magnification, adjusting subject to background distance etc.  In general majority of photographers prefer a clean background with not much detail so as to bring all attention to the main subject. However the choice of a very smooth even toned background or one with recognizable shapes and details is more a matter personal choice.


bokeh background macro photography
Photo by: Bùi Linh Ngân


Depending on the subject and what constitutes the background one may work better than the other. It is recommended to experiment a bit and find out what difference a background with or without detail make on your shots.

Making a Background


The simplest method of obtaining the desired background is to use colored paper. Plain color paper works very well, they are easily available, cheap, easy to carry and to work with and they come in all sorts of colors. For macro photography choose thicker sheets over thinner ones. You can cut the paper into smaller sizes, since the size of the subjects being shot is very small. 

Backgrounds can also be made by using different color gels on flash. An alternative which gives you much more control is to use a field monitor to display a Photoshop color. A much cheaper alternative is to use your Smartphone or Tablet; just import a jpg made on the PC to display a color gradient on them. We will discuss this in more detail in a future article.


Related Reading


  1. Compositing Images for Increased Depth Of Field In Macro Photography
  2. HDR Macro
  3. Diffraction and Macro Motion Blur
  4. Macro Photography - High Magnification, High Fstop, and High Detail
  5. The Sunny 16 Rule For Macro