Sunday, 19 April 2015

What is a lens mtf chart and how to use it to analyse lens quality.

What is a Lens MTF Chart 
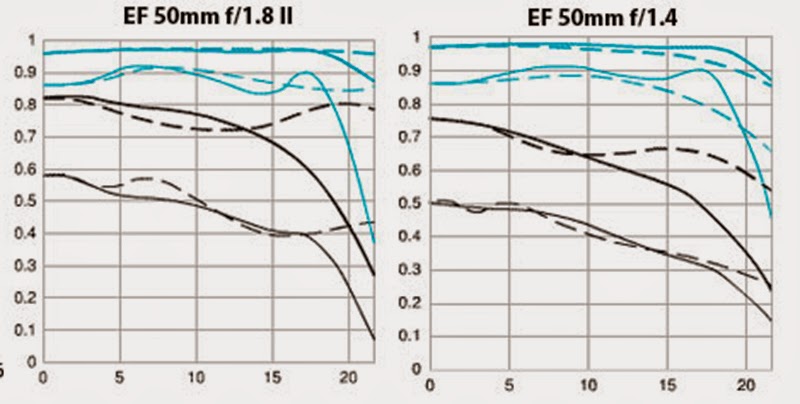

lens mtf chart
lens mtf chart comparison of canon 50mm 1.8 and 1.4 lens.

MTF is the abbreviation for Modulation Transfer Function which is a measurement of the optical performance of a lens. MTF charts will give you a better understanding of the optical quality of lenses, and can be useful references when researching, comparing and purchasing a lens.

MTF charts are the preferred tool for studying optical performance of lenses; as they use theoretical equations to plot a performance graph and don't rely on subjective opinion, subject matter, camera features, software or any other factors.

We all know that no lens is perfect; no matter how expensive they are, even the pricey lenses do not transmit 100% of the light that enters. What an MTF chart does is to plot the contrast and resolution of a lens from the center to its edges against a ‘perfect’ lens that would transmit 100% of the light that enters. The contrast of a lens is important as this works in correlation to lens resolution.

The y-axis (vertical axis) of a MTF chart plots the transmission of light through the lens with a maximum value of "1.0" which would indicate 100% transmittance of the light, although 100% transmittance of light is not possible because glass is not 100% transparent.

The x-axis (horizontal axis) shows the distance from the center of the image towards its edges. So, the "0" in the lower left corner represents the center of the lens and the numbers along the lower axis represent the distance out towards the edge of the lens in millimeters.

How to read a MTF chart


There are two groups of data plotted on an MTF chart: Sagittal and Meridional lines.

‘Sagittal lines’ (the solid lines) represent the contrast measurements of pairs of lines that run parallel to the central diagonal line that passes through the middle of the lens from the bottom left hand corner to the top right hand corner.

‘Meridional lines’ (the dotted lines; meaning relating to meridian) represent line pairs also positioned along an imaginary line from the center of a lens to the edge; these line pairs are perpendicular to the diagonal line.

In general, the higher and flatter the lines the better. Higher lines indicate better contrast (10 lines / mm) or resolution (30 lines /mm) while a flatter (left to right) line shows that the optical performance is close to the same at the edge of the image compared to the center.

Using a MTF chart to determine the bokeh effect of the lens


Another factor that can be read from the MTF graph is the 'bokeh' of the lens. Bokeh describes the quality of the out of focus areas in a picture. The bokeh effect varies between lenses and the effect is influenced both by the quality of the lens elements and the number of aperture blades in the lens design (more no of blades produce a better circle and therefore a better 'bokeh' effect).

In MTF charts; the closer the solid line and the dotted line are together, the softer the out of focus effect will be on a particular lens (meaning better bokeh).

Finding the Sweet Spot of a Lens using MTF Charts


When stopping down the lens from wide open apertures, the MTF of a lens typically increases for successively narrower apertures, then reaches a maximum for intermediate apertures, and finally declines again when we reach very narrow apertures.

The aperture corresponding to the maximum MTF is called ‘sweet spot’ of a lens, as images will generally have the best sharpness and contrasts at this settings.

Limitations of MTF Charts in Measuring Lens Performance


Even though MTF charts are useful for describing the quality of a lens, there are many limiting factors. An MTF chart says nothing about factors like Color-quality, chromatic aberrations, Image distortion, Vignette and Susceptibility to flare etc.

Also other factors like Focusing accuracy, camera shake, sensor dust, scratches, finger prints, moisture etc. present on the lens can have far more impact on image quality than small differences in MTF.

Also since MTF charts are not standardized; it can only be used to compare two similar lenses from the same manufacturer, same time difficult to compare across different manufacturers due to testing and display differences.

Putting all of this in simple terms


The left side of an MTF chart represents the center of the lens, as you move on to the right hand side it is the corner of the lens.

Invariably lenses are sharper in the middle and they get weaker as you get away from the center. Anything above 6 in the rating is considered good quality. Everything above 8 is considered of very good quality.

The dash lines and the different color lines represent different settings on the lens. It could be different focusing points, different apertures that are set, different types of contrast etc. Easiest method to remember is that; closer the lines are to the top of the chart the better the quality of the lens.

To select the better one from two lenses; you have to know how to interpret their MTF charts; only technically. How they fair in real life situations is going to be another. But this is one way to put a technical aspect on it.

NEXT: Image Stabilization / Vibration Reduction

Saturday, 18 April 2015

Lens Quality


The ever increasing megapixel count in modern digital cameras has reached a stage where the resolution of your picture is actually limited by the quality of lens used and not by the resolution of the camera. So lens quality has assumed new significance, you need higher quality lenses to exploit the full potential of your digital camera. Higher resolution sensors amplify any minor flaws the lens has and thus makes using lower quality lenses with them absolutely unacceptable.

There are a number of things that determine the quality of a lens, here are some of the important factors to consider while evaluating the quality of a given lens.


Resolution


Resolution is one of the most important factors to consider when evaluating lenses. Resolution determines how much details can the lens resolve. Some lenses are very sharp and produce much detail and some are not that sharp, typically this is very much in proportion to the price tag of the lens. Only exception to this is some prime lenses like the 50mm 1.8 which is extremely sharp but moderately priced.

Chromatic Aberration

Chromatic aberration
Photographic example showing high quality lens (top) compared to lower quality model exhibiting lateral chromatic aberration (seen as a blur and a green edge in areas of contrast.) Credits: Wikipedia


Chromatic aberration is a common optical problem caused by lens dispersion. It is also known as color fringing” or “purple fringing” and occurs when different colours of light travel through the lens at different speeds and gets focused at different positions in the focal plane. In other words the lens is unable to bring light of all wavelengths (colour) to the same focal plane and as a result the image looks blurred with noticeable coloured edges with bluish green, purple, red, yellow or magenta tint. Chromatic aberration occurs mainly in high contrast situations especially when shooting subjects with a bright background. Post processing software’s like Adobe Photoshop could fix the problem to an extent.

Distortion

Lens distortion
Lens distortion. Image credits: Wikipedia


We have seen that fish eye lenses are not corrected for distortion and they produce images with a great deal of distortion in them, in reality many lenses are not perfect and even lenses which are not fisheye do suffer from distortion. This causes straight lines to be rendered with a curve. Lens distortion is most noticeable when straight lines run parallel to and near the edge of the frame.  The amount of curve will vary from lens to lens and also from focal length to focal length within the same lens.

The most common kinds of distortion are:- 

Barrel distortion which appears as a bulge in the center of the image (commonly found in wide angle lenses) and it makes it hard to get horizon straight as it kind of bends.

barrel distortion
barrel distortion courtesy wikipedia

camera lens barrel distortion
camera lens barrel distortion courtesy wikipedia


Pincushion distortion is the opposite of Barrel distortion (mostly found in tele photo lenses). 

pin cushion distortion
pin cushion distortion courtesy wikipedia
camera lens pincushion distortion
camera lens pincushion distortion courtesy wikipedia


And Mustache or Wave Distortion; which combines both barrel and pincushion distortions. Barrel distortion in the center and pincushion distortion towards the corners. It is called mustache distortion as it bends the lines and creates the shape of an old fashion mustache shape in the lines that follow the edge of the top of the frame.

moustache distortion
moustache distortion courtesy wikipedia
Camera Lens Mustache distortion
Camera Lens Mustache distortion courtesy wikipedia


Distortion is something that can be fixed in software by removing the distortion from the image (though wave distortion is harder to correct). But, this correction is a destructive process. You lose image quality during the process of remapping the pixels in the image. A better alternative is a distortion free lens which delivers a better final image.

Vignetting

vignetting
vignetting image courtesy david ball


Vignetting (or light fall-off) is the darkening of the corners of an image. This effect is caused by more light reaching the center of an image than reaching the edges. All lenses let in a little less light at the corners. It is only that in case of better quality lenses the effect is not that noticeable. Vignetting is most noticeable when you shoot some subject that is very bright (e.g. sky) using wide open apertures.

Vignetting is not always bad, in certain cases it enhances the look of the image by focusing the viewers attention more towards the center of the frame where the main subject is located, but it could look really bad in certain other situations. Vignetting can be fixed with some in camera software and also in image editing softwares.

Flare

Lens flare
Lens flare image courtesy wikipedia

Flare is caused when lights from just outside the frame (non image forming light) are coming in and bouncing around inside the lens causing problems. Flare is mostly caused by bright light sources. 

camera lens flare
camera lens flare image courtesy wikipedia


When the bright light source is within the image frame, it produces visible artifacts. And when the light source in not within the frame but just outside; it causes haze.  Haze makes the image look "washed out" by reducing contrast and color saturation (adding light to dark image regions, and adding white to saturated regions, reducing their saturation). Using a lens hood is a highly effective technique for reducing flare.

Bokeh

bokeh
bokeh image courtesy wikipedia


Bokeh is the aesthetic quality of the blur found in the out of focus areas of an image. Differences in lens aberrations and aperture shape (no of aperture blades) cause some lens designs to blur the image in a way that is pleasing to the eye, while others produce blurring that is rather unpleasant or distracting—"good" and "bad" bokeh, respectively. Bokeh occurs in areas outside the depth of field and photographers sometimes shoot at shallow depth of fields to create images with pleasing out of focus regions. Bokeh is most visible around small background highlights, such as specular reflections and light sources, which is why it is often associated with such areas. However, bokeh is not limited to highlights; blur occurs in all out-of-focus regions of the image.

Lens Sharpness


As photographers we need to be aware of the fact that even lenses with identical focal lengths and features could be of very different optical quality. So if you are to figure out which lens is better from a given set then you need to be aware of certain characteristics of lenses.
  
Most major manufacturers have some way to distinguish their pro series lenses from their standard lenses. In case of Canon they call their premium lenses L, L stands for luxury and all top of the line lenses from canon are marked L and they feature a red band on the barrel. in case of Nikon they do not have a specific category like Canon but they do put a gold stripe and a gold letter N on their best lenses. N stands specifically for Nano Coating, a type of coating they put on lenses to reduce flare. But it’s not the only thing that they do to the lens to make it good, there are several other factors that result in the quality difference between these top of the line lenses and other ordinary lenses.

What’s the best aperture for maximum sharpness?


We know for a fact that lenses are sharp in the middle aperture range. But precisely which aperture setting will work best can only be determined using some tools like the lens MTF charts, and the data in those charts needs a little bit interpretation.

If you look at the center and corners of an image you could find that in most cases center sharpness is not really a big issue, most lenses are sharp in the center, but some lenses are very very weak when it comes to image quality especially in the corners and that is where the real quality difference is felt. So there are ways of rating lenses in a very technical manner which we'll discuss next.


Wednesday, 15 April 2015

How to find the sharpest aperture on a lens?

What’s the best aperture to shoot?


This is one question many beginners ask. Well selection of aperture depends mainly on the effect that you wish to create in your picture.

how to find a lenses sharpest aperture


Shallow depth of field


 If you are after shallow depth of field effect with your subject sharply in focus with the background and foreground elements rendered in a smooth blur, you will want to use the largest aperture (smallest f number) that your lens permits (f/2.8, f/4 etc).

Large depth of field


If you are aiming for large depth of field then it is better to use smaller apertures but not necessarily the smallest aperture (remember diffraction limited aperture) f/16, f/22 etc. a good rule of thumb would be to use an aperture 1 or 2 stops down the minimum aperture of the lens. For example if your lens stops down to f/22 it’ll be safe to use apertures f/11 or even f/16 but at f/22 there will definitely be diffraction happening.

How to find your lenses Sweet Spot


Every lens has a sweet spot, the aperture setting in which the lens produces the cleanest, sharpest results. You can do some trial shoots with any lens at different apertures, download the pictures on to your pc, look at them closely in the bigger monitor and find for yourselves which aperture gives the best result for that particular lens.

An easy way of roughly knowing the sharpest aperture of any lens is to remember that the sharpest images are obtained by using an aperture value that is somewhere in the middle of the aperture range of the lens.

For example for a lens that has aperture values ranging from f/2.8 to f/22

f/2.8   f/4   f/5.6   f/8   f/11    f/16    f/22

f/8 should give the sharpest results. With f/5.6 and f/11 producing very similar results.

Another rule of thumb many pro photographers follow to achieve maximum image sharpness is to use  an aperture that’s 2 stops from the lenses maximum aperture.

For example a lens that has f/2.8 as its maximum aperture;

f/2.8   f/4   f/5.6   f/8   f/11    f/16    f/22

Should give you sharp images at f/5.6 (which also happens to be among the three apertures in the middle of the aperture range which we discussed earlier).

And a lens which has f/4 as its maximum aperture f/8 should give the sharpest pictures. So always remember every lens has a sweet spot, it varies from lens to lens, but it’s always in the middle of the range.


Next: Lens Quality

Tuesday, 14 April 2015

What is a Fast Lens?

Fast Lenses

Fast Lens
Fast Lens


Many newbies confuse the term fast lens to mean that these lenses allow you to shoot fast (frame rate). But that is not the case, Fast lenses are so called because they allow you to use faster shutter speeds for any given ISO setting. So put simply the larger the maximum aperture of the lens the faster the lens is.

Advantages of fast lenses


  • Faster shutter speeds
  • Better Bokeh
  • Lower ISO’s
  • Shooting in low light
  • Shallower depth of field
  • Brighter view finder
  • Faster focusing
  • Can use extenders and tele converters
  • Better lens construction


In general lenses that have maximum aperture of f/4 or more (f/2.8, f/1.8, f/1.4, f/1.2) are called fast lenses.

Having a fast lens in your kit is advantageous in many ways. First and foremost they allow you to create those shallow depth of field pictures in which the subject really stand out from the rest of the elements and background elements are rendered in a smooth blur. This is something that cannot be done (in most cases) with slower lenses. 

Another advantage a fast lens has (in majority cases) is the smooth rounded shape of the bokeh it creates which is a very pleasing effect.

In situations where you are shooting handheld and light levels are low having a fast lens or not could mean either you get your shot or not. You can keep you ISO within manageable limits to control noise.

You get a brighter view through the viewfinder and the extra light coming in through the lens helps the camera’s auto focus mechanism perform better, there by achieving faster focusing speeds and better focusing accuracy. 

Fast lenses are also advantageous when you need to use extenders or tele converters with your lens. For example if you have a 300mm f/2.8 lens you can fit it with a 2x tele converter and still have  autofocus enabled on all focus points. The lens now behaves like a 600mm f/5.6. Remember with lenses that has maximum aperture of f/8 only the center auto focus point works and for even slower lenses auto focus does not work at all. 

Last but not least, faster lenses in general (although costly) are better to their slower siblings in both lens quality and construction quality.

Next: Depth of Field

Sunday, 12 April 2015

Aperture


Aperture is the opening in the lens through which light travels to reach the sensor. The size of the opening could be controlled by the photographer so as to let in more or less light as required. The amount that lens can open and close down is referred to as aperture and are listed as f numbers to quantitatively describe the relate size of the opening. It is also referred to as the diaphragm, the iris etc.

Camera Aperture
Camera Aperture


F stop – the ratio of the focal length of the lens to the entrance pupil –or- the opening of the lens.

Typical ranges of apertures used in photography are

1 1.4 2 2.8 4 5.6 8 11 16 22 32 45 64 and maximum opening of lenses are always put as “1: the opening of the lens”.

The above table presents f stops in 1 full stop increments. Most cameras allow you to control f stops in 1/3rd stop increments for precision control however in this discussion we will stick to full stops to keep things simpler.

There is an easy method to remember f stop values; trick is to remember the numbers 1 and 1.4. If you write 1 and on the line below write 1.4 now write the doubles of those in the lines

1 2 4 8 16 32 64

1.4 2.8 5.6 11 22 45

Now if you combine both the lines

1 1.4 2 2.8 4 5.6 8 11 16 22 32 45 64

You get the aperture scale. It is quite possible to go beyond those numbers, like we have lenses that go beyond f 64 and also below f 1. But on a typical camera around f 1.4 to f 22 is the scale that you are likely to see.

If you observe closely you will find that larger opening are denoted by lower f numbers and smaller openings are denoted by larger f numbers. This is one aspect of photography that causes much confusion to the beginners.

If you could lay hands on a lens that has manual aperture dial (all old lenses do); hold it up, look through the lens and as you open and close the aperture, you will see that the size of the aperture opening changes to let in more or less light. When you move the aperture from f 2.8 to f 2 you are opening up the aperture by one full stop and thus have doubled the amount of light. And when you are going from f 2.8 to f 4 you are closing the aperture by one full stop there by cutting in half the amount of light passing through.

One thing you will notice is that the numbers are not doubling or cutting in half with each step because when you go from f 2.8 to f 2 the circle only gets a little bit bigger but it lets in twice as much light. 

Size of the opening


aperture
Aperture


You can figure out the size of the opening on any of your lenses using the formula focal length over the maximum f number.

So using this formula on a 50mm 1:1.4 lens, we get 50/1.4=35mm. if you set the lens to f/1.4 and measure across the opening of the lens it will be exactly 35mm.

Size of Opening across different focal lengths

If we compare the size of lens openings for lenses with different focal lengths set to the same f stop we will find that differ.

For example a 24mm lens with f/1.4 as its maximum aperture will have an opening of 17mm. remember on the 50mm lens it was 35mm. so a much smaller opening on a wider lens lets is the same quantity of light as a larger opening on a lens with a longer focal length it’s the focal length that makes all the difference. Now if we consider a 300mm f2.8 lens, it has a massive opening of 107mm but still lets in only less light then both the 50mm f 1.4 and the 24mm f 1.4.


Camera Lens Aperture

The important thing you need to remember about aperture is that f 1.4 is a large opening and lets in a lot of light and f 22 is a much smaller opening and only lets in much less light. Thus it is now clear that aperture controls the amount of light it lets through the lens but there is more to aperture than just that, it also controls the depth of field in the picture.