Tuesday, 31 December 2013

Pro Tips for Great Group Photos - The Trick to Keeping People from Blinking


People blink all the time, in photography we often find that they always blink at the wrong time, that’s why we end up with perfectly fine portraits except for the fact that the subject’s eyes are closed.


portrait photography trick to keep people from blinking their eyes
Photo by: Tord Sollie


The problem is compounded when we are trying to shoot group photos. With groups consisting of 5 or more people, it is guaranteed that someone will have their eyes shut; the larger the group size the greater the chance of this occurring.

However there is one simple trick to keep people from blinking their eyes when you press the shutter. When you have set up your camera and is ready to shoot, tell everyone to close their eyes and only open them on the count of three.  Here’s what I say to people whom I photograph:

“Now that we are all set let us focus for a moment, please close your eyes, open your eyes and give me your best smile on the count of three, ready…….. 1…2…3…. OPEN”.

After saying OPEN wait one more count to actually press the shutter, this gives the subjects eyes time to adjust.  Believe me this simple trick could greatly improve your group photos.

There is one more trick that I use as my fail-safe… and that is to put the camera in continuous shooting mode and take three shots in one burst. This makes sure all of them have their eyes open in at least one of the pictures. And since the lighting, composition and framing are all the same I could easily clone out any issues if needed.

Related Reading


  1. Professional Portrait Photography Composition Tip – Crop off The Top of Your Subject's Head
  2. Pro Tip for Better Portraits – The Issue of Leaving Too Much HeadRoom
  3. Pro Tip for Great Outdoor Portraits
  4. 7 Inspirational Portrait Photography Techniques
  5. Tips for Photographing Children

Monday, 30 December 2013

Professional Portrait Photography Composition Tip – Crop off The Top of Your Subject's Head

In the previous article our pro tip for better portraits was not to leave too much headroom in your pictures. Here’s another technique that takes the point even further, here you actually cut off a portion from the top of your subjects head while you compose your picture.


Professional Portrait Photography Composition Tip


It sounds weird right? Ya I know but this technique really does works so well that it’s one technique that most fashion / portrait shooters rely on when they need to fill the frame with the subject’s head. When done right, cropping off the top of the subjects head helps focus the attention of the viewers to the subjects face and eyes and thus produces a very compelling look.

However there is one thing that you need to pay attention to while trying this technique; you should never cut off your subject’s chin. It is pretty ok to cut off the top of your subject’s head, shoulders, side of their arms, hair etc. people see such pictures all the time and are used to it. But if you cut off part of your subject’s chin it would make for a very uncomfortable composition.

Related Reading


Saturday, 28 December 2013

Pro Tip for Better Portraits – The Issue of Leaving Too Much HeadRoom


professional portraiture
Portrait Photography Tip

One classic mistake most amateurs make while taking portraits of people is to leave too much room above their subjects head. However this is one mistake that is very easy to fix, only thing is that the photographer should be aware of this while shooting and should constantly remind himself/herself to check it.


How to Fix the Too Much Headroom Problem in Portraits


Remember the rule of thirds in photography, when shooting portraits always try to place your subject’s eyes in line with line in the top one-third of the frame and you will never have portraits with too much space above the subject’s head.

Related Reading


Friday, 27 December 2013

Pro Tip for Great Outdoor Portraits


Ever wondered what’s the biggest secret behind those professional looking outdoor portraits. Yes the single most important trick to make your outdoor portraits look professional is to shoot with wide open apertures.


outdoor portrait photography tips
Photo by: chris zerbes


Shooting wide open has many advantages, the shallow depth of field produced when shooting wide open will make your subject stand out from the background. The background will be rendered as a smooth blur there by producing some visual separation between the subject and the background, and thus the viewer’s attention will now be entirely focused on the main subject.

How to achieve this effect


outdoor portrait photography
Photo by: chris zerbes


The easiest way of achieving such results consistently is to set your camera to Aperture Priority / AV mode and select an f/stop that is either the lowest or one stop narrower than the lenses’ maximum aperture.

For example.

If you are shooting with a lens which has f/2.8 as its maximum aperture then either shoot at f/2.8 or at f/4 which is one stop narrower than the lenses maximum aperture.


outdoor portrait photography tip
Photo by: chris zerbes


This is the most commonly used technique used by professional photographers to create those dreamy looking outdoor portraits. However you should be extremely careful about your focusing when using this technique, make sure you focus right on the subjects eyes, it is very important when shooting with very shallow depth of field, as even if the focus is slightly off it could entirely ruin the shot.

Related Reading


  1. Environmental Portrait Photography Tips
  2. Classic Portraiture - Determining Camera Placement and Height
  3. Reducing Glare When Photographing People Who Wear Glasses
  4. What Lens Should I Choose? Tips for choosing the right lens for portraits
  5. How to Photograph Silhouettes - Tips for Photographing Silhouettes

Thursday, 26 December 2013

Essentials of composition

By: Sapna Reddy

essentials of composition


1. There are no rules to composition, only tools/guidelines. Using the tool of thirds to place your main subject strengthens the composition.

2. Use structural elements (boulder on right) to anchor your composition.

3. Use accent colors to enhance the aesthetic appeal of the main subject. (fall color leaves in this comp).

4. Layer your composition..there must be a foreground (boulder and leaves), middle ground (turnaround of the river) and background (tree bases). This adds depth to the composition.

5. What you exclude from the composition is as important as what you include. No point in including excessive trees and surrounding woods when the story is about the river. 

6. Use leading lines when possible. Direct viewer's eyes toward your main subject. Here the river flowing forms a leading line to the center of the comp.

7. Create dynamism. Prolonged exposures help to convey the feeling of flow.

8. Check your histogram to make sure you are not clipping your darks or blowing out your highlights.

9. Border patrol. Be sure to check the margins of your comp and exclude or include objects as needed. this is very important for a clean look to the comp.

10. Remember to double check that your focal point is on the main subject of the composition and aperture adjusted based on composition.

Yes..You must think of all points 1-10 before you click the shutter. One of my mentors told me "photograph like you mean it"...and so I do.

Follow me on facebook.

Related Reading


  1. Rule of Thirds
  2. Getting Horizon Level in Photography
  3. Using Focal Points in Photography
  4. Framing Your Shots
  5. The Golden Section

Tuesday, 24 December 2013

How To Photograph Christmas Trees


Now that everyone has their Christmas trees decorated and have piled up presents underneath it, let’s see how best to capture the beauty of the Christmas tree in our photographs.


How To Photograph Christmas Trees
Photo by: Stephen Vance


Here are some tips to photograph Christmas Trees.


1. Use a Tripod


Shooting Christmas trees means shooting indoors mostly in low light situations (often times the main lighting in the room is turned off or reduced in strength to reveal the beauty of the Christmas tree and to make it stand out in the scene) using a solid tripod gives you the ability to get sharp pictures even with very slow shutter speeds.  This also helps you shoot in low ISO’s for better image quality.

2. Cable Release / Remote or Self Timer


To further improve the sharpness of our pictures we can use a cable release or camera remote to release the shutter, if you don’t have a cable release or a remote you can simply set your camera to self timer and get sharp images.

3. Use White Balance Creatively


christmas tree photography technique
Photo by: Andy Castro


You can play with white balance settings of your camera to get creative effects. Set white balance to warmer settings and give your Christmas images a Cozy feel alternatively set your white balance to cooler settings and give your Christmas images a wintery feel. Do also try shooting in black and white, Christmas images look great without all those colors detracting attention of the viewers from the subjects.

4. Shoot RAW


christmas tree photography tips
Photo by: Trey Ratcliff


The previous tip was about creative use of white balance to enhance the feel of your shots, one could either experiment while shooting or shoot in RAW and choose the settings that work best later while post processing. Shooting in RAW format also gives you more control over exposure in post processing.

5. Use Evaluative or Matrix Metering Mode


Photographing Christmas lights could prove tricky to your camera’s meter, it is better to use Evaluative or Matrix metering modes rather than spot metering mode.  If you use spot metering mode, depending upon where you get your meter readings from (it could be from a bright light source or a shadow) your exposure could be way off.

6. Meter from a Neutral Subject


While taking a meter reading it is recommended to meter off a neutral subject in the scene, and not with the camera pointed directly at a light source or a shadow area consider some area that is somewhere in between.

7. Use Your Camera’s Histogram to Correct Exposures


christmas tree bokeh
Photo by: Jack


Consult your camera’s histogram regularly to determine correct exposures, in such tricky situations your cameras metering system could fail and will give you incorrect exposures. Do not rely just the LCD display to check your exposure but use the histogram feature (use both RGB and Luminosity histograms) to make sure your exposure is correct and you are not clipping highlights or shadows.

8. Play with Depth of Field


Try experimenting with depth of field to get different effects, if you have an uninteresting background or if you wish to make your Christmas tree stand out in your picture use wide apertures (f/2.8, f/4 etc). if you wish to include the features in the background also reasonably sharp use narrow aperture (f/11, f/16 etc).


Christmas Light Photography


Shooting light sources with narrow apertures in lowlight has a very nice side effect; all the lights in your picture will look like starbursts (similar to the effect you get using a starburst filter). This could make your picture stand out from the rest, but remember shooting in low light conditions with narrow aperture will require either a very high ISO setting or very low shutter speeds or a combination of both.

9. Shutter Speeds and How it affects the lights


The shutter speed used to capture the scene also affects the way the lights are rendered in the picture. Slower shutter speeds capture movement in the lights and faster shutter speeds freeze them completely.


Christmas lights and shutter speeds


Lights appear larger and a bit blurred when shot using slower shutter speeds whereas they appear smaller (like points of light) when shot with faster shutter speeds.

10. Capture Details


how to photograph christmas tree
Photo by: Flood G


You have taken a lot of care to make sure your Christmas tree look great and have decorated it with all sorts of items carefully chosen to match the scene. Once you have captures wide shots of the Christmas tree it’s time to move in close, use a macro lens if you have one and capture details like branches, presents and lights.

11. Mind the Reflections


christmas tree photography
Photo by: Mohammadali F


When shooting up close, shiny objects could reflect the world around them and that could mean you and your camera could also get reflected. Sometimes it creates a very interesting picture and sometimes it appears as a detail which the photographer forgot to notice while photographing the object. Keep this in mind and if you choose to keep reflections it should appear intentional and make it artistic else it is better to avoid it entirely by changing shooting angles.

12. Take Christmas Portraits with Your Christmas Tree Included


christmas portraits
Photo by: Jeff Meyer


Take pictures of your friends and family and try to include your Christmas tree also in the shot, to get best results, turn on every light on the Christmas tree, adjust ambient light (light in the room) to match the brightness of the lights in the Christmas tree. It is better to keep the ambient light a bit lower than the lights on the Christmas tree to create a mood. Remember when photographing people in such conditions it is better to get shutter speeds a bit faster even if you are shooting on a tripod as chances are your subjects could move slightly and cause blur. Raising the ISO is many times the only option to get the required shutter speed.

13. Add Light to the Scene


photographing christmas trees
Photo by: Lulu Lovering


To get a sparkly feel to your Christmas pictures you will need an additional light source (other than the lights on the Christmas tree) this is even more important when shooting with narrow apertures. It could either be a continuous light source or your camera flash.

14. Using Flash to Add Light


tips for photographing christmas trees
Photo by: Jason Mrachina


When using flash to capture Christmas pictures make sure you only use it as a fill light source and never as the main light. Also never use flash front on, use it bounced off the walls or the ceiling. Control the brightness of the flash or use adequate flash exposure combination to get the balance between the ambient and the flash right. It is also advisable to set your flash to rear curtain (second curtain) sync and drag the shutter to expose the scene. If you room is lit predominantly with tungsten lights then gel your flash yellow to match the colour temperature of the room lights.

Have fun, use the tips, take lots of pictures and do share it with us in comments… Merry Christmas.

Related Reading


  1. Best Camera Settings for Photographing Christmas Lights
  2. 12 Photography Tips for Better Party Photos
  3. Shaped Bokeh Tutorial
  4. 20 Digital Photography Tips for Better Christmas Pictures
  5. How to Photograph Christmas Lights

Monday, 23 December 2013

Diy Flash Diffuser for Macro Photography Using Styrofoam Plate


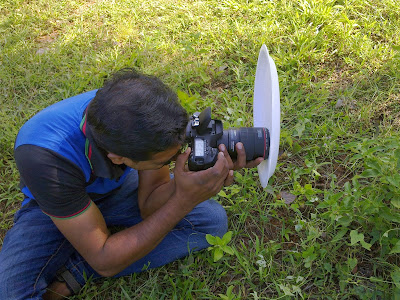
This is perhaps the easiest flash diffuser project ever. Take a styrofoam plate, the larger the plate the better, it need not be circular even rectangle or oval shaped plates work quite well.


diy flash diffuser
diy flash diffuser


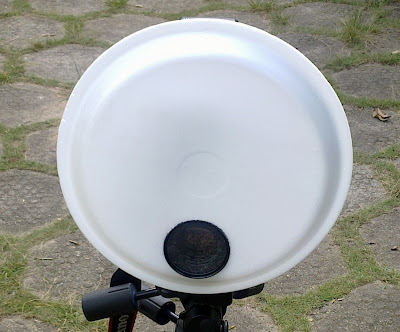
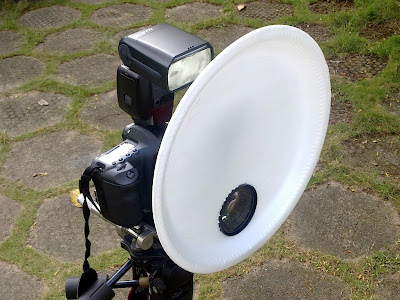
Take out your lens filter, press it gently on the styrofoam plate so as to make a mark, then cut out the circle,  (cut the inside of the line so that the plate attaches tightly on to the lens filter) attach the filter back on to the lens, slid the styrofoam plate on to the filter and you are good to go.


styrofoam dish flash diffuer


There is some light loss with this setup as a considerable amount of light gets reflected back from the white surface of the styrofoam plate. But the impotant thing for us is that most of the light will pass through the plate, the surface of the plate now acts as the light source which is many times larger than the flash head also the light gets spread in all angles evenly illuminating the area ahead.

With this diy flash diffuser it is possible to get soft light very close to the lens which is not possible without it as the lens itself would cast its shadow on the subject. 


macro photography flash diffuser


This will also work with a dedicated flash unit mounted on top of the camera. The most important thing to remember is that this setup is only effective for macro photography, for subjects that is a little bit distant from the camera this wont work well due to the light loss and spread of the light beam. But for macro photography this works like a charm.

Here's a shot taken with our diy flash diffuser


flash diffuser for macro photography


Related Reading


  1. How to turn any Lens into a Macro Lens the Lens Reversal Technique
  2. How to Lock a Lens at a Certain Aperture
  3. Stacking Lenses with Coupling Rings for Extreme Macro Photography
  4. Macro Photography Using Extension Tubes
  5. Lens Extension and Effective F Stop

Saturday, 21 December 2013

Star Trail Tutorial

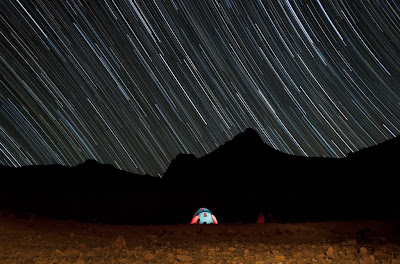
The photo given below was taken in the Moroccan Atlas mountains while on a hiking trip. The total exposure time is 56 minutes, the photo consists of 28 2-minute images stacked using startrails.exe.


Star Trail Tutorial
Star Trail Tutorial


The map position is very approximate.

Here's my tutorial:


To capture the movement of the stars at night, you'll need to have a very, very long exposure, 5 minutes as a minimum, but usually more like an hour. To do so, you could just produce one ultra-long-exposure frame using your camera's bulb mode, but there are several problems with that. First of all, if any problem occurs during this time (ie your camera shuts down, the memory card has a write issue) you will lose all the information, which can be a tremendous annoyance if you had a three-hour exposure underway. In addition, if your picture has any other elements that might be brighter than the stars, such as the tent in my shot, (which it should have to make it an interesting image) these will be very; very overexposed if you use a shutter speed such as 60 minutes. Therefore, almost everyone doing star trail pictures uses the so-called stacking method, in which a number of images are taken, and then stacked to simulate a very long exposure.

Below, a step-by-step guide:


Startrail Tutorial
Startrail Tutorial  - This photo was taken in the  Moroccan Atlas
 mountains while on a hiking trip. The total exposure time is 39 minutes,
 the photo consists of 13 3-minute images stacked using startrails.exe.


1. Set your camera up on a very sturdy tripod, and frame your composition. If possible, frame your shot before nightfall, since when the stars appear it will be very difficult to compose because of the lack of light.

2. Decide how long you want your total exposure to be. Keep in mind that the stars will be moving along concentric circles centered on the northern star. Therefore, if you point to the north, you will need a much longer exposure for your trails to be a of a given length, and conversely, it you will need a shorter exposure as you point more to the south.

3. Now, you will divide this total exposure time you chose into many shorter exposures. I like to use 2 minutes, but use anything that does not overexpose any parts of the frame, while trying to stay under 8 minutes or so. So say you wanted a total exposure time of 56 minutes, which would be 28 2 minute exposures. You will achieve this by setting your camera to the bulb setting in manual mode and then connecting an intervalometer (50$ online). The intervalometer will send the signal to your camera to open and close the shutter every two minutes. The only reasons cameras are not able to do this natively, as well as many other features, is because manufacturers purposefully limit their functionality. So set your intervalometer to the desired exposure time and number of frames, and set the interval between frames to 0. (in my case: exposure time:2 min; number of shots: 28)

4. Set the focus to infinity manually and start the intervalometer. Wait until all the shots are taken.

5. Now the stacking: you will need to use a program that stacks the images by choosing the brightest pixel when there is a conflict. This will make sure the little pieces of star trails are all combined in the final image. I recommend startrails.exe for windows, but you can just google star trails stacking and you’ll find lots.

Have fun: Thomas Sittler

Related Reading


  1. How to Photograph the Sun
  2. How to Photograph the Milky Way
  3. How to Photograph Rain Drops
  4. 22 Tips for Photographing Stunning Seascapes
  5. Forest Photography Tips

Friday, 20 December 2013

Inner Diffuser Baffles in Softboxes – What is it for? What does it do?

Some softboxes come with two layers of diffusion panels, a smaller one on the inside of the softbox very near to the light bulb and a large one that you place on the outer panel to cover the front.


inner diffusion panel in softbox


Not all softboxes have two diffusion panels, it is generally found on larger ones. The function of the inner diffusion panel is to spread the light evenly across the front diffusion panel. Without the primary diffusion panel light distribution will not be even across the front, there might be hotspots in the center and less light towards the corners.


What does the second diffusion panel in softboxes do


Making light pass through an additional layer of diffusion material does two things, it softens the light a bit and also lose a little bit of light. The design of the softbox as well as the light you are putting inside has a very strong bearing on how even the light distribution is across the surface. Generally the larger the lightbox, the more you need to disperse the light evenly from the main source.

Having an extra layer of diffusion material does not mean you have to use them on all occassions, for example if you are using continuous light sources like the Westcott Spiderlites then it will be a good idea to take off the inner diffusion panel, as the light from those fluorescent bulbs are already soft and it is highly unlikely that you will get a hotspot in the center. Removing the inner diffuser makes it possible to get the maximum output out of the CFL’s. But when shooting with strobes it is better to leave it in place to get soft even light across the surface of your softbox.

Related Reading


  1. Photography lighting - 12 Questions to ask yourself before clicking a picture
  2. Candles Oil Lamps and Flames
  3. Effect of Location on Light
  4. Seasonal Quality Of Light
  5. Gobos, Cutters and Flags

Thursday, 19 December 2013

DIY 10 Stop ND Filter Using Welding Glass


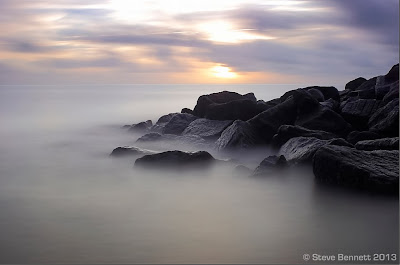
The purpose of Neutral Density (ND) filters is to reduce the amount of light entering the camera lens. This makes it possible to get long exposure times needed to blur moving water, clouds etc and can also be very helpful to get rid of people in a scene when shooting at locations favored by tourists.


nd filter
Shot taken with a 10 stop ND filter


ND filters are made of special glass that reduces the light level evenly across the visible spectrum there by retaining the original white balance intact. Superior glass also reduces chances of any aberrations or ghosting occurring in the image. All major manufactures like B+W, Hoya etc make quality ND filters. The only downside of ND filters are its price, like anything related to Photography, ND filters are not cheap good quality ND filters cost well in excess of $100 and many amateurs find it hard to justify the price.


neutral density filter
Shot of the same scene as above without the ND filter


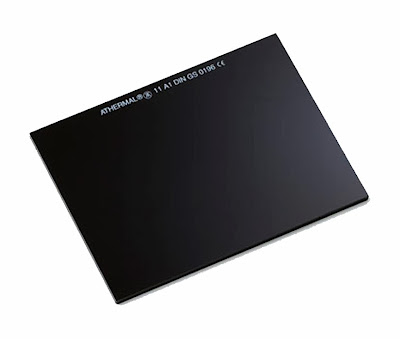
So in this article we will discuss how we can create a 10 stop ND filter using welding glass. Welder’s glass comes in various strengths ranging from 4 stop to 11 stops, choose a strength depending upon your purpose (how bright is the scene and how long do you need the shutter speed to be) darker glass produces longer exposure times and vice versa.

When considering purchase of welding glass it is good to know that the numbers on the welding glass are not the same as stops. I have only worked it out for the ones I use which are:

#8 = 10 stops
#9 = 11.5 stops
#10 = 13 stops

One other thing when using very dark ND filters, is that the viewfinder needs to be covered to stop light leaking in through the viewfinder, which can get past the mirror when it is raised. Some modern cameras have a shutter built in to close the viewfinder but most doesn't. I use a piece of black gaffer tape over the eyepiece. This also stops the cameras meter giving an incorrect reading.


DIY Welding Glass ND Filter


Before we proceed any further let us be clear on certain aspects, welding glass is not designed with photography in mind, they are also not of the same optical quality as ND filters. This means there are chances of distortion, ghosting or loss of image quality when photographing using welding glass.

The pictures will also have strong color casts depending on the type of glass being used but this could easily be corrected if you shoot in RAW file format.


neutral density filter using welding glass
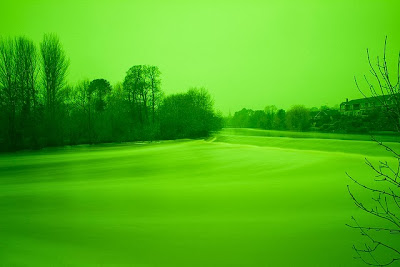
This is how the ND filter shot looks straight from the camera
without custom white balance.


However I have found that if you choose a reasonably good quality welder’s glass to make your ND filter you will get images comparable to that taken with dedicated ND filters, especially so if there is no light falling at the filter from angles that are far from perpendicular to the filter plane.

Attaching the DIY Welding Glass ND Filter to the Lens


If you google it, you will see that many photographers use different techniques to attach the filter to their lens.

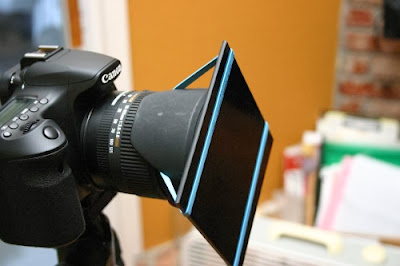
Aaron Czeszynski’s article at Diyphotography.net shows a really simple method of attaching the filter to the reversed lens hood using rubber bands.


welding glass filter
Photo by: Aaron Czeszynski 


Alex Wise in his photography blog alexwisephotography.net uses rubber bands to attach the filter directly to the camera.

diy neutral density filter
Photo by: Alex Wise


Both techniques is simple to use, but one should be careful and ensure that there is no light leaking in from the point where the lens and filter meet, else everything is spoilt. Another disadvantage of these techniques is that you cannot use a lens hood when the filter is attached like this. And as we explained earlier non image forming light (light falling at the filter from angles that are not perpendicular to the filter plane) could seriously reduce image quality and a proper lens hood could do a lot of good in such situations.

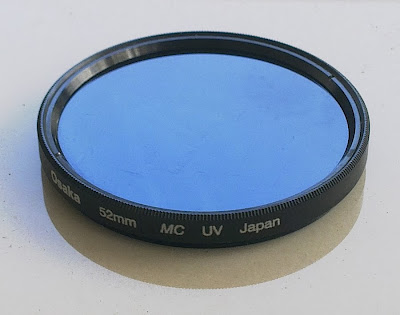
So what I did was to remove the glass from a broken/damaged filter take it to a optic store and in no time they cut the welding glass to fit the filter perfectly.


DIY ND Filter
DIY ND Filter


Wow a neat looking 10 stop ND filter in no time, the welding glass cost me Rs 30 and the optician charged Rs 20, even if I put in my travelling expenditure it is well under Rs 70 (approximately 1 $).


diy welding glass nd filter

And what's even better is the fact that you could use a lens hood as normal which is a significant advantage over other methods. Check out this post if you need to make a hood for your lens.

Here are some shots taken with diy welding glass ND filter for your inspiration.


welding glass nd filter

welding glass nd filter

welding glass filter photography

neutral density glass filter

welding glass camera filter

diy 10 stop nd filter

By: Steve Bennett


Related Reading


Wednesday, 18 December 2013

Best Camera Settings for Photographing Christmas Lights

We had published a series of articles on Christmas photography and there is one dedicated to photographing Christmas lights. However ever since the article was published I’ve been receiving mails asking about camera settings to effectively capture Christmas lights.


Best Camera Settings for Photographing Christmas Lights
Photo by: Justin Brown


It is evident from the question itself that some of our readers find it hard to figure the right combination of exposure values manually. So here are certain settings for your digital camera that will ensure that you get what you desire, no matter what the prevailing conditions are. With these settings you simply can’t go wrong. Among the bunch of pictures you take, you will surely find the one that your heart desired.

Best Digital Camera Settings for Photographing Christmas Lights


1. Set file format to RAW

Camera RAW File Format


2. Set White balance to Daylight or Tungsten (I know you can change it later if you shoo RAW, but just do it)

camera daylight white balance


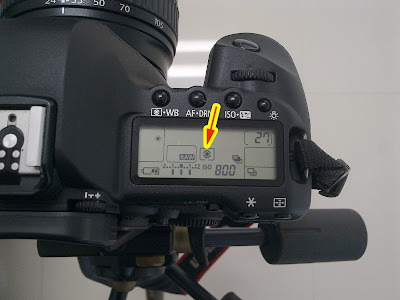
3. Set ISO to ISO 800

camera iso settings
camera iso settings


4. Set Metering mode to Matrix / Evaluative

camera matrix or evaluative metering mode


5. Set focusing to center focus point only

6. Set camera to Program (P) mode

camera program shift shooting mode


7. Set drive mode to Continuous

camera continuous shooting mode


8. Set Auto Exposure Bracketing to 1 stop.

camera automatic exposure bracketing


9. Whenever possible shoot with your camera on a tripod or set on a stable surface. (when shooting on tripod set ISO to ISO 100)

10.  Any lens within focal lengths of 18mm to 35mm will be the ideal choice depending on your camera format.

Why these settings work?


RAW file format ensures that you have at least a 1 stop margin of error for exposure. It also makes it possible to shift the white balance to any mode in post processing.

We are setting ISO to ISO 800 because it will ensure reasonably fast shutter speeds to get sharp pictures when shooting handheld. Most modern cameras handles noise very well up to ISO 800, some could even give you clean pictures with much higher ISO’s. Thus ISO 800 is chosen as the best compromise between image blur and image noise. 

Matrix or Evaluative metering mode is the most advanced metering mode in today’s digital camera. When set to this mode the camera divides the entire frame into many small grids and evaluates light levels within all these grids; it then compares the data with thousands of similar scenarios which are already stored in the camera's memory before deciding the exposure values.

We are setting the focus to center focus point only because center focus point is the most sensitive focus point in most digital cameras. Having only one focus point ensure s that the camera does not accidentally focus on any other area than what the photographer intended. Focus on the part of the scene with your center focus point and use focus lock to recompose your frame.

We are making use of the Automatic Exposure Bracketing feature of the modern digital cameras to cover any exposure error. When we shoot in Program mode with 1 stop A.E.B and continuous shooting mode the camera takes three different pictures with 3 different exposure settings changing both Aperture and Shutter Speed.

For example


If we are photographing a scene in program mode with 1 stop AEB and the camera meter is indicating aperture f/7 and shutter speed 1/200 @ ISO 800.

  1. The first picture will be taken with the above settings – which will be the correct exposure as per camera meter.
  2. Then the camera will take a 1 stop under exposed picture. New exposure will be aperture f/8 and shutter speed 1/320 @ ISO 800.
  3. Finally the third picture will be a 1 stop over exposed picture. New exposure will be aperture f/5.6 and shutter 1/160 @ ISO 800.


The camera is shifting both aperture and shutter speed to get to the desired exposure values because we are in Program mode, had we been using Aperture Priority or Shutter Priority mode instead only one variable (either aperture or shutter speed) will be change depending upon the mode selected. But for photographing Christmas lights I find Program mode and the auto bracketing feature to be the best combination.

So between RAW file format, and 1 stop exposure bracketing we are actually talking about possibility to correct exposure up to 2 stops, the need for which will be hightly unlikely with the Matrix or Evaluative metering.

Shooting Tips


Whenever possible take your reading from a neutral area of the scene, do not meter directly from the lights or from the shadows, this will ensure accurate exposures.

Shoot in bursts, take three shots continuously by keeping the shutter pressed this will ensure you get all three frames with same composition and also reduce chances of shake.

If you find that your camera is struggling to achieve focus (modern cameras seldom face this issue) shift to manual focus and focus manually. You can use live view mode if your camera has the option and use the zoom in feature to ensure accurate focus.

Remember if you turn off your camera, the Auto exposure bracketing will be reset (depends on your camera make and model) and you will have to set it again.

Related Reading


Tuesday, 17 December 2013

How to Photograph Light Streaks


This post is in response to some e-mails we received lately, although the question was framed differently like:

  1. How to photograph light through trees?
  2. Light bursts coming through the trees?
  3. How to Photograph Rays of Light?
  4. How to shoot "ray of light" effectively?
  5. How can I get photos showing the "shaft of light" effect?
  6. How to take a picture with light streaks?
  7. How do people get those light streaks on their pictures?

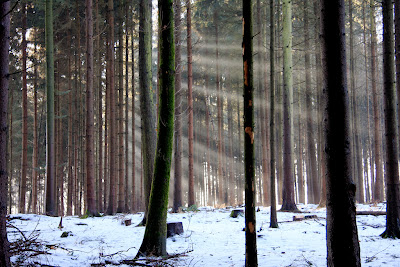
We are sure what they all wanted to know was how to take a picture like the one given below.


lightstreaks
Photo by: Raghu Ram
Exif data of this shot:

Camera : NIKON D7000
Lens : Nikon 18-105 f/3.5-5.6G ED VR
Focal Length : 18mm
Shutter Speed : 1/320 secs
Aperture : :f/8
ISO: 800Time
Time : 08.18 AM
Location : Neyyar WIldlife Sanctuary, Kerala, India.

To capture a picture like this you need to get several things right, some that you can control (eg. Camera settings) and some that you cannot. To capture light streaks the primary requirement is a light source. It could be natural (sunlight) or artificial. Secondly you need something in between the light source and the camera to model the light (trees and branches work really well). And finally you need mist, smoke or dust in the atmosphere to reflect the light (only then will you be able to see the streaks).


photographing rays of light
Photo by: Romain Guy


The most important factor when photographing rays of light is the amount of pollution present in the air. It could be mist or fog (moisture will reflect light) smoke or dust; the type of pollution does not matter, what matters most is the amount. Too much and you will not be able to see the light rays and too little will not reflect enough light to show the rays clearly. Getting just the right amount is the key to great light streaks.

Tips for Photographing Light Streaks


1. Choose the right time of the day to shoot light streaks


Early mornings is the best time to photograph rays of light shining through the trees, second best option is late evening.

2. Hide the light source


Try to hide the light source (if it’s the sun hide it behind a tree) to avoid highlight clipping. If you include the light source in your composition, chances are more that the contrast range becomes too much for your camera sensor to handle.

3. Choose the Right Location


Light sreaks work well when shot in a high contrast location where the light is falling on to a high contrast (dark) background.

4. Metering


Metering is the trickiest part, to make matters easy use automatic exposure bracketing feature and remember not to take meter reading either directly from the light rays or from the darkest shadows, choose something in between.

5. Dealing With Lens Flare


When trying to capture rays of light, on many occasions you will be shooting directly into the light source and this could cause lens flare. While on certain occasions lens flare actually add to the aesthetic quality of the photograph on certain others it actually takes away from the picture. So be aware of possibility of lens flare. You can control lens flare to an extent by using a lens hood,  keeping  your filters and the front element of your lens clean etc.

Here are a few more for your inspiration.

How to Photograph Light Streaks
Photo by: Morbcn


tips for photographing light streaks
Photo by: ManImMac


How to Photograph Rays of Light
Photo by: Chris Smith

How to take a picture with light streaks
Photo by: mcmamauri

Light Streaks
Photo by: Daniela Hartmann

light streak photography
Photo by: Remi Lanvin

Related Reading