Monday, 28 April 2014

Creative Architecture Photography Composition – Deliberately Tilting the Camera


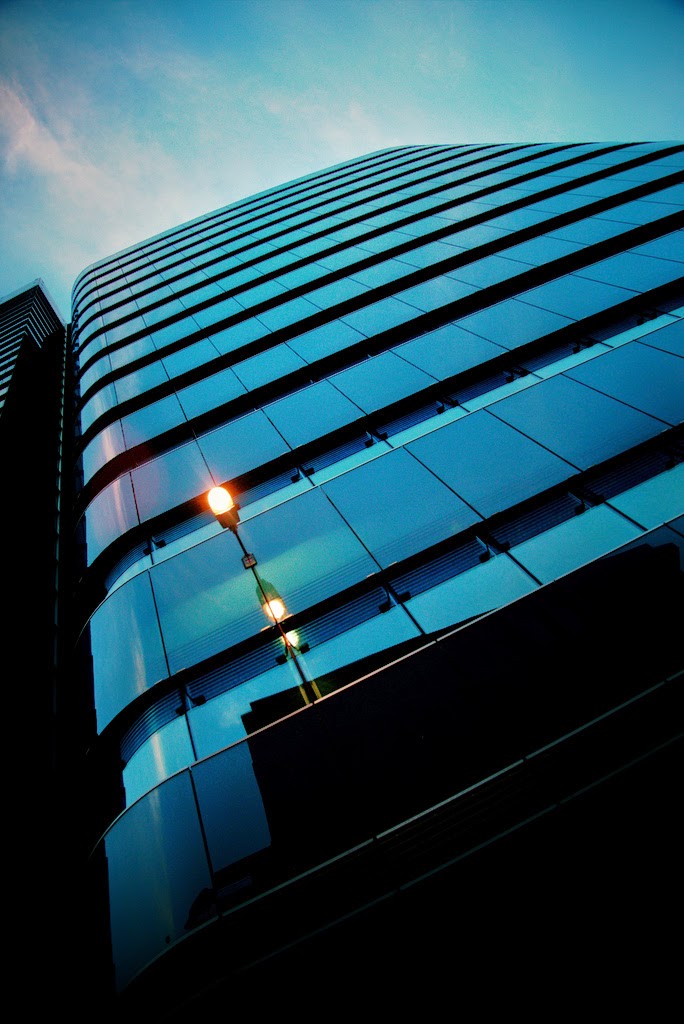
One way to create dynamism and interest in detail shots done in an abstract manner is to deliberately tilt the camera to the side. This creates tension in the image making it somewhat disorientating but exciting.


Creative Architecture Photography Composition Deliberately Tilting the Camera
Photo by: Simon & His Camera 


Tilting the camera to one side causes both vertical and horizontal lines of structures to converge diagonally, however this technique is seldom used for shots that feature the entire building. As we humans are not used to seeing leaning buildings and structures, we expect them to be perfectly level on the ground, tilting the camera makes the buildings look as if they are falling and this unsettles our sense of balance. The technique should be considered as a means of creative expression and works best when shooting abstract detail shots of buildings that has little dynamism on its own.

Related Reading


  1. Architectural Photography Composition Tips - How to Photograph Long, Low Buildings
  2. How to Photograph Tall Buildings from Close Up
  3. Tips for Removing any Obstructions and to un-clutter the Front Elevation
  4. Architectural Photography Tutorial – How to Put the Camera At a Higher Angle
  5. How to Photograph Tall buildings? How High Should I Position My Camera For Best Results?


Sunday, 27 April 2014

Architectural Photography Composition Tips - How to Photograph Long, Low Buildings


In the previous article we discussed how to photograph tall buildings from close up; now let’s discuss how can we photograph long, low building such as industrial parks, warehouses, retail parks etc.


Architectural Photography Composition Tips - How to Photograph Long, Low Buildings
Photo by: Dylan Toh


By their very nature, these structures are very un-inspiring and so it is very difficult to make an interesting photo of them. When confronted with such a situation we photographers basically have three options.

1. Shoot the structure from a distance so as to include the immediate surroundings also in the picture.


This technique will work if the building is situated in an attractive landscape which could add interest, drama or contrast to the shot. Also you need to be able to move a distance from the building and be able to get a clear unobstructed view of the structure. The trick to make it work lies in the placement of your main subject.

For example

Imagine you are photographing the front elevation of a long, low building from a front on position. By using a wide angle lens to include the full width of the building and placing the building just above the central horizon line, one could use the receding lines in the image to show the dynamic structure and fill the remaining top third of the frame with a clear blue sky.

Alternatively you could compose your picture by placing the building a little below the central horizon line so that more area of the frame is now occupied by the exaggerated clear blue sky which adds drama to the picture.

2. Photograph the building at an oblique angle from close up.


The idea here is to exaggerate the line dynamics of the building and use it to add interest to the picture. Get very close to the structure, compose your frame from an oblique angle using a very wide angle lens to include the whole building in the frame. Shooting from close up using very wide angle lenses exaggerates perspective thus adding interest to the otherwise dull scene.

3. Shoot from a high vantage point overlooking a corner of the building and shoot low level aerial pictures


This is one of the best ways to make interesting photographs of long, low buildings. One requirement is that you need a high vantage point to shoot from which overlooks a corner of the building. With such low level aerial shots, it appears as if we are looking down on the structure from an angle. This creates strong line dynamics within the image and also significantly expands the area of the picture taken up by the building. Also in such compositions some portion of the roof is also visible which adds to the three dimensional nature and also gives viewers a better sense of scale of the whole building. One thing that contributes to the interestingness of such shots is that, it is one angle that we normally don’t see and it puts things in an entirely different perspective.


Related Reading


  1. Tips for Removing any Obstructions and to un-clutter the Front Elevation
  2. Architectural Photography Tutorial – How to Put the Camera At a Higher Angle
  3. How to Photograph Tall buildings? How High Should I Position My Camera For Best Results?
  4. How to Effectively Convey a Sense of Scale in Architectural Photography?
  5. Architectural Photography Tips – How to Photograph North Facing Buildings

Wednesday, 23 April 2014

How to Photograph Tall Buildings from Close Up


While photographing tall buildings in a crowded neighborhood, we often find that there simply isn't enough room for us to move farther away from the building. The possibility of finding a vantage point from a distance will be next to none as other buildings surrounding the one we wish to shoot will surely obstruct our view from the distance, at least partially.


How to Photograph Tall Buildings from Close Up
Photo by: Kenny Mc Cartney


From a very close distance even out widest lens will not be able to capture the entire view in a frame. In such cases the best alternative you have is to shoot a vertical panorama of the scene and stitch the images together using a rectilinear projection in Adobe Photoshop. This allows you to correct the distortions caused by converging verticals in the scene.

A vertical panorama is exactly like a regular panorama (horizontal) one difference being here you move the camera up or down instead of moving from one side to another (moving sideways). Vertical panoramas could be easily done with a tilt shift lens with little or no perspective distortion. All you need to do is shift the lens all the up or down and shoot the scene and then shoot different frames shifting the lens in the opposite direction with at least 25% overlap between frames.

The picture given at the top of this article shot by Kenny Mc Cartney is a good example of a Vertical Panorama (Vertorama) created using a tilt shift lens. The 165m (541ft) tall building was shot from a mere 20 meters distance. It is stitched together from 5 different images, all shot with the camera held horizontally for maximum resolution.

Now you can shoot vertical panoramas with normal lenses too, but you will need to correct for perspective distortions while post processing; it is a bit more work at the computer, not as tidy as the results produced by a tilt shift lens and distortion correction causes a loss of resolution, but still a very effective way to photograph tall buildings from a very close distance.


Related Reading


  1. Tips for Removing any Obstructions and to un-clutter the Front Elevation
  2. Architectural Photography Tutorial – How to Put the Camera At a Higher Angle
  3. How to Photograph Tall buildings? How High Should I Position My Camera For Best Results?
  4. How to Effectively Convey a Sense of Scale in Architectural Photography?
  5. Architectural Photography Tips – How to Photograph North Facing Buildings

Tuesday, 22 April 2014

Tips for Removing any Obstructions and to un-clutter the Front Elevation


When you prepare a property for a photo-shoot there might be several elements that either obstructs the view, is not required in the frame, will give a negative impression to the viewer or take away the viewers’ attention from the main subject i.e. the building; here are some tips to help you get around them.

Look out for garbage/recycling bins, advertising boards, hockey or basketball nets, garden tools, old newspapers, water hoses, pool items and toys, cloths left on the clotheslines etc. also watch out for excrement from any pet animals on the yard.

Any of these items if included in the picture should be deliberate and to create a feel of activity, of human presence etc. else it is better they are all removed from the scene. You could move them temporarily to the garage if there is one or place them somewhere towards the rear of the house (the side which will not be featured when shooting an angled perspective of the front elevation).

Dealing With Cars


If there are cars, it is better to park them in the garage or on the opposite side of the street. It is not advisable to park the vehicle directly in front of the property.

At times you will come across situations when there are parked vehicles on the street or a garbage bin, directly in front of the property you wish to shoot and you have no means to move them from the frame. In such situations the best solution to get around the problem is to raise the height of the camera and shoot from a height that will help you exclude any obstructions in front of the building from the frame. You can use a stepladder, shoot from the top of a vehicle, raise your camera above on a strong light stand attached with a tripod head and use CamRanger to operate the camera, find a suitable vantage point on any building which is opposite the one you wish to shoot and has a clear, unobstructed view etc.

One other option you have if the building is some distance away from the street (is situated in a large compound or is separated by a walkway or a wide pavement) is to use a wide angle lens and photograph the building from an oblique angle that excludes the vehicles on the street altogether.

When none of this works and you are left with no options other than to photograph the building with the vehicles in the frame, you can try to achieve some artistic effect and make it look that the vehicles were intentionally included in the frame by capturing the reflection of the building in the car’s glossy paint work or on the front windscreen. Just make sure the vehicle is clean and tidy and is presentable (not a shabby one with dents and other issues) you could maybe change the color of the vehicle or do some minor touch ups to make them look good in post but try to get most out of the situation while on location. Also try not to include the vehicle registration plates in the image, they serve no purpose, is a big visual distraction and will also date your image.

In cases where you need to photograph the exterior from across a street, you basically have three options. There will be traffic on the street; the amount of traffic will vary depending how busy a street is however the options you have here are:

  1. Patiently wait for breaks in the traffic to take your shots.
  2. Shoot from a higher vantage point so as to avoid the street and the traffic altogether from the frame.
  3. Shoot with a slower shutter speed so as to include the vehicles as streaks or blur for an artistic feel. This works especially well during early mornings and late evenings when the ambient light levels are low and the vehicles all have their lights on.


Related Reading


  1. Architectural Photography Tutorial – How to Put the Camera At a Higher Angle
  2. How to Photograph Tall buildings? How High Should I Position My Camera For Best Results?
  3. How to Effectively Convey a Sense of Scale in Architectural Photography?
  4. Architectural Photography Tips – How to Photograph North Facing Buildings
  5. Right Weather For Photographing Architecture

Sunday, 20 April 2014

Architectural Photography Tutorial – How to Put the Camera At a Higher Angle


The average height of a human being is around 5’3” and shooting from approximately this height replicates the scene in front in a way that feels most natural to us. However in the case of architectural photography there is often the need to put the camera at a much higher angle.

One such situation is when photographing tall buildings, we discussed in our previous article - How High Should I Position My Camera for Best Results? That the right height to shoot tall buildings is from 1/3rd of the height of the building from the ground. 1/3rd height of tall building means a height of several feet / meters from ground level. Even when we are not photograph very tall buildings we might need to raise the height of the camera when there is some obstruction in front of the building which we would like not to be included in the shot.

For example

Imagine a situation where there is a low rise gas station (any building) directly in front of the building that we wish to shoot. If we cannot find a suitable spot from within the buildings compound from where we could get the whole structure in view using an ultra-wide angle lens, our only option is to position ourselves in front of the low raise building, raise the camera to a height which is well above the low rise building and shoot.

How to Put the Camera At a Higher Angle


Architectural Photography Tutorial – How to Put the Camera At a Higher Angle


Depending on how high you need the camera to be there are several options available; the range of options available are varied.

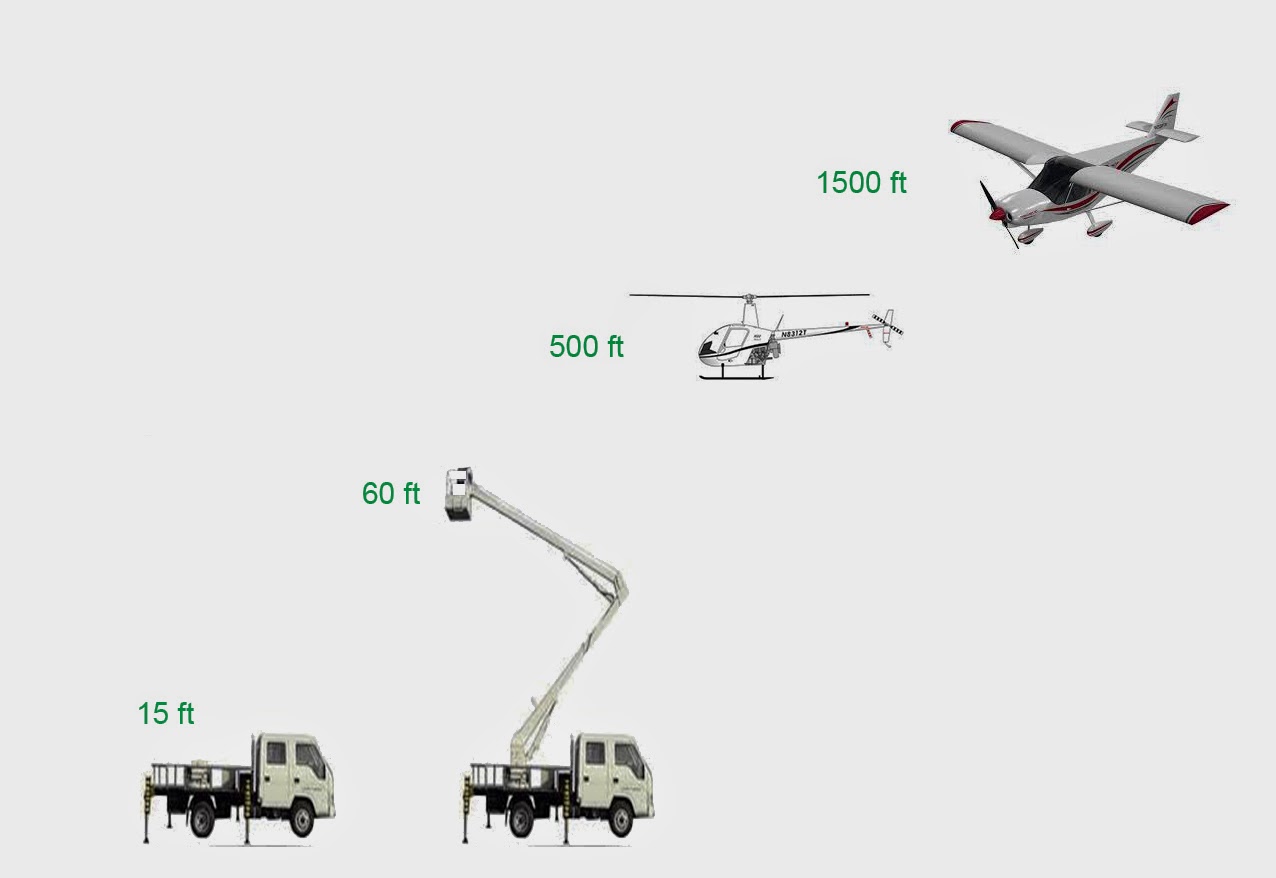
If you only need to raise the camera a few feet you can shoot from a step ladder, or the roof of a motor vehicle. This will help you get sufficiently high to shoot over parked cars, or short fences or walls and get much cleaner shots than shooting from ground level.

Attaching a tripod head to a very sturdy and tall light stand would also work. You could easily see the live feed from the camera for composition and focus and remotely control the camera using your smart phone, tablet or laptop by using wireless controllers like CamRanger .

To raise the camera even further you may need a scissor lift, a scaffolding tower or a hydraulic platform, better yet you can shoot from another building if one is situated in a convenient position, with a clear unobstructed view and if permission could be obtained.

In situations that require much more height than these conventional methods one need to hire a helicopter or even a small air plane to shoot from. These options have the added benefit that we could now shoot a unique ‘whole-site’ perspective which is not possible from any other angle.


Related Reading


  1. How to Photograph Tall buildings? How High Should I Position My Camera For Best Results?
  2. How to Effectively Convey a Sense of Scale in Architectural Photography?
  3. Architectural Photography Tips – How to Photograph North Facing Buildings
  4. Right Weather For Photographing Architecture
  5. Finding The Right Time of the Day to Photograph Exteriors

Saturday, 19 April 2014

How to Photograph Tall buildings? How High Should I Position My Camera For Best Results?


We have discussed about camera height and the way it influences the subjects and the perspective when we were discussing tips on portraiture. You can read the article here - Classic Portraiture - Determining Camera Placement and Height. Well the same principles are applicable for every subject no matter how big or small the subject is.


How to Photograph Tall buildings
How to Photograph Tall buildings: Photo by: James Cridland

So the general rule is; if you photograph a subject from a very low angle you will get an exaggerated perspective where the subject will look much bigger than it actually is. And if you photograph it from high above then you will get a perspective as if you are looking down at the subject and as a result it will appear tiny, minuscule or irrelevant.

When we are photographing subjects like architecture, it is not only the perspective that we are worried about, we need also make sure the distortions are kept to the minimum, what this implies is that we will need to keep our sensor plane parallel to the building while being able to include the entire building in the frame.

Limitations of Tilt Shift Lenses - Problems Causes by Excessive Shift Movements


Usually when faced with such problems, it is specialized hardware for image capture like tilt shift lenses that photographers resort to, to get the job done. A wide angle tilt shift lens will be able to include the whole building in the frame without including excessive foreground. But when working in crowded cities, where space to move backwards is very limited even those extreme wide angle lenses fail to include the whole building in the frame when photographing from ground level. In such situations photographers may need to use excessive shift movement to cover the entire building (this can result in the building looking top-heavy with verticals appearing to diverge at the top. It is the geometrical distortion that causes the outermost part of the field of view to become elongated).

Apart geometrical distortions there is the issue of losing image quality when using extreme shift movements. When the lens is shifted to its limits, the image sensor in the camera is actually recording data that comes from the outer limits of the lens’s circle of illumination. This could considerably reduce image quality and in extreme cases cause visible Vignetting in the corners.

Right Height To Position The Camera For Photographing Tall Buildings


How to Photograph Tall buildings How High Should I Position My Camera For Best Results


The right height to position the camera when photographing tall buildings is approximately one third of the buildings height. From this height the camera will be able to give some positive perspective distortion (meaning it gives some emphasis to the building) and the added height will enable most lenses to capture the entire building in the frame without including excessive foreground (in case of normal lenses) or having the need to use excessive shift movements (in case of tilt shift lenses).

Why photograph from one third height of the building? Why not higher?


Selecting a vantage point that is higher than one third height of the building will diminish the stature of the building. The higher the vantage point the lesser the emphasis the building gets. So to produce an image where the building gets a reasonable perspective, stick to photographing it from approximately one third height.

Tip to Quickly Find a Suitable Vantage Point


One simple trick to easily find a suitable vantage point to shoot from (if none is identified in the immediate neighborhood) is to climb one third of the way up the building you need to shoot and look out any window in the direction which you need to shoot from. You will be easily able to identify any vantage point that provides a clear, unobstructed view of the building.


Related Reading


  1. How to Effectively Convey a Sense of Scale in Architectural Photography?
  2. Architectural Photography Tips – How to Photograph North Facing Buildings
  3. Right Weather For Photographing Architecture
  4. Finding The Right Time of the Day to Photograph Exteriors
  5. The Ideal Angle of The Sun for Photographing Exteriors

Friday, 18 April 2014

How to Effectively Convey a Sense of Scale in Architectural Photography?


When photographing architecture, especially large, majestic structures it is important to convey a sense of scale to your viewers. This is applicable while photographing both exterior views and also interior spaces.


How to Effectively Convey a Sense of Scale in Architectural Photography?
How to Effectively Convey a Sense of Scale in Architectural Photography? Photo by: Thomas Leuthard


What we really need to do is insert an element in the picture whose size every one viewing it will be familiar with. This element will act as a point of reference and viewers will be able to judge how big or small the surrounding structures are based on their relative size in comparison with the known element.

While any subject, the actual size of which most people are familiar with will work just fine; one subject that is guaranteed to add life and also an element of interestingness to the photograph is a human form. Yes you guessed right, include a person or a group of people in your shots and you immediately have a point of reference to effectively convey the scale of all other elements in your picture.


How to show a sense of scale in architecture photography
How to show a sense of scale in architecture photography: Photo by: Juan José Aza 


The human form is something that everyone is familiar with and is easily recognized; no matter how small it appears in the image or even if it is just a silhouette. The size of person in the picture reveals what the true proportions of other elements in the image to the viewers.


Related Reading


  1. Architectural Photography Tips – How to Photograph North Facing Buildings
  2. Right Weather For Photographing Architecture
  3. Finding The Right Time of the Day to Photograph Exteriors
  4. The Ideal Angle of The Sun for Photographing Exteriors
  5. Best Time of the Year for Architectural Photography

Thursday, 17 April 2014

Architectural Photography Tips – How to Photograph North Facing Buildings


Perhaps one of the most difficult assignments you could be called to work will be to photograph a building situated in a busy/crowded city and whose elevation faces true north. If you are wondering why, then I strongly recommend you first have a look at these two posts which we published earlier in this blog.

1. The Ideal Angle of The Sun for Photographing Exteriors
2. Best Time of the Year for Architectural Photography


How to Photograph North Facing Buildings


Yes buildings with elevations that face true north receive little to no direct sunlight during most times of the year. And be rest assured that most of your assignments will always be during the wrong time of the year. So let us discuss what options we have when faced with such a situation and what strategies should be adopted to produce professional quality images in such unfavourable circumstances.

Tips for Photographing North Facing Elevations


Chances of a building having an elevation that is facing true north are actually very slim. On most occasions the elevation will be slightly angled towards the east or the west while being angled north.

We know that sun rises in the east and sets in the west and the angle and elevation of the sun changes with different seasons. During summer months sun is much higher up in the sky than in winter months. Also during summer sun rises from a north easterly direction travelling in a southerly arc to set in the northwest direction. So if the building you need to photograph is angled towards northeast or northwest then chances are that the front elevation of the building will be briefly illuminated by direct sunlight during sunrise or sunset.

1. You could aim to get best results by planning to shoot northeast facing elevations early in the morning and northwest facing elevations in the evening. The greater the angle of the buildings elevation towards northeast or northwest the better.

2. Photographing building in crowded cities where the structure is surrounded on all sides by other buildings is generally a tough task. But in our case such a situation might actually work to our advantage. In certain cases you could see that the front elevation of a north facing building is evenly illuminated by sunlight being reflected off buildings opposite it. This could actually produce some pretty decent results, only make sure you are not angling your camera in the direction of the sun.

3. Another option we have is to shoot the north facing elevation during an overcast day. When there are clouds in the sky, they act as a giant diffuser scattering sunlight, making it a very soft diffused light. Even north facing buildings are evenly illuminated in such conditions. Only problem will the reduced contrast and texture detail and the exposure difference between the clouds that is now acting as our light source (which is also in the composition) and the buildings. A graduated neutral density filter might come in handy in some occasions to even out the exposure difference and record detail in the clouds while keeping the building rightly exposed.

4. Shoot bracketed exposures - this is one of the times when a stacked exposure (HDR) could give you much better results than one single exposure. Rather than depending on softwares that create HDR images automatically, you could produce much better results (realistic images) by manual blending technique, which we will cover in detail when we get to post processing techniques for architectural photographers.

5. There is one final option that works like a charm every time. Let’s photograph the building during dusk more as a night shot. Now it doesn't really matter what direction the building is facing.


Related Reading


  1. Right Weather For Photographing Architecture
  2. Finding The Right Time of the Day to Photograph Exteriors
  3. The Ideal Angle of The Sun for Photographing Exteriors
  4. Best Time of the Year for Architectural Photography
  5. Weather Forecasting for Architectural Photography

Wednesday, 16 April 2014

Right Weather For Photographing Architecture


Photographing Architecture on Bright Sunny Days


Right Weather For Photographing Architecture
Right Weather For Photographing Architecture: Photo by: Randy Von Liski


Bright sunny days with clear blue skies and few fair weather clouds are the ideal weather conditions for photographing architecture. Sun being billions of miles away from earth causes sunlight to be very hard light. As a result direct sunlight on buildings produces sharp high contrast pictures with clearly defined shadows and rich saturated colors. Such hard light is great to reveal texture and detail in the buildings, especially when the light strikes from an angle.

One other advantage is the bright blue skies that we get, attractive sky is one important aesthetic element when photographing buildings. But that is not the only reason for choosing sunny days for out shoot. The exposure for bright blue skies and the building beneath it lit by direct sunlight are most likely to be even. So we could easily expose our sky and the building in one single shot as long as the sun is at some angle behind you.

Photographing Architecture on Overcast Days


Overcast conditions are generally not recommended for architectural photography. The major reason for this is the quality of light. When there are clouds in the sky, the overhead clouds acts as a giant diffuser not that far from the earth’s surface. This alters the quality of sunlight and makes it a soft even light which wraps around objects, penetrates even the most difficult spaces and fills in the shadows. As a result of light striking from many angles, even the shadow areas get much more light. This reduces the overall contrast of the picture and also hides textural details; as a result the building appears flat making the picture dull and boring.

Apart from the reduced contrast and texture there is one other problem; that is of exposure. We know that the clouds above are now acting as giant diffusers and this in effect makes them our new light source. Now we are trying to photograph a subject with the light source also in the picture. Obviously the clouds overhead are going to be many stops brighter than the buildings in the foreground. Now in certain cases you could reduce the problem either by using graduated neutral density filters or by taking multiple exposures (one for the sky and one for the building) and then combining them later in image editing programs such as Adobe Photoshop.

However not everything is bad about overcast skies, we know such conditions are very much preferred by photographers working in other genres of photography like landscapes, nature and even portraits; the soft diffused light along with a sky which has a lot of character could add a lot of mood and drama to the shot. In architectural photography too there are certain subjects that actually benefit from such conditions.

One such subject is north facing buildings. Elevations of buildings facing north receive very little to no direct sunlight depending on their exact position. Then there are building in crowded cities where sun never could light the entire building at once due to other buildings, structures, trees or any other object blocking the light. A building cut in two by direct sunlight and shadow is a very difficult subject to handle. In those situations overcast conditions could easily illuminate the entire structure producing much more pleasing lighting than on bright sunny days.

So you need to consider all aspects about the location of your building, the direction in which it is facing, are there buildings or other structures obstructing sunlight in the angle from which you wish to photograph etc. 


Related Reading


Tuesday, 15 April 2014

Finding The Right Time of the Day to Photograph Exteriors


In the previous article we discussed how to find the ideal angle of the sun for photographing exteriors of buildings. In this article we will discuss how to calculate the right time of the day when sun will be in that ideal position to shoot our building. Which is when sun is approximately 45° between the axis of the lens and the plane of the elevation.


Finding The Right Time of the Day to Photograph Exteriors


Calculating the right time of the day might appear very simple as we know that sun always rises in the east and sets in the west travelling in a southerly arc. Agreed it does not rise in the true east or sets in the direction of the true west. And depending upon the time of the year the elevation of the sun changes, altering the angle at which sunlight strikes subjects on earth. But how much difference can it make? Well……. not much and if you know the basics you will be able to correctly predict the right time of the day when sun will be in the desired position.

Though our calculations on the position of the sun are based on the fact that sun rises in the east and sets in the west there are some additional factors that need to be considered as they also affect our calculations. Whenever possible obtain a location plan of the building which clearly shows its geographical position some days before the actual shoot. You will be able to decipher the main elevations that need to be photographed using the location plan and a brief chat with your client who is familiar with the building.

Photographing Exteriors of Buildings that Faces East and West


As a general rule East facing elevations should be photographed in the morning and west facing elevations in the afternoon, unless you are trying for special effects by shooting the building when it is backlit by the sun.

Photographing Exteriors of Buildings that Faces South


Elevations that faces partially south (south-east or south-west) is guaranteed sunshine on a sunny day, unless it is completely surrounded by tightly packed buildings which are much taller than it.

For buildings that faces southeast, morning hours are the best and for buildings that faces southwest afternoon hours are ideal. The more easterly the angle the earlier will be the optimum shooting time and the more westerly the angle, the later will be the best time for photography.

It is very rarely that we find a building is facing true south. But if you are called upon to photograph one, you need to consider the most important secondary elevation (side) before finalizing whether to shoot in the morning or in the afternoon. If your composition is going to be from a southeast angle you need to photograph it in the morning and if your composition is going to be from a southwest angle you need to photograph it in the evening.

Problem Exteriors


Even though the principles we discusses work on most occasions, sometimes when photographing in crowded cities we find that there are other tall buildings opposite to ours that could block the sunlight when it is shining frontally at our elevation. In such situations it is recommended that you choose the opposite time of the day than you would otherwise choose.

For example


Calculating the right time of the day to photograph exteriors


The principle suggests that you choose mornings for photographing elevations that face southeast and afternoons for photographing buildings that face southwest. But in situations where light falling on your building could be obstructed by another building standing opposite to it. Photograph southeast facing elevations in the afternoon and southwest facing elevations in the morning.

The reason being, at one point during the course of its movement from east to west the sun will reach an angle that completely lights the whole street, first lighting up one side of the building for half an hour or so and then the opposite side before disappearing behind the buildings once more. The only issue here will be that the sun will be shining at a more oblique angle.

Photographing Exteriors of Buildings that Faces North


As we have discussed earlier sun travels from east to west in a southerly arc and this causes some problems when we need to photograph buildings that face north as such elevations does not receive direct sun light during most seasons. In most cases you can solve the issue by photographing northeast facing buildings early in the morning and by photographing northwest facing elevations early in the evening. We will be discussing how to photograph north facing elevations in detail in a separate article.

As discussed in the previous article softwares / apps for smart phones like The Photographer's Ephemeris or Sun Surveyor will be of immense help when planning your shooting sequence for both exterior and interior shots.

No matter how precisely and scientifically you plan, it is important that you always arrive early on location as is all set up well before time in order to wait for the angle to increase for improved texture and modelling, as necessary. Keep shooting at regular intervals and you will get a series of shots which reveal the texture in completely different ways, giving you many choice for selecting one or for compositing multiple frames for extreme lighting effects.


Related Reading


  1. Best Time of the Year for Architectural Photography
  2. Weather Forecasting for Architectural Photography
  3. Architectural Photography – Taming Natural Light for Exterior Shots
  4. The Importance of Styling and Detailing in Architectural Photography
  5. Perspective in Interiors Photography

Monday, 14 April 2014

The Ideal Angle of The Sun for Photographing Exteriors


In the previous article Best Time of the Year for Architectural Photography we have already mentioned that the sun reaches much higher elevations in summer than in winter months. This also changes the angle from which sunlight strikes subjects on earth. As architectural photographers out objective will be to use the light emphasize the right characteristics of the building. The angle at which the building is lit will determine which all parts of the building receive direct sunlight, where the shadows are, how long or short are the shadows, the amount of contrast between the bright and dark areas in the picture, whether it reveals or hides texture, how rich are the colors and also whether it enhances or compresses perspective.

The movement and angle of the sun


The effect you wish to achieve in your shots determine the angle from which the building should be lit. Since we have no control over the sun, the best we could do is to shoot during the right time of the day. Having a strong understanding about the movement and angle of the sun will help you work out the optimum time of day to shoot the relevant elevations thus making the most efficient use of available sunlight.

Best Angle of the Sun for Straight on Front Elevation Shots


Best Angle of the Sun for Straight on Front Elevation Shots


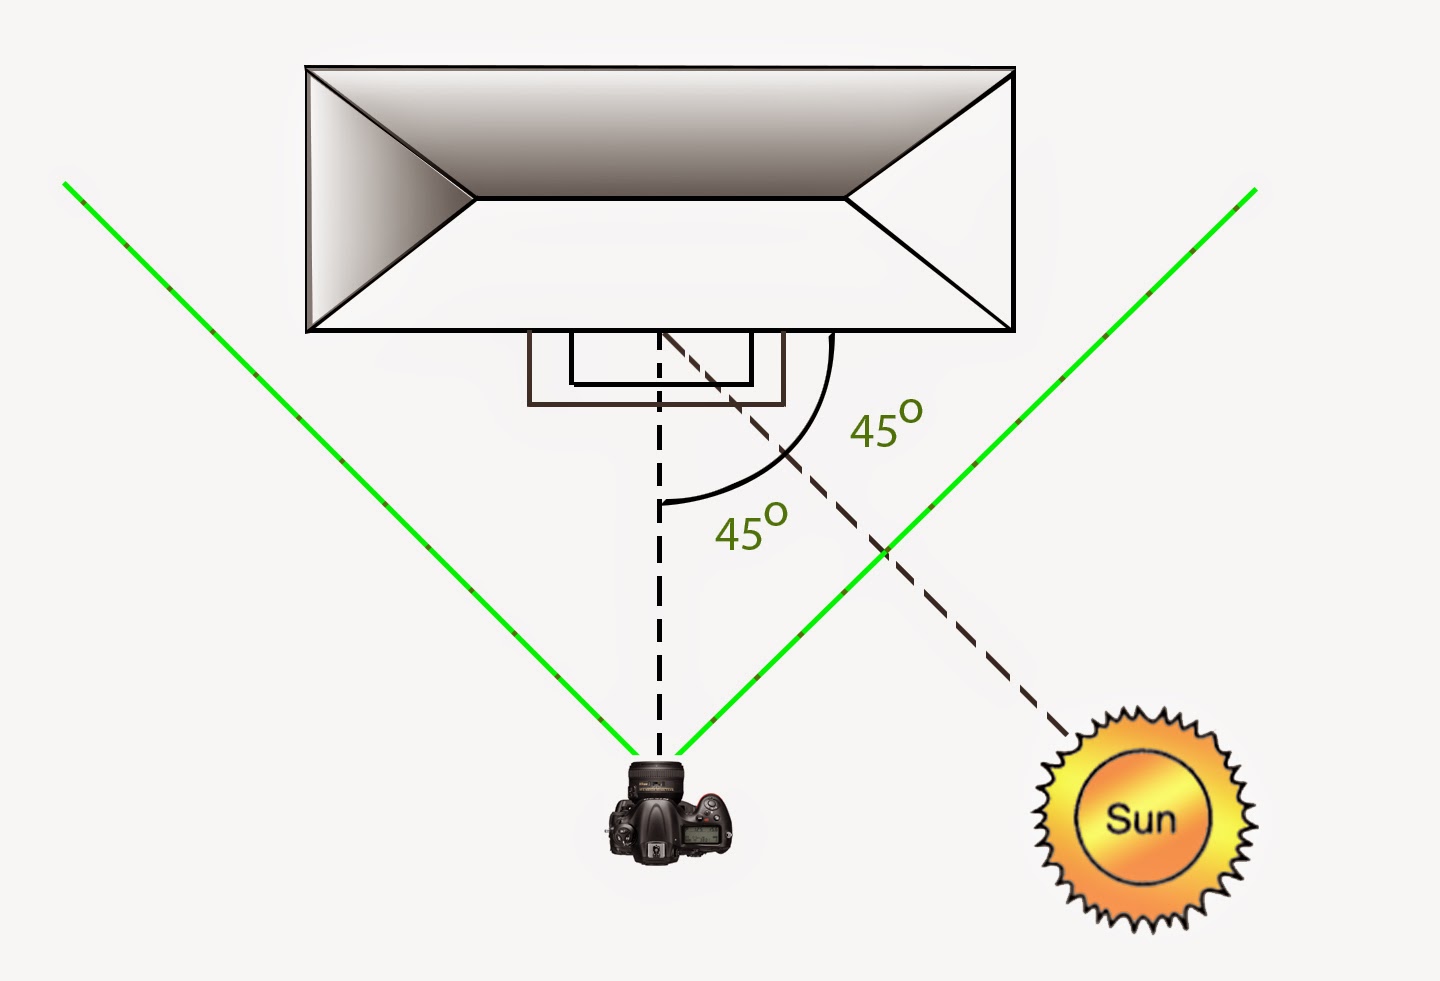
The best position of the sun for shooting straight on front elevation shots is when the sun is approximately 45° between the axis of the lens and the plane of the elevation. The light coming from the side and from a height is creates perfect shadows for both modelling the structure and to reveal texture.

Best Angle of the Sun for Shooting 60°/30° Perspective of the Front Elevation


Best Angle of the Sun for Shooting Front Elevation from an angle


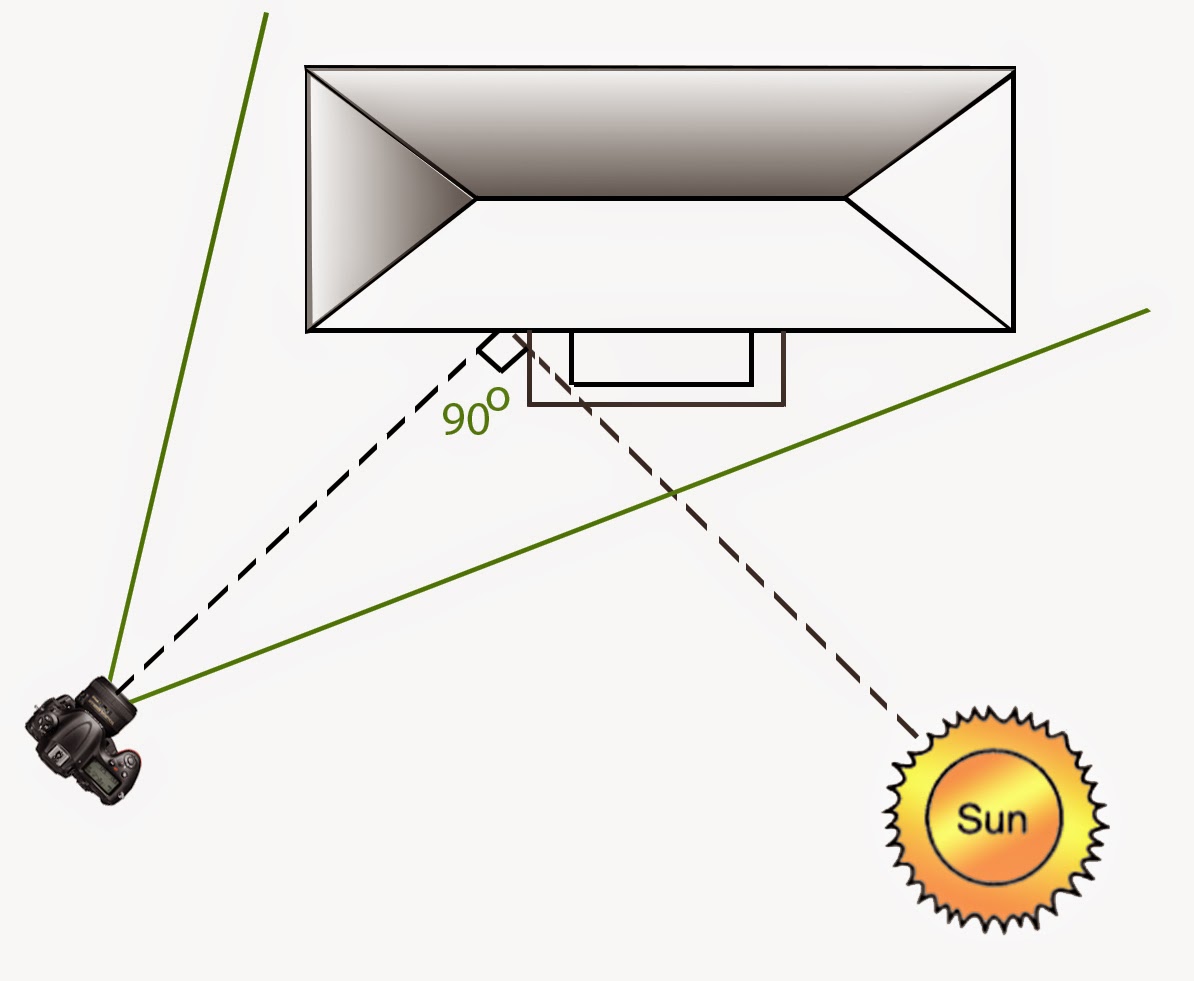
For Shooting 60°/30° Perspective of the Front Elevation the best angle of the sun is approximately 90° between the axis of the lens and the plane of the elevation. From that angle the front elevation of the building will be well lit while the side of the building will be in shadow, this will emphasize the three dimensional feel of the picture.

You can vary the tonal difference between the lit and shadow areas by changing the angle of light (shooting at a different time). When the angle between the lens axis and the direction of the sun becomes smaller the tonal contrast decreases and the building appears flat. The smaller the angle the lesser the contrast and vice versa. One advantage of lesser tonal variation is that the side of the building will receive more light and therefore will show more detail on the side elevation; this could be very important for certain elevations.

One little problem you may face when photographing buildings up close using wide angle lenses especially during winter months (sun being in a much lower elevation creating longer shadows) is that the photographers shadow may appear in the image. This could be easily fixed by:

  1. Using a longer focal length lens if there is space for you to move further away from the building.
  2. If you are shooting with a tilt shift lens, you could use vertical shift to crop foreground where the shadow appears.
  3. If there is another building or a tree behind you, you can hide or disguise your shadow with that of the buildings or trees.
  4. One final option is to wait for the sun to move round or select an alternative angle where the sun in a more favourable position.


Related Reading


  1. Weather Forecasting for Architectural Photography
  2. Architectural Photography – Taming Natural Light for Exterior Shots
  3. The Importance of Styling and Detailing in Architectural Photography
  4. Perspective in Interiors Photography
  5. Controlling Perspective in Exterior Shots Using Focal Length

Sunday, 13 April 2014

Best Time of the Year for Architectural Photography


The height and angle of the sun and the quality (color temperature) of light varies with changing seasons. Let us discuss what the conditions are during each of the four seasons and find out the best time of the year for photographing architecture.


Best Time of the Year for Architectural Photography
Best Time of the Year for Architectural Photography - Photo by: jesuscm 


Summer


Advantages of Choosing Summer months to Photograph Architecture


During the summer, sun is at a much higher angle in the sky than in any other season. So summer is an ideal time to shoot exteriors (especially in crowded locations) as the higher elevation of the sun enables light to reach even the most confined of streets and alleys illuminating parts of buildings that are either fully or partly in shade during most part of the year.

Apart from the angle of light, one other factor is the color of light. During summer the light is whiter than in any other season. Also any trees or shrubs on location will have lush green foliage adding to the freshness of the location.

Other advantages of choosing summer months for architectural work is that days are longer and deep blue skies are more frequent during the time.

Disadvantages of Choosing Summer months to Photograph Architecture


However there are some disadvantages too, during summer as the light is coming from a higher point in the sky, shadows are shorter. There is also a tendency for haze to be present in the atmosphere which could greatly reduce contrast and thus degrade the image quality.

Winter


Advantages of Choosing Winter months to Photograph Architecture


During winter months the sun is at a much lower height in the sky than during any other season. The quality (color temperature) of light is redder than during other seasons owing to the extra distance the light needs to travel through the earth’s atmosphere. This could add a bit of warmth to the scene which works well with architecture. Also during winter the air is much clearer and crispier with very little haze producing clear, sharp, high contrast pictures.

The lower angle of sun helps light penetrate deeper into interior spaces. This is beneficial for photographing interiors as the long shafts of sunlight with a golden tint to it could greatly increase the richness of the interiors.

Disadvantages of Choosing Winter months to Photograph Architecture


Although light during winter months produce long shadows, penetrate deep into otherwise hard to reach spaces and add warmth to the image, the lower elevation of the sun make exterior photography during the time much more difficult. Days are shorter during winter and to get the shot right precise timing is of paramount importance.

One other disadvantage is the extreme cold weather (happens more when there is clear blue skies during winter) and the chances of fog.

Best Time of the Year for Architectural Photography


We have seen what conditions are present during summer and winter months and the advantages and disadvantages of both. Now Spring and Autumn months presents conditions that are somewhat of a compromise between the advantages and disadvantages of both the summer and winter months. Also Spring and Autumn are the best season to shoot rich and natural looking foliage. So considering the facts we could infer that Best time of the year to shoot Architecture is during Spring and Autumn. 

While this being true, in reality we never get to shoot a building at our chosen time; practical constraints are always there and more often than not what we do is to make the best out of available conditions when we are on location or choose a day from within a relatively narrow frame work of time say a week or two. However being knowledgeable about the various factors do add to our ability to make wise decisions.

Related Reading


  1. Weather Forecasting for Architectural Photography
  2. Architectural Photography – Taming Natural Light for Exterior Shots
  3. The Importance of Styling and Detailing in Architectural Photography
  4. Perspective in Interiors Photography
  5. Controlling Perspective in Exterior Shots Using Focal Length


Saturday, 12 April 2014

Weather Forecasting for Architectural Photography


The perfect weather for architectural photography is when the sun is shining brightly on a clear blue sky with a few fair-weather cumulus clouds present. But such ideal conditions are not a common occurrence; rather than hoping for fair weather or making your decisions just by looking outside and hoping for the best, photographers need to develop a knack for predicting weather.


Weather Forecasting for Architectural Photography

Having the ability to predict which days are going to be great photo days and which ones aren't worth getting out of bed for will go a long way in making sure you get much better shooting conditions and as a result much better photographs. Also often the money shots (trade mark shots which carry the individual style/signature of the photographer) are all mostly about shooting in the right conditions, it requires a skill to predict what conditions will be, from where will the light hit the subject, the angle of light, color temperature of light, nature of shadows etc. the process also involves the inevitable wait for the right conditions to happen. Without the skill to accurately predict how natural light will behave, where the sun will be at any time of the day, presence of clouds, mist, fog etc., the process of getting everything right gets infinitely difficult.

Luckily the advancements in technology especially in the form of smart phones and tablets and the numerous apps designed to add a lot of functionality to them has made our life a lot easier.

Apps like the The Photographer's Ephemeris and Sun Surveyor which are available for Android and IOS devices offer prediction and tracking capabilities of both the sun and moon. You will find that there are a number of apps available for this purpose, we have only included two which we think are the most useful ones for architectural photographers.

The Photographer's Ephemeris


The Photographer's Ephemeris


The Photographer's Ephemeris uses Google maps to show the position of both the Sun and Moon as they rise and set for any given date (past, present and future) and location. This allows you to plan your shoot based on the direction of the light, you will know what portion of the building will be lit and what will be in the shade, both during the day and at night, days, weeks or even months in advance.

Sun Surveyor


Sun Surveyor
Sun Surveyor


Sun Surveyor features an assortment of tools like the 3D compass complete with a handy slider to alter the position of the Sun for a given time of the day which is very helpful for predicting and visualizing the shadows throughout the day. It also has an option to show the Moon as well and the feature is available offline.  
The ability to combine the 3D spherical compass with the handset’s built-in camera image gives a view of the Sun (or Moon) along with the predicted path so you can check to see if obstacles (buildings, trees or any other structure) might affect the light.

While the above apps give you sun and moon positions, angle of light and help you predict the way shadows behave etc., the actual weather is still very unpredictable and is not very accurate for more than a couple of days. Moreover knowing about the presence of clouds is another big advantage and for this purpose it is recommended that you check satellite photographs online for the desired location.

Scheduling your shooting as scientifically as possible will tremendously increase your chances of getting the best available weather conditions, however there still will be wasted journeys where you will find that in spite of predictions of fair weather the weather on location is just not congenial for the shoot. Similarly there will also be wasted days when you actually decide to stay on bed based on predictions of bad weather but the weather turns out to be pretty good.

However a good source of inspiration to get out there and start shooting even during bad weather is the realization that even on overcast days, there will be a few occasions when the sun breaks through all the cloud cover. No matter how short the duration is we will still be able to get our shot if we are prepared as all we need is a few short bursts of bright sunlight to create a picture that is going to freeze that perfect moment in time for ever.

Friday, 11 April 2014

Architectural Photography – Taming Natural Light for Exterior Shots


We humans have a highly developed visual sense and our brain is used to seeing things in a certain way; generally illuminated by an overhead light source (the sun). Now depending upon the climatic conditions (time of the day, presence of cloud cover etc) the quality of light could be either hard (on sunny days with little or no clouds) or soft (overcast conditions where the clouds overhead act as a giant softbox).


using natural light in architectural photography


Since daylight has been the dominant source of light in our everyday life, our subconscious mind expects subjects to be illuminated from an overhead angle and our brain readily accepts images produced with such lighting as natural.

In both variants of architectural photography (exterior and interior) natural light is more often than not used as the dominant light source. Photographers either adapt the light to fit their needs by using filters (for color correction and controlling intensity of light) and by using other light modifiers like scrims, gobos and reflectors (mainly in interior photography) or use supplemental lighting using artificial lights in order to reduce the contrast between light and shadow areas (also mainly used in interior photography).

However this reliance on natural light as the dominant light source makes things a bit complicated for architecture photographers as they have absolutely no control over the elements of nature.   It is to counter this vulnerability that architectural photographers are advised to develop a fundamental skill of timing; that is the ability to anticipate how natural light will behave during the course of the day and fix shooting order/sequence to make the most of the changing lighting conditions.

Some Basic Facts about the Sun


To us (read the residents of planet earth) sun appears to move across the sky from east to west.
Sun reaches different height in the sky depending on many factors like the latitude of the observer, time of the day and year.

Depending on the position of the sun in the sky (time of day and year) and also presence of cloud cover, sunlight illuminates the same building differently.

Color of light during midday is white and during morning and evening times its golden (more yellows, oranges and reds).

There are many mobile phone apps and computer softwares that help predict the precise position of the sun on any given day at any point on earth. And for those of you who are not that much into these gadgets there is always the good old sun finder charts to help you out.

Things to Consider When Preparing Your Shooting Schedule


The key to successful shoot (read most efficient shoot) lies in properly scheduling the shoot. The actual shooting sequence and timing of each element should be based on how the project is structured in relation to the natural lighting during that time of the year. The answers to the following questions will help you determine the right timing to shoot each aspect of a building.

  1. Which direction is the building facing?
  2. At what time of the day will a given facade get the illumination from the sun?
  3. Does the light penetrate to the interiors?
  4. Can a nearby building give us some reflected light at any time which will help us illuminate the structure better?

Considering the above aspects, plan your shooting schedule carefully so as to make the best use of available lighting. In the following articles we will discuss what light of different quality could do to your images and also take a look at many techniques that will help you master the use of natural light in architecture photography.


Related Reading


  1. The Importance of Styling and Detailing in Architectural Photography
  2. Perspective in Interiors Photography
  3. Controlling Perspective in Exterior Shots Using Focal Length
  4. Architectural Photography Composition - Line Dynamics
  5. Composition in Architectural Photography

Wednesday, 9 April 2014

The Importance of Styling and Detailing in Architectural Photography


Once we have determined the shooting angle , the optimum camera position to shoot from, and have our composition right it is time now to turn our attention to the little details and arrange / re arrange them if necessary in a way that will enhance the character and aesthetic appeal of the building being shot.


styling tips for architectural and interiors photography
styling tips for architectural and interiors photography. Photo by: Jijo John


Styling is one important element in professional architectural photography. It is one of elements that distinguish the work of a professional from than of an amateur. In most high end shoots, there will be a professional stylist involved, and in cases where there is none it is up to the photographer to make the place look good in the photograph.

What is Styling?


Styling involves rearranging objects already present in the more into a more aesthetically pleasing one, adding props, taking away things that really don't belong in the scene etc. People often confuse styling with interior design; but they are two different things, the manner in which an interior is styled could be very impractical (functionally) for actual living. However when done right styling make a huge difference to how a space feels, a professional stylist is one who is able to create a scene that will inspire the viewer and also accurately represent the life style of the people living in the space.

The most important thing to remember when styling a building is that depending upon the type of building being photographed, different interiors demand different treatments. The stylist or photographer should properly understand the concept, atmosphere and character of the building and look for ways to enhance it.

Styling Tips for Architecture Interiors


1. Use Elements of Colour


It is not uncommon for interior designers to furnish a room predominantly with a warm but neutral palette of colours that blend well with the neutral tones of wood. However when photographed such interiors could end up looking dull and boring. You can make the space more appealing by adding splashes of bright bold colours (think pillows, cushions, chair backs, flowers) it will also enhance the contrast in the scene.

2. Create a Feeling of Comfort


Comfort calm and serenity , pleasure and relaxation are the feelings to elicit when styling a room.  No matter how grand or humble a home, lit candles , fire in the fire place, coffee table laden with great reading materials etc are common ingredients of good life and could be used to add a sense of comfort to the scene.

3. Flowers - The Best Prop that Works Every time


Flowers are undoubtedly the most commonly used accessory in interior styling; they have it all, colour, texture, beauty, aroma... each of them are works of art and they could help bring a house to life. Houseplants also could do the same but to a lesser extend. If your shoot is in a location where it is impractical to acquire some flowers, you could always go out and find some flowers, some twigs, some leafs etc with which you could easily make an arrangement that would fit the space.

4. Food - Helps Create a sumptuous  and bountiful Mood


Food items like flowers bring life into a setting and so is an absolute favorite prop of stylists. Neatly laid out food and beverages  invites the viewer to the party. In public living spaces food items help create assumptions bountiful mood. 

In a dining room showing the table laid out for a meal and in the kitchen showing some succulent food mid-preparation are much better ways than showing an empty wooden table or a cooking range.

5. Use Books or Trinkets or Curios to Add Interest


 A sideboard covered with unusual trinkets and books will help convey the character and lifestyle of the people who live in that space.

Some Popular Interior Styling Techniques


Make a casual arrangement of some books and magazines in the living room or study. You can add further interest to the shot by leaving one book open under a lamp with an open pair of glasses suggesting to the viewer that someone who was reading has just left their chair briefly.

Leaving a dressing gown which appear to be casually strewn (actually carefully arranged) across the corner of the bed could add interest to the shot. Similarly in a bathroom you can throw a towel over the edge of the bath.
An open fountain pen on a half written paper, a financial paper draping down the side of a desk etc could be used to enhance the look and feel of the office.

A cutting board with some fruits or  vegetables some whole some cut and a knife could be a great thing to have in a kitchen shot.

All these are just suggestions to help you get your creative juices flowing, involve yourselves with the room, take in the ambiance, and think of how best you could convey to the viewer what you feel and you will know instinctively what is needed, this is when you add your own touch to the space and remember no two photographers will ever capture the same interior in the same way. Do keep in mind that there only exists a very fine line between what is appropriate and what is outrageous. One effective technique is to adopt the practice less is more.

Styling Tips for Architectural Exteriors


Although the majority of architectural shots requiring styling are interiors, exteriors shots also equally benefit from a little extra attention to detail. Whenever you show outdoor furnishings make sure it appears every bit as comfortable as indoor furnishings. Take efforts to make the space reflective of the life style of people who live there and also inviting to the viewers. You can add interest or create a sense of action in exterior shots by including articles that suggest human  involvements like gardening tools, gloves, fishing rods etc. And of course the good things in life, flowers, candles, food etc could also be used to great results.


Related Reading