The keys to excellent photography are good composition, correct exposure, and perfect light. An understanding of shadows, how they are created and how to modify them to suit one’s needs is essential to create pictures that stand out from the crowd. It is through the use of light and shadow that photographers create the illusion of depth in their images; it helps the viewer get a sense of scale, shape, and texture.
Generally shadows are classified into two Hard and Soft, what differentiates Hard shadow from Soft shadow is the contrast of the shadow and sharpness of its edge. Hard shadows have more contrast and sharp edges and soft shadows have less contrast and less edge definition.
The type of photography you are doing determines how you control your shadows; a successful photographer knows how to make hard shadows, soft shadows or something in between to make the light suit his subject. Depending upon what you intend to photograph you could make use of the different varieties of shadows, there is no general rule that says hard shadows are bad and vice versa. Hard shadows are indeed very useful, they can be used to emphasize texture, and they are so strong that they can compete with the main subject in any picture or even become a part of the subject itself. Soft shadows are useful if you are looking for a smooth surface finish in your images like for example when photographing an aged person and you wish to hide those wrinkles as much as you can and make the person look a bit more young pretty. So both Hard shadows and soft shadows have their own uses in different photographic situations. Let us discuss how we could modify them to suit our different needs.
Remember the previous article in which we discussed the Quality of Light. The same principles affects here also. The smaller the light source the harder the shadows and vice versa. Similarly the closer the light source the softer the shadows and vice versa.
 |
| Photo By Arichards |
Have a look at the picture of an apple given above, its just not a picture of an apple but it’s a picture of an apple and its shadow, the shadow is so noticeable that it becomes an essential part of the composition.
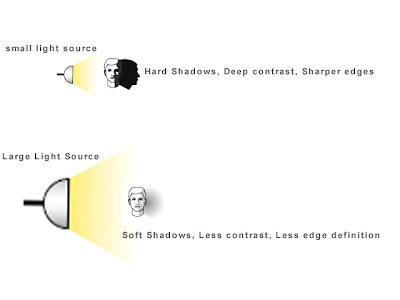
Originating from its source, Light radiates in all directions and travels outwards in straight lines. A small light source such as a bare light bulb or a candle produces harsh light with deep, sharp-edged shadows. A large light source produces much softer light with soft shadows and less edge definition.
So let us consider the factors that affect the characteristics of our subjects shadows.
By size of the light source we mean the relative size of the light source and the subject. The larger the light source is in relation to the subject the softer the light and softer the shadows. So if you need your shadows to be subtle, soft, with less contrast and less edge definition, use a large light source. And if you need shadows to be immediately noticeable with deep contrast and sharp edges use a small light source.
Originating from its source, Light radiates in all directions and travels outwards in straight lines. A small light source such as a bare light bulb or a candle produces harsh light with deep, sharp-edged shadows. A large light source produces much softer light with soft shadows and less edge definition.
So let us consider the factors that affect the characteristics of our subjects shadows.
Size of the Light Source
By size of the light source we mean the relative size of the light source and the subject. The larger the light source is in relation to the subject the softer the light and softer the shadows. So if you need your shadows to be subtle, soft, with less contrast and less edge definition, use a large light source. And if you need shadows to be immediately noticeable with deep contrast and sharp edges use a small light source.
 |
| Size of Light Source and its effect on Shadows |
Distance from the Light Source to the Subject
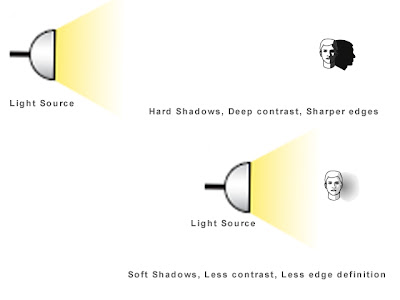
The closer the light source is to your subject the larger it appears and the softer the light it produces, so if you need soft shadows place your light source as close to your subject as possible and you will get much soft shadows with less contrast and smooth edges. If you need to produce hard edged shadows with deep contrast move your light away from your subject the harshness of your light increases with the distance.
 |
| Distance from Light Source to the Subject and its effect on Shadows |
Modifying Light
So what if you require soft shadows in your picture and the only light source available to you is a small flash or strobe, or you wish to take a photo in mid day sunlight.
Well in that case the simplest method to adopt when using artificial light sources is to bounce it off some white surface like a wall or a ceiling or even a hand held reflector.
 |
| Bouncing Light off Surfaces |
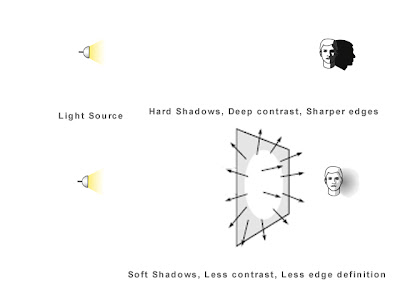
Another method is to use a diffusion panel, place any diffusion material (eg tracing paper) in between your light source and your subject and now you have control over the size of the light source and its distance. The size of the diffusion material you use becomes the size of your light and the distance at which you keep your diffusion material now becomes the distance from your light source to your subject.
The tracing paper or for that matter any translucent material used as a diffuser allows light to pass through it but in that process it also diffuses it. The light passing through the diffuser scatters into new straight lines proceeding in all directions from every part of its large surface area.
How the different diffusers modify light?
The tracing paper or for that matter any translucent material used as a diffuser allows light to pass through it but in that process it also diffuses it. The light passing through the diffuser scatters into new straight lines proceeding in all directions from every part of its large surface area.
 |
| Using Diffusers to Soften Shadows |
The object you were illuminating now casts a softer-edged, graduated shadow, and the larger and closer your diffusing material the less harsh and contrasty the shadow becomes. This is because light from a large area cannot be completely blocked out by the subject; and as a result most of the subject areas which were previously in the shadow region now receive some illumination.
In the next article we will discuss about The Inverse Square Law of Light.
In the next article we will discuss about The Inverse Square Law of Light.